
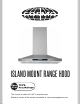
Installation Guide


CAUTION: HOOD MAY HAVE VERY SHARP EDGES; PLEASE WEAR
PROTECTIVE GLOVES WHENEVER IT IS NECESSARY TO REMOVE ANY
PARTS FOR INSTALLING, CLEANING OR SERVICING.
Step 1:
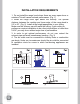
This Island Range Hood has an adjustable
height. Measure from the ceiling to a height of
24” to 36” above your cooktop. Install at a
height appropriate to your ceiling. Make sure
the chimney can still reach the ceiling. If your
ceiling or preference requires installation to be
a few inches higher or lower than 24-36" you
may do so without major loss of performance.
Write down this measurement, this is the
height (how tall) you will need to adjust the
Island Range Hood.
Step 2:
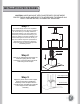
Remove the Island Range Hood from the
carton and gently place on a flat
workspace. Connect the Duct into the air
outlet using HVAC foil tape.
Step 3:
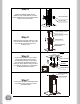
Align the 4 pieces of the Lower Support
Frame to the holes on the Blower
Assembly. Screw into place with the
included screws. Set aside the combined
Lower Support Frame and Blower
Assembly.
7
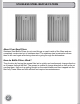
INSTALLATION PROCEDURES
24" to 36"
Lower Support Frame
Blower Assembly
Duct
Air outlet