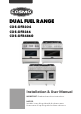
DUAL FUEL RANGE COS-DFR304 COS-DFR366 COS-DFR486G Installation & User Manual IMPORTANT: Read and save these instructions.
THANK YOU FOR YOUR PURCHASE Thank you for your purchase. We know that you have many brands and products to choose from and we are honored to know that you have decided to take one of our products into your home and hope that you enjoy it. COSMO Appliances are designed according to the strictest safety and performance standard for the North American market. We follow the most advanced manufacturing philosophy. Each appliance leaves the factory after thorough quality inspection and testing.
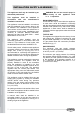
TABLE OF CONTENTS SAFETY & WARNINGS ..........................................................4-5 General Safety & Warnings ......................................................4 Installation Safety & Warnings .................................................5 INSTALLATION MANUAL .....................................................6-20 Legs ........................................................................................6 Anti-Tip Device .............................................................
SAFETY & WARNINGS PLEASE READ AND FOLLOW THESE IMPORTANT INSTRUCTIONS FOR THE SAFETY OF YOUR HOME AND OF THE PEOPLE LIVING IN IT. Save this Manual for local electrical inspector's use. Read and save these instructions for future reference. Observe all governing codes, ordinances and regulations. Installation and service must be performed by a qualified installer, service agency or the gas supplier.
INSTALLATION SAFETY & WARNINGS This appliance shall only be installed by an authorized professional. This appliance shall be installed in accordance with the manufacturer's installation instructions. This appliance must be installed in accordance with the standards of the country where it will be installed. The installation of this appliance must conform to local codes and ordinances.
INSTALLATION: LEGS The ranges must only be used with the legs properly installed. Before installing the legs, position the appliance near its final location as the legs are not suitable for moving the appliance over long distances. Four height-adjustable legs are shipped with the range in the polystyrene container situated over the appliance. After unpacking the range, raise it enough to insert the legs in the appropriate receptacles situated on the lower part of the appliance.
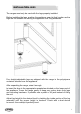
INSTALLATION: ANTI-TIP DEVICE 1.) The anti-tip bracket shipped with the range must be properly secured to the rear wall as shown in the picture below. The height of the bracket from the floor must be determined after the range legs have been adjusted to the desired height and after the range has been leveled. Measure the distance from the floor to the bottom of the anti-tip bracket receptacle on the back of the appliance. Position the two anti-tip brackets on the wall at the desired height plus 1/8" (0.
INSTALLATION: RANGE ELECTRICAL REQUIREMENTS A properly grounded and electrical receptacle Type NEMA 14-50R should be installed; refer to ELECTRICAL CONNECTION section Page 10. Check all local code requirements. GAS REQUIREMENTS An agency-approved, properly-sized manual shut-off valve should be installed no higher than 3" (7.6 cm) above the floor and no less than 2" (5 cm) and no more than 8" (20.3 cm) from the right side (facing product).
INSTALLATION: RANGE HOOD To eliminate the risk of burns or fire by reaching over heated surface units, cabinet storage space located above the surface units should be avoided. If cabinet storage is to be provided, the risk can be reduced by installing a range hood. These hoods have been designed to work in conjunction with the range and have the same finish for a perfect look. For maximum performance, the height of the bottom of the hood from the worktop should be between 30" (76.2 cm) and 36" (91.4 cm).
ELECTRICAL CONNECTION The appliance shall be connected to a single phase electric line rated at 120 208Vac or 120/ 240Vac and 60Hz frequency. ELECTRIC POWER RATING • 120/208Vac: 10 A max • 120/240Vac: 12 A max HEATING ELEMENTS POWER RATING • Oven bake element = 1500 Watt • Oven circular element = 3200 Watt • Oven broil element = 2850 Watt Install a suitable electric power supply receptacle connection type NEMA 14-50R able to support a load of at least 30 A (per line) according to local code requirements.
POWER CORD REPLACEMENT DO NOT USE EXTENSION CORDS WITH THIS APPLIANCE AS IT MAY RESULT IN FIRE, ELECTRIC SHOCK OR OTHER TYPE OF PERSONAL INJURY. The appliance is equipped at the factory with an electric supply cord set 4 wires type with ring terminals (L1, L2, N, Ground) suitable for range use UL/CSA listed type SRDT/DRT 2x6AWG (L1, L2)+2x8AWG (N, G) rated 300V, 40 or 50A with fused plug type NEMA 14-50P; cable length 1.
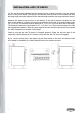
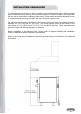
DIMENSION DIAGRAM: DFR304 12
DIMENSION DIAGRAM: DFR366 13
DIMENSION DIAGRAM: DFR486G 14
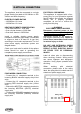
CIRCUIT DIAGRAMS DFR304 DFR366 15
CIRCUIT DIAGRAMS DFR486G 16
GAS CONNECTION All gas connections must comply with national and local codes. The gas supply line (service) must be the same size or greater than the inlet line of the appliance. This range uses a 1/2" NPT inlet (see drawing below for details of gas connection). On all pipe joints use appropriate sealant resistant to gas. This range can be used with Natural or LP/ Propane gas. The range is shipped from the factory for use with natural gas.
GAS CONNECTION PRESSURE REGULATOR Since service pressure may fluctuate with local demand, every gas cooking appliance must be equipped with a pressure regulator on the incoming service line for safe and efficient operation. The pressure regulator shipped with the appliance has two female threads 34" NPT. The regulator shall be installed properly in order to be accessible when the appliance is installed in its final position.
GAS CONVERSION WARNING! Before carrying out this operation, disconnect the appliance from gas and electricity. Gas conversion shall be conducted by a trained professional. Call customer service to identify a trained professional near your home. The gas conversion procedure for this range includes 3 steps: 1.) Pressure regulator 2.) Surface burners 3.) Adjustment of minimum setting The conversion is not completed if all 3 steps have not been concluded properly.
GAS CONVERSION STEP 2: SURFACE BURNERS To replace the nozzles of the surface burners, lift up the burners and unscrew the nozzles shipped with the range using a 7mm socket wrench. Replace nozzles using the conversion kit. Contact Cosmo Customer Service at 1-888-7843108, or go to www.cosmoappliances.com to purchase a conversion kit. Each nozzle has a number indicating its flow diameter printed on the body.
BEFORE USING RANGE HOOD INSTALLATION CHECKLIST 1.) Is the range mounted on its legs? 2.) Is the back guard securely connected? 3.) Has the anti-tip device been properly installed? 4.) Does the clearance from the side cabinets comply with the manufacturers directions? 5.) Is the electricity properly grounded? 6.) Is the gas service line connected following the directions of the manufacturer? 7.) Have all the proper valves, stoppers and gasket been installed between the range and the service line? 8.
OPERATING SAFETY & WARNINGS • Remember to set all cooktop / oven / broiler burners control knob to OFF position when not in use. • Be sure your appliance is properly installed and grounded by a qualified technician. • Children should not be left alone or unattended in area where appliance is in use. • Children should never be allowed to sit or stand on any part of the appliance.
OPERATING SAFETY & WARNINGS • Always place oven racks in desired location when oven is cool. If rack must be moved while oven is hot, do not let potholder contact hot heating element in oven. • Do not clean oven door gasket. The door gasket is essential for a good seal. Care should be taken not to rub, damage, or move the gasket. • Do not use oven cleaning products. No commercial oven cleaner or oven liner protective coating of any kind should be used in or around any part of the oven.
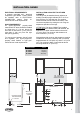
BURNER BTU DIAGRAMS SURFACE BURNER LAYOUT DFR304 DFR366 BURNERS • Left Front: 18000 BTU • Left Rear: 13000 BTU • Center Front: 8500 BTU • Center Rear: 8500 BTU • Right Front: 13000 BTU • Right Rear: 4200 BTU BURNERS • Left Front: 18000 BTU • Left Rear: 4200 BTU • Right Front:13000 BTU • Right Rear: 8500 BTU DFR486G BURNERS • Left Front: 18000 BTU • Left Rear: 8500 BTU • Center Front: 4200 BTU • Center Rear: 13000 BTU • Griddle: 13000 BTU • Right Front: 18000 BTU • Right Rear: 8500 BTU 24
OPERATING INSTRUCTIONS COOKTOP SURFACE COOKING IMPORTANT: Remember to set all cooktop / oven / broiler burners control knob to OFF position when not in use.
OPERATING INSTRUCTIONS TIPS FOR USING BURNERS CORRECTLY WARNING: KEEP CHILDREN AT A SAFE DISTANCE FROM THE APPLIANCE DURING OPERATING. DO NOT ALLOW CHILDREN TO OPERATE THE APPLIANCE. IMPORTANT: Remember to set all cooktop / oven / broiler burners control knob to OFF position when not in use. 1.) Always check that the burner caps are properly installed before operation. 2.) Verify that the flame of the worktop burners be completely blue and with regular aspect as shown below. 3.
OPERATING INSTRUCTIONS TIPS FOR USING PANS CORRECTLY ATTENTION: Always ensure that bottom and handles of pans do not protrude from the worktop. When cooking with flammable fat such as oil, do not leave the range unattended.
OPERATING INSTRUCTIONS OVEN COOKING BEFORE USE: When using the oven for the first time it should be operated for 15-30 minutes at a temperature of about 500°F without cooking anything inside in order to eliminate any moisture and odors from the internal insulation. IMPORTANT: In case of electric power failure, set oven/broiler controls in off position and do not attempt to use oven/broiler until electric power has been restored. TIPS • Use care when opening the oven door.
OPERATING INSTRUCTIONS OVEN FUNCTIONS The oven has 5 functions defined for the following operations: BAKE - Broiler + Bottom heating elements, to be used with oven temperature from 100° to 500°F TURBO - Circular + Bottom heating elements + fan, to be used with oven temperature from 100° to 500°F BROIL - Broiler heating element, to be used with temperature selector at 500°F for broiling CONVECTION BROIL - Broiler heating element + fan, to be used with temperature selector at 500°F for convection broiling
OPERATING INSTRUCTIONS BAKE Preheating Preheat the oven before baking. The oven does not need to be preheated for large pieces of meat or poultry. See your recipe for preheating recommendation. Preheating time depends on the temperature setting and the number of racks in the oven. Tips for Getting the Best Results • Minimize opening the door. • Choose the right size bake ware. • Use the bake ware recommended in the recipe.
OPERATING INSTRUCTIONS COOKING WITH CONVECTION There are many advantages to cooking with convection. In the convection system, a fan in the back of the oven moves heated air evenly around the oven. The moving air provides even heat so foods can be placed on any rack level with consistent results and without having to rotate the pans. Convection also enables cooking simultaneously on multiple racks. Low, shallow bake ware should be used with convection cooking.
OPERATING INSTRUCTIONS CONVECTION BAKE & TURBO (Continued) Preheating Preheat the oven before baking. The oven does not need to be preheated for large pieces of meat or poultry. See your recipe for preheating recommendation. Preheating time depends on the temperature setting and the number of racks in the oven. Temperature Setting When using Convection Bake, reduce the temperature recommended in the recipe by 25°F.
OPERATING INSTRUCTIONS BAKING RECOMMENDATIONS FOOD PAN SIZE Cookies 12„X15' Cookie Sheet 8"or 9'Round 9'x13” Pan 12 Cup Layer Cakes Sheet Cakes Bunt Cakes Brownies or 9"x9" Bar Cookies Pan Biscuits Quick Bread Muffins Fruit Pies Fruit Cobblers Yeast Bread, Loaves Dinner Rolls Cinnamon Rolls Yeast 350* 350* 325* 325* 25 to 35 minutes 30 to 40 minutes 60 to 75 minutes 20 to 25 minutes 12"x15" 425* or Package 10 to 15 minutes Cookie Directions Sheet 8"x4" Loaf 350* 55 to 70 Pan minutes 425* 14 to 19
OPERATING INSTRUCTIONS BAKING RECOMMENDATIONS (continued) FOOD PREPARATION APPROXIMATE DRYING TEST FOR DONENESS TIME (hrs) Fruit Dipped in 1/4 cup lemon juice and 2 clips water; 1/4" slices 11-15 Slightly pliable Bananas Dipped in 1/4 cup lemon juice and 2 cups water; 1/4" slices 10-15 Soft, pliable Cherries Wash and towel dry.
OPERATING INSTRUCTIONS BROIL / CONVECTION BROIL Preheating Broiling requires constant exposure to high, intense heat. Only the upper element heats in the BROILER mode. It is recommended that you preheat the broil element before starting to cook. Preheat until the "PRE-HEATING" light turns off (about 5-6 minutes). Tips for Getting the Best Results • Defrost food before broiling. • Keep oven door closed during broiling. • Steaks should be more than 1" thick if rare meat is desired.
OPERATING INSTRUCTIONS BROIL / CONVECTION BROIL (Continued) Setting BROILER or CONVECTION BROILER Select CONVECTION BROIL to brown food slightly also on the bottom side. This mode is preferred for browning food on both side that is too delicate for turning such as fish. The degree of browning of each side might be different. Set Oven to BROIL or CONVECTION BROIL 1.) Place oven rack in desired position. 2.) Set Selector Switch to BROIL or CONVECTION BROIL. 3.
OPERATING INSTRUCTIONS BROILING & ROASTING RECOMMENDATIONS BROILING AND ROASTING RECOMMENDATIONS FOOD ITEM RACK OVEN MODE FUNCTION SELECTOR CONTROL TEMPERATURE SETTING SELECTOR APPROXIMATE SPECIAL INSTRUCTIONS AND TIPS 15 to 20 minutes Broil until no pink in center 12 to 20 minutes Time depends on rareness of steak 12 to 20 minutes Rare to Medium Rare BEEF Ground Beef Patties, Vt thick 2 Broiler or convection Broiler T-Bone Steak 2 Broiler or convection Broiler Flank Steak 2 Broiler or
CARE & MAINTENANCE REPLACING OVEN LIGHT BULBS WARNING! Disconnect power before servicing unit. To replace the oven light bulb, unscrew the protection cap that projects out inside the oven. NOTE: Touching the bulb with fingers may cause the bulb to burn out. Always use protective glove or use a cloth to remove the bulb. CLEANING YOUR RANGE ATTENTION: During cleaning operation never move the appliance from its foreseen original installation position. • Never use abrasive cleaners.
TROUBLESHOOTING Baking Problem Food browns unevenly Food too brown on bottom Food is dry or has shrunk excessively Food is baking or roasting too slowly Pie crusts do not brown on bottom or crust is soggy Cakes pale, flat and may not be done inside Cakes high in middle with crack on top Pie crust edges too brown 39 Cause • • • • • • • • • • • • • • • • • • • • • • • • • • • • • • • • • Oven not preheated Aluminum foil on oven rack or oven bottom Baking utensil too large for recipe Pans touching
TROUBLESHOOTING PROBLEM POSSIBLE CAUSE SOLUTION Burner will not ignite There is no power to the cooktop Replace fuse or reset circuit breaker. Burner will not operate First time use. Air still in the gas line. Turn on any one of the surface burner knobs to release air from the gas lines. Control knob is not set correctly. Push in knob before turning to a setting. The burner port is clogged. Clean burner port opening using a stiff, nylon toothbrush or a straightened paper clip.
TROUBLESHOOTING PROBLEM POSSIBLE CAUSE SOLUTION Oven is not heating No power to the oven Reset the circuit breaker or replace the fuse in the electrical box to your oven. Oven control not turned on Make sure the oven temperature has been selected and timer is not "OFF". Oven is not cooking evenly Not using the correct Refer to cook charts for recommended bake ware or oven rack position. Always reduce recipe rack position temperature by 25 °F (15 °C) when baking with Convention Bake mode.
LOCATION OF APPLIANCE TAGS The rating tag shows the model and serial number of your range.
WARRANTY AND SERVICE For full warranty details on this product please visit: http://www.cosmoappliances.com/warranty TO RECEIVE WARRANTY SERVICE, YOUR PRODUCT MUST BE REGISTERED. TO REGISTER, VISIT: WWW.COSMOAPPLIANCES.
IMPORTANT Do Not Return This Product To The Store If you have a problem with this product, please contact Cosmo Customer Support at +1(888)784-3108 DATED PROOF OF PURCHASE, MODEL #, AND SERIAL # REQUIRED FOR WARRANTY SERVICE IMPORTANT Ne pas Réexpédier ce Produit au Magasin Pour tout problème concernant ce produit, veuillez contacter le service des consommateurs Cosmo Customer Support au +1(888) 784-3108 UNE PREUVE D’ACHAT DATEE EST REQUISE POUR BENEFICIER DE LA GARANTIE.
NOTE:
Cosmo is constantly making efforts to improve the quality and performance of our products, so we may make changes to our appliances without updating this manual. Electronic version of this manual is available at: www.cosmoappliances.