
User Manual


3. Slowly attempt to tilt the range forward.
If you encounter immediate resistance, the range foot is engaged in the anti-tip
bracket. Go to Step 8.
4. If the rear of the range lifts more than " (1.3 cm) o the oor without
resistance, stop tilting the range and lower it gently back to the oor. The range
foot is not engaged in the anti-tip bracket.
IMPORTANT: If there is a snapping or popping sound when lifting the range,
the range may not be fully engaged in the bracket. Check to see if there are
obstructions keeping the range from sliding to the wall or keeping the range foot
from sliding into the bracket. Verify that the bracket is held securely in place by
the mounting screws.
5. Slide the range forward, and verify that the anti-tip bracket is securely attached
to the oor or wall.
6. Slide range back so the rear range foot is inserted into the slot of the anti-tip
bracket.
7. Repeat steps 1 and 2 to ensure that the range foot is engaged in the anti-tip
bracket.
If the rear of the range lifts more than " (1.3 cm) o the oor without
resistance, the anti-tip bracket may not be installed correctly. Do not operate
the range without anti-tip bracket installed and engaged.
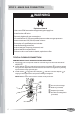
8. Move the range into its nal location. Place a carpenter’s level on the oven oor
to check that the range is level from side to side and front to back.
NOTE: The range must be level for optimum cooking and baking performance.
9. If needed, use a wrench to adjust the height of the leveling legs until the range is
level from side to side.
STEP 5 - LEVEL THE RANGE (IF NEEDED)
IMPORTANT: The range must be level.
The Range can be raised approximately 2" (5 cm) by adjusting the leveling legs.
1. If the range is not level, pull the range forward until rear leveling leg is disengaged
from the anti-tip bracket.
2. Place a standard at rack in oven.
3. Place the level on the rack.
4. Using a wrench or pliers, adjust the leveling legs up or down until the range is
level.
5. Push range back into position. Check that rear leveling leg is engaged in the
anti-tip bracket.
26