
Installation Manual


39
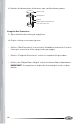
IMPORTANT: If the range is pulled away from the wall for any reason, always
verify anti-tip bracket engagement again.
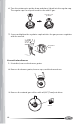
2. Slowly attempt to tilt the range forward.
• If you encounter immediate resistance, the range foot is engaged in
the anti-tip bracket. Range installation is completed.
• If the rear of the range lifts more than 1/2" (1.3 cm) off the floor
without resistance, stop tilting the range and lower it gently back to
the floor. The range foot is not engaged in the anti-tip bracket.
Proceed to Steps 3 and 4.
IMPORTANT: If there is a snapping or popping sound when tilting the
range, the range may not be fully engaged in the bracket. Check to
see if there are obstructions keeping the range from sliding to the
wall or keeping the range foot from sliding into the bracket. Verify
that the bracket is held securely in place by the mounting screws.
3. Slide the range forward, and verify that the anti-tip bracket is securely
attached to the floor or wall.
4. Slide range back so the rear range foot is inserted into the slot of the anti-
tip bracket.