
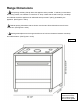
Instructions / Assembly


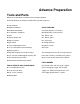
Advance Preparation
Tools and Parts
Gather the required tools and parts before starting installation.
Read and follow the instructions provided with any tools listed here.
■ Tape measure
■ Phillips screwdriver
■ Flat blade screwdriver
■ 1/8” flat blade screwdriver
■ Level
■ Hand or electric drill
■ Wrench or pliers
■ Pipe wrench
■ 1 5/16" combination wrench
■ 1/8” (3.2 mm) drill bit (for wood floors)
■ Marker or pencil
■ Pipe-joint compound resistant to LP gas
■ 3/16” (4.8 mm) carbide-tipped masonry drill
bit (for concrete/ceramic floors)
■ Noncorrosive leak-detection solution
FOR LP/NATURAL GAS CONVERSIONS:
■ 1/2" Combination wrench
■ 1/4" (6 mm) nut driver
■ 9/32" (7 mm) nut driver
■ Masking tape
PARTS SUPPLIED:
Check that all parts are included.
■ LP/Natural Gas Conversion Kit
■ 5 - Burner caps
■ 3 - Burner grates
■ 3 - Oven racks
■ 1 Anti-tip brackets
■ 2 plastic anchors
■ 2 screws
The anti-tip bracket must be securely mounted
to the floor. Thickness of flooring may require
longer screws to anchor bracket to subfloor.
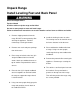
PARTS NEEDED
Check local codes and consult gas supplier.
Check existing gas supply and electrical
supply. See “Electrical Requirements” and
“Gas Supply Requirements” sections.