
Instructions / Assembly

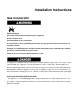

Install Anti-Tip Bracket
Tip Over Hazard
A child or adult can tip the range and be killed.
Connect anti-tip bracket to rear range foot.
Reconnect the anti-tip bracket, if the range is moved.
Failure to follow these instructions can result in death or serious burns to children and adults.
Contact a qualified floor covering installer for the procedure of drilling mounting holes through your
type of floor covering.
Assemble the required tools and parts before starting installation. Read and follow the instructions
provided with any tools listed here.
Tools needed for installation:
concrete / ceramic floors: 3/16" ( 4.6
mm) masonry drill bit
wood floors: 1/8" (3.2 mm) drill bit
hand or electric drill
flat-blade screwdriver
hammer
measuring tape
masking tape
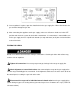
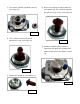
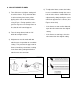
Parts supplied for installation (See Figure 7):
Anti-tip bracket
2 plastic anchors
2 screws
Install the anti-tip bracket to hold the left rear leg of the slide-in range. Follow these steps to secure
the range to the floor before moving the range into final operating position.
Figure 7