UNDER CABINET RANGE HOOD This manual is made with 100 % recycled paper.
IMPORTANT SAFETY INSTRUCTIONS READ AND SAVE THESE INSTRUCTIONS FOR DOMESTIC COOKING ONLY 1. Read all instructions before using the appliance 2. Install or locate this appliance only in accordance with the provided installation instructions. 3. Clean Rangehoods Hoods Frequently. Grease should not be allowed to accumulate on the rangehood or filters. 4. Always turn the fan on when flambéing foods on the range. 5.
DUCTED INSTALLATION Determine whether the hood will discharge vertically or horizontally. For vertical or horizontal discharge, run ductwork between the hood location and roof cap or wall cap. 28"/33" 1" A minimum 6” round duct must be used to maintain maximum airflow efficiency. 4" Always use rigid type metal ducts only. HOOD MOUNTING SCREWS Whenever possible reduce the number of transitions and turns in the ductwork. If a long duct run is required increase the duct size from 6” to 7”.
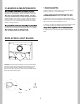
DUCTED INSTALLATION (CONT) 6" VERTICAL DUCT KNOCKOUT POWER CABLE L N 3.Temporarily position the rangehood in its intended place. Using a pencil measure, mark the mounting holes, duct and electrical locations. - 4. Drill/cut out the required openings for duct and electrical access; ensure the damper/duct connector enter the ductwork and the damper opens and closes freely 5. Connect the electical supply wiring (make sure power supply is off) 6.
DUCTLESS INSTALLATION WARNING 6" VERTICAL DUCT KNOCKOUT To reduce the risk of electrical shock, switch the power off at the service panel. Lock or tag the service panel to prevent power from being switched on.accidentally. The hood is designed for installation under a kitchen cabinet: POWER CABLE L N 3.Temporarily position the rangehood in its intended place. Using a pencil measure, mark the mounting holes, duct and electrical locations. 4.
OPERATION(ELECTRONIC) OPERATION(PUSH BUTTON) Always turn the hood ON before cooking in order to establish an air flow in the kitchen. After turning off the range, let the hood run for a few minutes to clear the air. Power To activate the rangehood, press the power button. Once activated, the buttons and LED light up. Light Power The Silhouette Select™ rangehood are equipped with 3 light settings High, Low and Off. Press the light icon once and the 20w halogen bulbs turn on providing full task lighting.
CLEANING & MAINTENANCE 2. Reach within the unit and push out the lamp housing towards you. See Fig. 1 on previous page. from the cooking process. To ensure optimal performance, appearance, and a sanitary cooking environment, clean the plate. See Fig. 2 above. clean cloth and mild detergent solution on stainless steel and painted surfaces. Do not use corrosive or abrasive cleaning agents or steel wool or scouring pads as these will scratch the surface.
TROUBLESHOOTING Issue Cause What to do After installation, the unit doesn’t work. 1. The power source is not turned ON. 2. The power line and the cable locking connector is not connecting properly. 1. Call for service. 2. Call for service. Light works, but motor is not turning. 1. The blower is defective, possibly seized. 2. Damaged capacitor. 1. Call for service. 2. Call for service. The unit is vibrating. 1. The blower is not secure in place. 2. Damaged blower wheel. 3.
WARRANTY AND SERVICE For full warranty details on this product please visit: http://www.cosmoappliances.