User Manual Original Electric Gooseneck Kettle Model: CO108-NK Questions or Concerns? Mon—Fri, 9:00 am—5:00 pm PST/PDT support@cosori.
(We hope you love your new kettle as much as we do.) join the Cosori Cooks Community on Facebook facebook.com/groups/cosoricooks recipe gallery explore our www.cosori.com/recipes featured recipes enjoy weekly, made exclusively by our in-house chefs CONTACT OUR CHEFS Our helpful, in-house chefs are ready to assist you with any questions you might have! Email: recipes@cosori.
Table of Contents Package Contents Specifications Important Safeguards Plug and Cord Getting to Know Your Kettle Before First Use • Water Test Using Your Kettle • Boiling Water • Making Pour-Over Coffee • High Altitude Users • Kettle Sounds • Adjusting Lid Tightness • Boil-Dry Protection Care and Maintenance • Cleaning • Descaling Warranty Information Customer Support Package Contents 3 3 4 5 6 8 8 9 9 10 10 10 11 11 12 12 12 13 14 1 x Electric Gooseneck Kettle 1 x Power Base 1 x User Manual Specificatio
IMPORTANT SAFEGUARDS Always follow basic safety precautions when using your kettle. Read all instructions. General Safety CAUTION! • • • Do not touch hot surfaces. Use handle. Do not touch the heated parts of the base or the metal walls of the kettle during or immediately after operation. Do not fill the kettle above the “MAX” line. This may cause water to boil over and may cause scalding. • Using accessory attachments not recommended by the manufacturer may result in fire, electric shock, or injury.
PLUG AND CORD • • • Do not let the cord (or any extension cord) hang over the edge of a table or counter. Do not allow the cord to touch hot surfaces. This kettle has a 3-prong grounding plug. Always plug in to a grounded electrical outlet. Do not modify the plug in any way. This kettle uses a short power-supply cord to reduce the risk of entangling or tripping. Use extension cords with care. • Any extension cord must also be a grounding-type 3-wire cord.
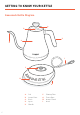
GETTING TO KNOW YOUR KETTLE Gooseneck Kettle Diagram A B E D C I F H G A. B. C. D. E. 6 Lid Steam Vents Kettle Spout Handle F. G. H. I.
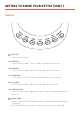
GETTING TO KNOW YOUR KETTLE (CONT.) Controls ON / OFF • Turns the kettle on/off. 170°F WHITE • Sets the kettle to 170°F / 77°C, the ideal temperature for white tea. 180°F GREEN • Sets the kettle to 180°F / 82°C, the ideal temperature for green tea. 195°F OOLONG • Sets the kettle to 195°F / 91°C, the ideal temperature for oolong tea. 205°F COFFEE • Sets the kettle to 205°F / 96°C, the ideal temperature for coffee. 212°F BOIL BLACK • Sets the kettle to 212°F / 100°C to boil water.
BEFORE FIRST USE Water Test Perform the Water Test before using your kettle to make sure it’s working properly. Do not drink the water that is boiled during this test. 8 1. Remove all packaging from your kettle and its accessories. 2. Completely unravel the power cable and place the power base on a flat, level, stable surface. 3. Fill the kettle with water to the “MAX” line [Figure 1.0], then put the lid on the kettle. Press firmly to make sure the lid fits securely. 4. Press (“ON / OFF”).
USING YOUR KETTLE Boiling Water Note: • Use filtered water for perfect pour over brewing. 6. • If you start the kettle without water in it, the kettle will turn off and controls will be disabled. See Boil-Dry Protection (page 11). 1. 2. Add at least ½ cup / 118 mL of filtered water to the kettle. Do not fill above the “MAX” line. Wipe any water from the outside of the kettle and the base. Put the lid on the kettle and make sure it fits securely. Place the kettle on the power base. 3. Plug in the cord.
USING YOUR KETTLE (CONT.) Making Pour-Over Coffee High Altitude Users You’ll need a pour-over coffee maker, such as Cosori’s Original 8-Cup Pour-Over Coffee Maker. At higher elevations, water boils at a lower temperature. You may need to use a different preset. 1. Place the coffee maker filter into the decanter. Altitude Preset for Boiling Water 2. Add ground coffee to the filter according to your preference. 3,881–9,255 ft / 1,183–2,820 m 205°F COFFEE Heat water using the gooseneck kettle.
USING YOUR KETTLE (CONT.) Adjusting Lid Tightness If you feel the kettle lid fits too loosely or is too hard to take off, you can adjust the tightness of the lid. 1. Take off the lid. 2. Use a tool to adjust the 3 tabs on the kettle lid. [Figure 2.1-2.2] 3. If you push the tabs in, the lid will fit more loosely, and will be easier to put on and take off. 4. If you push the tabs out, the lid will fit more tightly, and will not come off as easily. 5.
CARE AND MAINTENANCE Note: Do not remove the filter from the lid. Doing so will break the filter. Cleaning 1. Unplug the kettle and allow it to cool before cleaning. 2. Wipe the kettle and base with a soft, damp cloth. Make sure that the electric socket on the underside of the kettle is kept dry. 3. Dry all parts after every use. Descaling the Kettle You should descale the kettle at least once a week if you use it frequently.
WARRANTY INFORMATION Product Name Model Default Warranty Period Original Electric Gooseneck Kettle This warranty does not apply to the following: • 1 year For your own reference, we strongly recommend that you record your order ID and date of purchase. Damage due to abuse, accident, alteration, misuse, tampering, or vandalism. CO108-NK • Improper or inadequate maintenance. • Damage in return transit. • Unsupervised use by children under 18 years of age.
WARRANTY INFORMATION (CONT.) Defective Products & Returns If you discover your product is defective within the specified warranty period, please contact Customer Support via support@cosori.com with a copy of your invoice and order ID. DO NOT dispose of your product before contacting us. Once our Customer Support Team has approved your request, please return the product with a copy of the invoice and order ID.
SHOW US WHAT YOU’RE MAKING We hope this has been helpful to you. We can’t wait to see your beautiful results, and we think you’ll want to share glam shots! Others already in the community are awaiting your uploads—just pick your platform of choice below. Snap, tag, and hashtag away, Cosori chef! #iCookCosori @cosoricooks Cosori Appliances Considering what to cook? Many recipe ideas are available, both from us and the Cosori community.
Questions or Concerns? Mon–Fri, 9:00 am–5:00 pm PST/PDT support@cosori.