Fitness Trampoline TW10009 EN DE FR ES IT PL
Please read all instructions carefully and keep it for future reference. Warnings: Attention: For home use only. Attention: The Product is not suitable for the children under 3 years Danger: Keep all small parts and packaging materials for this product away from babies and children, otherwise they may pose a choking hazard. Danger: Lack of attachment may cause a risk of tipping or fall hazards. General Warnings: The product must be installed and used under the supervision of an adult.
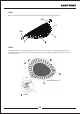
Parts List Nr.
Before Assembly Check all springs BEFORE assembly. If any spring is not attached or damaged, pls follow below processes to attach or replace the spring. A. Find the open end of the SPRING (#3) and hook this end into the hole on the Rail. B. Swing the SPRING (#3) to face inside of the trampoline. C. Attach the metal loop on the MAT (#2) to the spring hook. Assembly Instruction WARNING 1. Keep children away from the trampoline during assembly.
STEP 2 Remove the bracket pins from both ends of the trampoline, and place them to the side. PIN PIN STEP 3 Two people press the rails C and D at the same time, and use steady pressure, with the fingers of both hands extended, to push the rails A and B down until they touch the ground. Make sure that all joints are locked into place.
STEP 4 Insert the pin back into the bracket to prevent the rails from snapping together when it reaches the flat position. PIN PIN STEP 5 Remove the covering cap on the threaded connector, and slide the protective padding (#4) over the unfolded frame. Make sure the holes on the underside of the protective padding are positioned exactly over the threaded connector for the feet. Make sure handle brackets are visible.
STEP 6 Turn the frame upside down. Screw the six feet onto the threaded connectors on the underside of the frame. Turn the trampoline over and place it on its feet. STEP 7 Remove the rubber "feet" from the bottom of the two legs, then put the tube A on each leg, and then replace the rubber feet. Rubber feet STEP 8 Connect tube D to top of both C tubes. Use spring button to secure C and D together. You now have a “ top assembly”.
STEP 9 Lower top assembly into both A tubes until bottom hole in top assembly lines up with hole at top of each A STEP 10 Secure B knob to bottom of both A tubes.
STEP 11 To change height of handrail bar, remove E knob, move top assembly to desired height, then screw E knob 4 adjustment holes 4 adjustment holes CARE AND MAINTENANCE Inspect the trampoline before each use and replace any worn, defective or missing parts. The following conditions could represent potential hazards: 1. Missing, improperly positioned, or insecurely attached frame padding. 2. Punctures, frays, tears, or holes in the bed, or frame padding. 3.
Welcome to visit our website and purchase our quality products! With your inspiring rating, COSTWAY will be more consistent to offer you EASY SHOPPING EXPERIENCE, GOOD PRODUCTS and EFFICIENT SERVICE! US office: Fontana, California UK office: Ipswich Reward Points Exclusive Customer Service Personalized Recommenda�ons Permanent Shopping Cart Order History We would like to extend our hear�elt thanks to all of our customers for taking �me to assemble this product and giving us valuable feedbacks.
Trampolin TW10009 Bitte geben Sie uns eine Chance, es zu korrigieren und besser zu machen! Wenden Sie sich zunächst an unseren freundlichen Kundendienst.
Kontak�eren Sie uns! Senden Sie diesen Artikel NICHT zurück. Wenden Sie sich zunächst an unseren freundlichen Kundendienst. Vor dem Beginnen Bitte lesen Sie alle Anweisungen sorgfältig durch und Bewahren Sie die Anweisungen zur zukünftigen Verwendung auf. Warnung! Achtung! Nur für den Hausgebrauch. Achtung! Das Produkt ist nicht geeignet für Kinder unter 3 Jahren. Gefahr! Halten Sie alle kleinen Teile und Verpackungsmaterialien fern von Babys und Kindern, da Erstickungsgefahr besteht.
Teileliste Nr.
Vor dem Zusammenbau Überprüfen Sie vor dem Zusammenbau alle Federn. Wenn keine Feder angebracht oder beschädigt ist, befolgen Sie bitte die nachstehenden Schritte, um die Feder zu befestigen oder zu ersetzen. A. Suchen Sie das offene Ende der FEDER (Nr. 3) und haken Sie dieses Ende in das Loch in der Schiene ein. B. Schwingen Sie den FEDER (Nr. 3) zur Innenseite des Trampolins. C. Befestigen Sie die Metallschlaufe an der MAT (Nr. 2) am Federhaken. Loch Bauanleitung WARNUNG 1.
SCHRITT 2 Entfernen Sie die Halterungsstifte von beiden Enden des Trampolins und legen Sie sie zur Seite. STIFT STIFT SCHRITT 3 Zwei Personen drücken gleichzeitig auf die Schienen C und D und drücken mit ausgestreckten Fingern beider Hände die Schienen A und B nach unten, bis sie den Boden berühren. Stellen Sie sicher, dass alle Gelenke eingerastet sind.
SCHRITT 4 Führen Sie den Stift wieder in die Halterung ein, um zu verhindern, dass die Schienen beim Erreichen der flachen Position zusammenschnappen. Stift Stift SCHRITT 5 Entfernen Sie die Abdeckkappe am Gewindeanschluss und schieben Sie die Schutzpolsterung (Nr. 4) über den aufgeklappten Rahmen. Stellen Sie sicher, dass die Löcher an der Unterseite der Schutzpolsterung genau über dem Gewindeanschluss für die Füße positioniert sind. Stellen Sie sicher, dass die Griffhalterungen sichtbar sind.
SCHRITT 6 Drehen Sie den Rahmen um. Schrauben Sie die sechs Fuß auf die Gewindeanschlüsse an der Unterseite des Rahmens. Drehen Sie das Trampolin um und stellen Sie es auf die Füße. SCHRITT 7 Entfernen Sie die Gummifüße von der Unterseite der beiden Beine, setzen Sie dann das Rohr A auf jedes Bein und ersetzen Sie die Gummifüße. Rubber feet SCHRITT 8 Verbinden Sie das Rohr D mit der Oberseite beider C-Rohre. Verwenden Sie den Federknopf, um C und D zusammenzuhalten.
SCHRITT 9 Senken Sie die obere Baugruppe in beide A-Rohre, bis das untere Loch in der oberen Baugruppe mit dem Loch oben an jedem A-Rohr übereinstimmt. Möglicherweise müssen Sie jedes A-Rohr für die obere Baugruppe auf ft drehen. Befestigen Sie die obere Baugruppe mit dem E-Knopf. SCHRITT 10 Befestigen Sie den B-Knopf am Boden beider A-Röhren.
SCHRITT 11 Um die Höhe der Handlaufstange zu ändern, entfernen Sie den E-Knopf, bewegen Sie die obere Baugruppe auf die gewünschte Höhe und schrauben Sie den E-Knopf wieder fest. Es gibt 4 verschiedene Höheneinstellungen für den Handlauf. 4 Einstelllöcher 4 Einstelllöcher PFLEGE UND WARTUNG Überprüfen Sie das Trampolin vor jedem Gebrauch und ersetzen Sie verschlissene, defekte oder fehlende Teile. Die folgenden Bedingungen können potenzielle Gefahren darstellen: 1.
Ihre Vorschläge und Kommentare für COSTWAY sind wirklich wich�g für uns! Mit Ihrer inspirierenden Bewertung wird COSTWAY konsistenter sein, um Ihnen EIN SCHÖNES EINKAUFSERLEBNIS, GUTE PRODUKTE und EFFIZIENTEN SERVICE zu bieten! DE office:FDS GmbH,Neuer Höltigbaum 36,22143 Hamburg,Deutschland Belohnungspunkte Exklusiver Kundendienst Personalisierte Empfehlungen Permanenter Einkaufswagen Bestellverlauf 5 Sterne Bewertung Wir möchten uns bei allen Kunden herzlich bedanken, dass sie sich die Zeit genommen hab
Trampoline TW10009 CE MANUEL D’INSTRUCTIONS CONTIENT DES INFORMATIONS IMPORTANTES SUR LA SÉCURITÉ. VEUILLEZ LIRE ET CONSERVER POUR LA RÉFÉRENCE FUTURE.
Veuillez lire attentivement toutes les instructions et les conserver pour la référence ultérieure. Avertissements : Attention : Pour l’usage domestique seulement. Attention : Le produit ne convient pas aux enfants de moins de 3 ans Danger : Gardez toutes les petites pièces et les matériaux d’emballage de ce produit hors de portée des bébés et des enfants pour éviter un risque d’étouffement. Danger : La manque de la fixation pourrait entraîner un risque de basculement ou de chute.
Liste des pièces N° Description de pièce Qté 1 Cadre 1 2 Tapis de saut 1 3 Ressort 4 Rembourrage de protection 1 5 Pied 6 6 Capuchon de couverture 6 7 Tube de la main courante 5 8 Sac de rangement 32 3 1 4 2 5 1 6 7 8 23
Avant l’assemblage Vérifiez tous les ressorts AVANT l’assemblage. Si un ressort n’est pas fixé ou est endommagé, veuillez suivre les procédures ci-dessous pour fixer ou remplacer le ressort. A. Trouvez l’extrémité ouverte du RESSORT (#3) et accrochez cette extrémité dans le trou du rail. B. Faites pivoter le ressort (#3) vers l’intérieur du trampoline. C. Attachez la boucle métallique du Tapis de saut (#2) au crochet du ressort. Extrémité ouverte Instructions d’assemblage AVERTISSEMENT 1.
ÉTAPE 2 Retirez les goupilles des deux extrémités du trampoline et mettez-les sur le côté. GOUPILLE GOUPILLE ÉTAPE 3 Deux personnes appuient sur les rails C et D en même temps, et exercent une pression constante, pour pousser les rails A et B vers le bas jusqu’à ce qu’ils touchent le sol. Assurez-vous que toutes les articulations sont verrouillées en place.
ÉTAPE 4 Insérez à nouveau la goupille dans le support pour empêcher les rails de s’emboîter lorsqu’ils atteignent la position à plat. GOUPILLE GOUPILLE ÉTAPE 5 Retirez le capuchon du connecteur fileté et faites glisser le rembourrage de protection (#4) sur le cadre déplié. Assurez-vous que les trous situés sur la face inférieure du rembourrage de protection sont positionnés exactement sur le connecteur fileté des pieds. Assurez-vous que les supports de la poignée sont visibles.
ÉTAPE 6 Retournez le cadre à l’envers. Vissez les six pieds sur les connecteurs filetés situés sur la face inférieure du cadre. Retournez le trampoline et placez-le sur ses pieds. ÉTAPE 7 Retirez les tampons en caoutchouc de la partie inférieure des deux pieds, puis placez le tube A sur chaque pied, puis replacez les tampons en caoutchouc. tampons en caoutchouc ÉTAPE 8 Raccordez le tube D au sommet des deux tubes C. Utilisez le bouton à ressort pour fixer les tubes C et D ensemble.
ÉTAPE 9 Abaissez l’ensemble supérieur dans les deux tubes A jusqu’à ce que le trou inférieur de l’ensemble supérieur soit aligné avec le trou supérieur de chaque tube A. Vous devrez peut-être faire tourner chaque tube A pour que l’ensemble supérieur soit en place. Fixez l’ensemble supérieur en place avec le bouton E. ÉTAPE 10 Fixez le bouton B au bas des deux tubes A.
ÉTAPE 11 Pour modifier la hauteur de la barre de la main courante, retirez le bouton E, déplacez l’ensemble supérieur à la hauteur souhaitée, puis revissez le bouton E en place. Il existe 4 réglages de hauteur différents pour la barre de la main courante. 4 trous d’adujstment 4 trous d’adujstment ENTRETIEN ET MAINTENANCE Inspectez le trampoline avant chaque utilisation et remplacez toute pièce usée, défectueuse ou manquante. Les conditions suivantes peuvent représenter des dangers potentiels : 1.
Bienvenue pour visiter notre site et acheter nos produits de qualité! Avec votre évaluation inspirante, COSTWAY sera plus professionnel pour vous offrir une BONNE EXPÉRIENCE D’ACHATS, de BONS PRODUITS et un SERCIVE EFFICACE ! FR office : 26 RUE DU VERTUQUET, 59960 NEUVILLE EN FERRAIN, FRANCE Points de Récompense Service à la Clientèle Exclusif Recommanda�ons Personnalisées Panier Permanent Historique des Commandes Nous tenons à vous présenter nos remerciements sincères à tous nos clients qui prennent beau
Trampolín TW10009 ESTE MANUAL DE INSTRUCCIONES CONTIENE IMPORTANTES INFORMACIONES DE SEGURIDAD, POR FAVOR LO LEA Y GUARDE PARA REFERENCIAS FUTURAS.
¡Contáctenos! NO devuelva este artículo. Primero póngase en contacto con nuestro amable departamento de servicio al cliente para obtener ayuda. ES Lea todas las instrucciones detenidamente y guárdelas para futuras referencias. Advertencias: Atención: solo es para uso doméstico.
Lista de Piezas Núm.
Antes del Montaje Revise todos los resortes ANTES del montaje. Si algún resorte no está fijado o está dañado, siga los procesos a continuación para fijar o reemplazar el resorte. A. Encuentre el extremo abierto del resorte (#3) y enganche este extremo en el orificio del riel. B. Gire el resorte (# 3) hacia el interior del trampolín. C. Fije el anillo de metal en la colchoneta (#2) al gancho de resorte. Extremo abierto Instrucción de Montaje ADVERTENCIA 1.
PASO 2 Retire los pasadores de soporte de ambos extremos del trampolín y colóquelos a un lado. PASADOR PASADOR PASO 3 Dos personas presionan los rieles C y D al mismo tiempo, y deben ejercer una presión constante, con los dedos de ambas manos extendidos, para empujar los rieles A y B hacia abajo hasta que toquen el suelo. Asegúrese de que todas las juntas estén bloqueadas bien en su lugar.
PASO 4 Vuelva a insertar el pasador en el soporte para evitar que los rieles se junten al llegar a la posición plana. PASADOR PASADOR PASO 5 Retire la tapa que cubre el conector roscado y deslice el acolchado de protección (#4) sobre el marco desplegado. Asegúrese de que los orificios en la parte inferior del acolchado de protección estén colocados exactamente sobre el conector roscado para las patas. Asegúrese de que los soportes de la manija estén visibles.
PASO 6 Dé la vuelta al marco. Atornille las seis patas en los conectores roscados en la parte inferior del marco. Dé la vuelta al trampolín y colóquelo sobre sus patas. PASO 7 Retire los "pies" de goma de la parte inferior de las dos patas, luego coloque el tubo A en cada pata, y luego vuelva a colocar los pies de goma. Pie de goma PASO 8 Conecte el tubo D a la parte superior de ambos tubos C. Utilice el botón de resorte para asegurar los tubos C y D juntos. Ahora tiene un " conjunto superior".
PASO 9 Baje el conjunto superior en ambos tubos A hasta que el orificio inferior en el conjunto superior se alinee con el orificio en la parte superior de cada tubo A. Es posible que tenga que girar cada tubo A para que encaje el conjunto superior. Asegure el conjunto superior en su lugar con la perilla E. PASO 10 Asegure la perilla B a la parte inferior de ambos tubos A.
PASO 11 Para cambiar la altura de la barra del pasamanos, retire la perilla E, mueva el conjunto superior a la altura deseada y luego vuelva a atornillar la perilla E en su lugar. Hay 4 ajustes de altura diferentes para el pasamanos. 4 orificios de ajuste 4 orificios de ajuste CUIDADO Y MANTENIMIENTO Inspeccione el trampolín antes de cada uso y reemplace cualquier pieza desgastada, defectuosa o que falte. Las siguientes condiciones pueden representar peligros potenciales: 1.
¡Bienvenido a visitar nuestro si�o web y comprar nuestros productos de alta calidad! ¡Con su calificación inspiradora, COSTWAY será más consistente para ofrecerle EXPERIENCIA DE COMPRA CONVENIENTE, BUENOS PRODUCTOS y SERVICIO EFICIENTE! EE.UU.
MANUALE UTENTE Trampolino TW10009 QUESTO MANUALE DI ISTRUZIONI CONTIENE IMPORTANTI INFORMAZIONI SULLA SICUREZZA. SI PREGA DI LEGGERE E CONSERVARE PER RIFERIMENTO FUTURO. Vi preghiamo di darci la possibilità di fare bene e fare di meglio! Seguire Costway Per prima cosa contatta il nostro servizio di assistenza clienti.
Conta�aci! NON restituire questo articolo. Per prima cosa contatta il nostro servizio di assistenza clienti. E-mail IT: cs.it@costway.com Prima di iniziare Si prega di leggere attentamente tutte le istruzioni e conservarle per riferimenti futuri. Avvertenze: Attenzione: Solo per uso domestico.
Lista delle Parti N.
Prima del Montaggio Controllare tutte le molle prima del montaggio. Se una qualsiasi molla non è attaccata o danneggiata, seguire i processi seguenti per collegare o sostituire la molla. A. Trovare l'estremità aperta della molla (N. 3) e agganciare questa estremità nel foro sul binario. B. Ruotare la molla (N. 3) verso l'interno del trampolino. C. Attaccare l'anello di metallo sul tappetino (N. 2) al gancio a molla. Estremità aperta Istruzioni del Montaggio AVVERTENZA 1.
PASSO 2 Rimuovere i perni del supporto da entrambe le estremità del trampolino e posizionarli di lato. PERNO PERNO PASSO 3 Due persone premono i binari (C) e (D) contemporaneamente e esercitano una pressione costante, con le dita di entrambe le mani estese, per spingere i binari (A) e (B) verso il basso fino a toccare il suolo. Assicurarsi che tutti i giunti siano bloccati in posizione.
PASSO 4 Reinserire il perno nel supporto per evitare che i binari scattino insieme quando raggiunge la posizione piatta. PERNO PERNO PASSO 5 Rimuovere il coperchio del connettore filettato e far scorrere l'imbottitura protettiva (N. 4) sul telaio aperto. Assicurarsi che i fori sul lato inferiore dell'imbottitura protettiva siano posizionati esattamente sopra il connettore filettato per i piedi. Assicurarsi che i supporti della maniglia siano visibili.
PASSO 6 Capovolgere il telaio. Avvitare i sei piedi sui connettori filettati sul lato inferiore del telaio. Capovolgere il trampolino e posizionarlo sui suoi piedi. PASSO 7 Rimuovere i "piedi" di gomma dalla parte inferiore delle due gambe, quindi posizionare il tubo (A) su ciascuna gamba e quindi sostituire i piedi di gomma. Piedi di gomma PASSO 8 Collegare il tubo (D) alla parte superiore di entrambi i tubi (C). Utilizzare il pulsante a molla per fissare (C) e (D) insieme.
PASSO 9 Abbassare il gruppo superiore in entrambi i tubi (A) finché il foro inferiore nel gruppo superiore non si allinea con il foro nella parte superiore di ciascun tubo (A). Potrebbe essere necessario ruotare ciascun tubo (A) affinché il gruppo superiore si adatti. Fissare il gruppo superiore in posizione con la manopola (E). PASSO 10 Fissare la manopola (B) alla parte inferiore di entrambi i tubi (A).
PASSO 11 Per modificare l'altezza della barra del corrimano, rimuovere la manopola (E), spostare il gruppo superiore all'altezza desiderata, quindi riavvitare la manopola (E) in posizione. Sono disponibili 4 diverse regolazioni in altezza per il corrimano. 4 fori di regolazione 4 fori di regolazione CURA E MANUTENZIONE Controllare il trampolino prima di ogni utilizzo e sostituire eventuali parti usurate, difettose o mancanti. Le seguenti condizioni potrebbero rappresentare potenziali pericoli: 1.
Benvenu� a visitare il nostro sito Web e acquistare i nostri prodo� di qualità! Con il tuo commento stimolante, COSTWAY continuerà a offrirti FACILITÀ DI ACQUISTO FACILE, PRODOTTI BUONI e SERVIZIO EFFICIENTE! US ufficio: Fontana, California UK ufficio: Ipswich Pun� del premio Servizio dei clien� esclusivo Raccomandazioni personalizzate Carrello permanente Storia degli ordini Ringraziamo sinceramente tu� i nostri clien� per aver dedicato del tempo per assemblare questo prodo�o e fornirci preziosi feedback.
INSTRUKCJA OBSŁUGI Trampolina fitness TW10009 NINIEJSZA INSTRUKCJA ZAWIERA ISTOTNE INFORMACJE DOTYCZĄCE BEZPIECZEŃSTWA. PROSIMY O ZAPOZNANIE SIĘ Z NIĄ I ZACHOWANIE JEJ DO WGLĄDU W PRZYSZŁOŚCI. W razie kłopotów skontaktuj się z nami! Jeśli potrzebujesz pomocy skontaktuj się z naszym przyjaznym działem obsługi klienta.
Skontaktuj się z nami! Nie zwracaj tego produktu. Jeśli potrzebujesz pomocy, skontaktuj się z naszym przyjaznym działem obsługi klienta. E-mail PL: sklep@costway.pl Zanim Zaczniesz Przeczytaj uważnie wszystkie instrukcje i zachowaj je na przyszłość.
Lista części Nr Nazwa Ilość 1 Rama 1 2 Mata 1 3 Sprężyna 4 Ochronna osłona 1 5 Nóżka 6 6 Osłonka 6 7 Poręcz 5 8 Torba transportowa 32 3 1 4 2 5 1 6 7 8 53
Przed montażem Sprawdź wszystkie sprężyny PRZED montażem. Jeśli jakakolwiek sprężyna jest uszkodzona lub niezamocowana, wykonaj poniższe czynności, aby założyć lub wymienić sprężynę. A. Znajdź otwarty koniec SPRĘŻYNY (# 3) i zaczep ten koniec w otworze w szynie. B. Przekręć SPRĘŻYNĘ (# 3) w stronę wnętrza trampoliny. C. Przymocuj metalową pętlę do MATY (# 2), do haczyka sprężyny. Otwarty koniec Instrukcja montażu UWAGA! 1. Trzymaj dzieci z dala od trampoliny podczas montażu. 2.
KROK 2 Usuń sworzeń wspornika z obu końców trampoliny i odłóż je na bok. SWORZEŃ WSPORNIKA SWORZEŃ WSPORNIKA KROK 3 Obie osoby niech naciskają szyny C i D, otwartymi dłońmi i wyprostowanymi palcami, niech popychają szyny A i B w dół, aż dotkną ziemi. Upewnij się, że wszystkie połączenia są zablokowane na swoim miejscu.
KROK 4 Włóż sworzeń z powrotem do wspornika, aby zapobiec zrywaniu się szyn, gdy położysz trampolinę na płasko. SWORZEŃ WSPORNIKA KROK 5 SWORZEŃ WSPORNIKA Zdejmij zaślepkę z gwintowanego złącza i nasuń wyściółkę ochronną (# 4) na rozłożoną ramę. Upewnij się, że otwory na spodniej stronie wyściółki znajdują się dokładnie nad gwintowanym łącznikiem nóg. Upewnij się, że wsporniki uchwytów są widoczne.
KROK 6 Odwróć ramę do góry nogami. Przykręć sześć stóp do gwintowanych łączników na spodzie ramy. Odwróć trampolinę i postaw ją na nóżkach. KROK 7 Usuń gumowe „nóżki” ze spodu 2 nóg, następnie umieść rurkę A na każdej nodze; następnie załóż gumowe nóżki. Gumowe nóżki KROK 8 Podłącz rurkę D do górnej części obu rur C. Użyj sprężynowego przycisku, aby zabezpieczyć C i D. Zakończono montaż górnej części trampoliny.
KROK 9 Obniż zespół górny do obu rur A, aż dolny otwór w zespole górnym zrówna się z otworem na górze każdej rury A. Być może trzeba będzie obrócić każdą rurkę A, aby dopasować montaż górnej części. Zabezpiecz za pomocą pokrętła E. KROK 10 Przymocuj pokrętło B do spodu obu rur A.
KROK 11 Aby zmienić wysokość poręczy, zdejmij pokrętło E, przesuń górną część na żądaną wysokość, a następnie przykręć pokrętło E z powrotem na miejsce. Dostępne są 4 różne ustawienia wysokości poręczy. 4 otwory regulacyjne 4 otwory regulacyjne CZYSZCZENIE I KONSERWACJA Sprawdź trampolinę przed każdym użyciem i wymień wszelkie zużyte, uszkodzone lub brakujące części. Następujące okoliczności, mogą stanowić potencjalne zagrożenie: 1. Brak, niewłaściwie umiejscowione lub źle zamocowane obramowanie ramy.
Zapraszamy do odwiedzenia naszej strony internetowej! Twoja ocena nas inspiruje! Dzięki niej COSTWAY będzie dążył do zaoferowania ci WYDAJNEJ OBSŁUGI, DOBRYCH PRODUKTÓW I BEZPROBLEMOWYCH ZAKUPÓW! PL office: Gdańsk punkty lojalnościowe doskonała obsługa klienta personalizowane rekomendacje karta stałego klienta historia zamówień Pięciogwiazdkowa Ocena Dziękujemy za dokonanie zakupu w naszym sklepie i zapraszamy do odwiedzenia go w przyszłości! 60