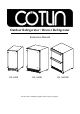
Outdoor Refrigerator / Drawer Refrigerator Instruction Manual HX-90BR HX-160BR HX-160DDR Be sure unit is standing upright 24 hours prior to plug-in.
IMPORTANT SAFEGUARDS Read all instructions before using this appliance. Use this appliance only for its intended purpose as described in this instruction manual. Always exercise basic safety precautions, as described below. After reading the instruction manual, store it in an accessible place where the user(s) of this product can easily find it.
11. Never unplug the unit by pulling on the power cord. Always grip the plug firmly and pull straight out from the outlet. Pulling the cord could cause wire breakage, possibly resulting in overheating and fire. 12. Repair or replace any cord that is frayed or damaged. Do not use a cord that shows cracks or abrasions along its length. 13. Do not use electrical appliances inside the food storage compartments, unless they are of the type recommended by the manufacturer. 14.
SAVE THESE INSTRUCTIONS! DANGER! Risk of child entrapment! Before discarding your old refrigerator: • take off the doors • leave the shelves in place so that children may not easily climb inside.
Table of Contents IMPORTANT SAFEGUARDS ........................... 1 Technical Specifications ...................................... 5 Location of Parts .................................................. 5 Installation ........................................................... 7 Operating Your Refrigerator .............................. 11 Cleaning and Maintenance ................................ 14 Troubleshooting .................................................
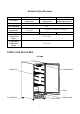
Technical Specifications Model: Description: Electrical Input: Current Rating: Unit Dimensions: Unit Weight: Ambient Temperature Range: Compartment Temperature Range: HX-90BR 15'' Outdoor Refrigerator HX-160BR 24'' Outdoor Refrigerator 115VAC ~ 60Hz 1.
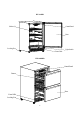
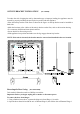
HX-160BR Shelevs(3) Control Panel Door Leveling Feet Front Grille Light Switch HX-160DDR Control Panel Drawer Door Front Grille Leveling Feet 6
Installation Remove the exterior and interior packaging. Use a soft dry cloth to wipe down the outside of the refrigerator thoroughly. Use a clean cloth dampened with lukewarm water to wipe down the inside of the refrigerator. The unit should be located in a well-ventilated area. Avoid placing it near any source of heat or moisture, or in direct sunlight. Direct sunlight may affect the finish, and nearby heat sources will cause higher electrical consumption.
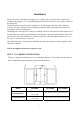
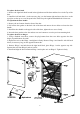
ANTI-TIP BRACKET INSTALLATION [HX-160DDR] To reduce the risk of tipping the unit by abnormal usage or improper loading, the appliance must be secured by properly installing the anti-tip device packed with the appliance. • Place the anti-tip bracket on the floor as shown in the figure. An anti-tip bracket must be installed at both sides. • Mark the locations of the 4 holes of the anti-tip bracket on the floor, refer to the location drawing. • Use a masonry drill bit and insert plastic anchors.
To replace the door latch 1. Remove the right latch hook located in the right bottom of the door and the sleeve in the Top of the door. 2. Install the left latch hook ( in the accessory bag ) on the bottom right and insert the sleeve to the top right. use the cap to cover the open holes. Please keep the right latch hook&block for later use. To reposition the door handle 1. Remove the two buttons from the front of the door. 2.
Electrical Connection Important! For your personal safety, this appliance must be properly grounded. In the event of an electrical short circuit, grounding reduces the risk of shock by providing an escape wire for the electric current. This appliance is equipped with a cord having a grounding wire with a grounding plug. The plug must be inserted into an outlet that is properly grounded and installed.
Operating Your Refrigerator Control Panel It is recommended you install the appliance in a place where the ambient temperature is between 6090 degrees Fahrenheit. If the ambient temperature is above or below recommended temperatures, the performance of the unit may be affected. For example, placing your unit in extreme cold or hot conditions may cause interior temperatures to fluctuate. The range of 34 - 50 degrees Fahrenheit may not be reached.
Compressor Run Indicator When the compressor is running, the RUN indicator is ON which representing a running compressor. If the compressor stops running, the running LED will go out as well. If the RUN indicator is flashing, the unit is in automatic defrost. DOOR ALARM If the door has been left open for more than 5 minute, the alarm will sound along with ‘dr’ flashing. The alarm will stop by closing the door or press any key.
between 65°F and 80°F for built-in models and between 65°F and 90°F for freestanding models. Caution: Damages caused by ambient temperatures of 40°F (4℃) or below are not covered by the warranty. To temporarily stop the cooling cycle, unplug the Refrigerator. To shut it down for longer periods of time, disconnect the plug and leave the door partially open. NOTE: If you unplug the Refrigerator, allow 3 minutes before plugging it back in. The unit will not restart in less than 3 minutes.
Cleaning and Maintenance Cleaning the Outside Unplug your Refrigerator. Clean the outside with a cloth dampened in mild soapy water. Dry thoroughly with a soft cloth. Polish with a stainless steel cleaner. To clean the door gasket, use only mild soapy water. Never use harsh cleansers or scouring pads to clean any part of your unit. Cleaning the Inside Unplug your Refrigerator and remove its contents. Rinse the inside surfaces with plain water and dry the chrome racks, basket and shelving.
Troubleshooting Unit does not turn on Not plugged in. Fuse blown or circuit breaker tripped. Press Power Button on control panel Noise or vibration Check that unit is level. If not, adjust leveling legs. Unit is too warm Check that door is properly closed and sealed. Check temperature setting. (To change the temperature setting, follow the steps in the Operating Your Refrigerator section of this manual.) Check if door has been opened frequently or recently filled with product.