TM Manufacturers of Britain’s Best Selling Range of Garden Tractors and Rider Mowers D Version 1.
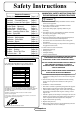
Engine Collector Cutter Decks Controls Safety Instructions Contents Summary: Safety Instructions Controls and Indicators Controls - Forward/Reverse Controls - Levers & Dash lights Cutting Decks Cutter Deck - Removal Cutter Deck - Check List Deck levels - Front to Back Cutter - Levelling Side to Side Cutter - Drive Belt Powered Collector Collector - Adjustments Collector - Drive Belts Collector - Brush Tyres and Wheels Electrical Engine - Oil and Oil Filter Engine - Cooling Engine - Fuel & Air Filter Tra
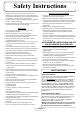
Safety Instructions 6. Check the condition of the tyres and ensure that they are inflated to the correct pressure (refer to the specifications on the back page of this manual). This is particularly important if the machine is to be taken on the public highway. 7. Check the mower is in good working order, paying particular attention to brakes and steering. 8. Check that all linkages, connections, and pivot nuts are secure and that the wheel nuts are torqued correctly. OPERATION 1.
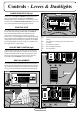
Controls & Indicators - Dashboard O O Light Switch Cutter Engage Switch Auxiliary Lift Switch Deck Height Switch Ignition Switch Engine Speed PGC Net Empty Switch fig 1 IGNITION WARNING LIGHTS (fig 2) The ‘Key Start’ controls both the ignition and the starter. Insert the key and turn to the first position, the dash lights will come on (check that all is ready to start). For starting from cold, turn the key to the second ‘heat’ position and hold for 10 seconds.
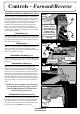
Controls - Forward/Reverse FOOTPEDAL CONTROLS / MOVING OFF (fig 1,2) To move off, ensure your foot is off the pedals ‘A’ and ‘B’ then disengage the parking brake by moving lever ‘C’ (fig 2) forward. Now gently depress either pedal ‘A’ or ‘B’ (fig 1) to move off forward or backward. The function of either pedal has the same effect as the accelerator on a car except that it controls the hydrostatic transmission and does not effect the speed of the engine. N.B.
Controls - Levers & Dashlights POWER TAKE-OFF (PTO) fig 1 Dashlights E D Lift the lever to the LEFT and DOWN, letting it find its own height to engage the PTO and UP and to the RIGHT to disengage (fig 1). This is an ON/OFF lever for the PTO. Always have this lever in the DISENGAGED POSITION when it is not in use. Do not put hands near moving pulleys and belts.
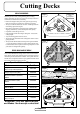
Cutting Decks MULCH MOWING Mulching can save time, avoids gathering piles of rotting cuttings and feeds your lawn. It is however necessary to observe certain rules to mulch mow successfully: • Reduce the height in each pass. If the grass has grown long make several passes to achieve the cut height you require. • Always cut with the throttle set to FAST – mulching needs the full running speed of the engine. • Mow often, particularly in spring and early summer.
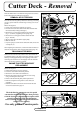
Cutter Deck - Removal Either the Mulch Deck or the Rear Discharge Deck can be fitted to the D18/50 using the following instructions: fig 1 D C F REMOVAL OF CUTTER DECK The cutter deck can be quickly removed for servicing or cleaning or to give greater clearance when driving or towing over uneven ground. Follow this sequence: 1. Put the cutter to the lowest position (see page 6). 2. De-tension the cutter drive belt with the lever situated under the left (nearside) running board (fig 6). 3.
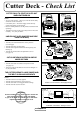
Cutter Deck - Check List CUTTER FAILS TO START OR CUTS OUT WHEN SWITCHED ON fig 1 fig 2 Check: • Are you on the tractor? – Unless you sit on the seat the safety switch cuts out the cutter deck. • Is the battery low? - The clutch engage switch will only operate if the battery is well charged. • Does the 10Amp barrel fuse on the printed circuit board need replacing? • That either the cutter switch or the safety switch on the seat is not faulty – if so, call your dealer.
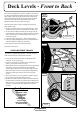
Deck Levels - Front to Back The cutter deck should be set so that it is parallel to the surface it is cutting with a maximum variation from side to side, or front to back of 3mm. Check this by placing the tractor on a hard level surface and measuring the clearance heights front to back and side to side with a steel ruler or tape with the cutter set one adjustment from its lowest position (see page 6). If the cutter deck seems to require levelling first check these other possible causes: 1.
Cutter - Levelling Side to Side LEVELLING SIDE TO SIDE fig 1 Adjustment is best done with the deck in a position one up from its lowest cut – check the level both sides and levelling is then achieved by adjusting the left (nearside) of the deck at two points: REAR ADJUSTMENT 1. Find the deck level disk (fig 1) near the back nearside wheel. underneath the actuator lifting arm. This disk has a concentric slot in which the deck-levelling rod is located. 2.
Cutter - Drive Belt Before carrying out tests or adjustments (the problem may be simpler) – first CHECK the following points: 1. Is the engine to cutter drive belt slipping? Check that the drive belt tension lever (fig 1) under the left running board is in the rear (tensioned) position. If not, rectify – this is the most likely cause. 2. Has debris collected in the cutter deck pulley housing (page 9)? If so remove the cover and remove the obstruction.
Powered Collector CONNECTION REMOVE THE NET To connect the Powered Grass Collector (PGC) to the D18/50 tractor, ensure both are on an even surface with the locking levers (fig 3) on the collector facing the lift arms of the tractor. Move the collector manually to the tractor. Lower the lift arms using the auxiliary lift switch button (page 4) on the dash console. At the end of each lift arm you will find a locating lug.
Collector - Adjustments ADJUST THE SWEEPING HEIGHT Using the Sweeping height lever (fig 2) select the position appropriate to the conditions and the height of the cut. TO GET THE BEST SWEEPING PERFORMANCE AND TO PRESERVE THE BRUSHES SELECT THE HIGHEST SETTING THAT WORKS – start high and adjust down until the brushes stop to collect. DO NOT SET THE BRUSHES TOO LOW – this will lead to scarifying and a very untidy finish as well as shortening brush life. CHECK LIST Not picking up satisfactorily – check: 1.
Collector - Drive Belts REPLACING AND TENSIONING PTO DRIVE BELT CONNECTION fig 1 It is important that the belt from PTO to collector (Part No. 22950100) is crossed over in the correct direction (fig 1) before being fitted over the collector pulley. The easiest way to do this is to place the belt on the PTO pulley and then stand behind the tractor holding the belt with two hands. Turn the right hand above the left and fit the belt on to the collector pulley.
Collector - Brush If the brush has become worn or damaged it is simple to replace the whole brush assembly or individual bristles. 4. Now remove the cover mouldings and free the brush stock. 5. You can now slide off the brush bosses which each hold three brushes. Note their position on the brush stock (fig 1) which must alternate when you return them. TO REMOVE THE BRUSH STOCK 1. Remove the grass bag assembly by lifting it off the pivot brackets. 6.
Tyres and Wheels Countax tractors are fitted with grassland tyres that are designed to present a large area to the ground for grip; and are soft profile to prevent marking your turf. They are of thicker section and tougher than most 4 ply tyres. Persistent punctures and tyre deflation are nevertheless a problem experienced by about 5% of Countax customers. This is not a problem just for Countax owners - it is shared by the users of all types of off-road machinery fitted with pneumatic tyres.
Electrical FUSES AND SHORTS Fuse location fig 1 There are 5 fuses on the D18/50 tractor. The 20Amp (yellow) charging circuit, the mid positioned 20Amp (yellow) lights, ignition and safety switches. The 20Amp (yellow) electric lift for cutter deck and auxiliary lift. The forth 20Amp fuse is connected in line for the net emptying system. Main fuse 30 amp To check – remove fuse and check small window, there should be an unbroken metal strip bridging the gap (fig 2).
Engine - Oil and Oil Filter LUBRICATION OIL INSPECTION AND REFILL fig 1 Always check the engine oil before starting the tractor. Ensure the tractor is on an even level surface when inspecting or refilling oil. To check oil levels, follow this procedure: • Clean around dipstick to prevent debris from falling into the crankcase and damaging your engine. • Remove dipstick and wipe off any oil with a clean lint free cloth. • Install the dipstick back into the tube, but DO NOT tighten.
Engine - Cooling COOLANT LEVEL Radiator Cap fig 1 The coolant level should be checked daily as a matter of routine. ONLY EVER INSPECT COOLANT WHEN THE ENGINE IS COMPLETELY COLD. To check level, follow this procedure: TEN W LY IGH EM R Check the difference of the cooling water level before and after operation once a week. Before operation when the engine is cold there should be a low level of coolant. Immediately after operation (when the engine is hot) there should be a high level of coolant.
Engine - Fuel & Air Filter FUEL FILTER fig 1 Replace the fuel filter after 400 hours of use or annually (Part No. 1182005510). Follow this procedure: • Loosen the inlet and outlet port clip of filter and remove pipe. • Remove the fuel filter by pulling it towards you. • Install a new fuel filter to the support. • Attach the inlet/outlet pipe to the fuel filter. AIR BLEEDING FROM FUEL SYSTEM Fuel Filter By starting your D18/50 the solenoid pump is actuated to bleed air automatically from the fuel system.
Transmission - Oil TUFF TORQ K71 AXLE fig 1 Change transmission oil first time after 50 hours, then every 200 hours thereafter. Transmission oil should be a good quality 10W40 engine oil CE or CD rated. To change oil follow this procedure: • Remove the drain plug and drain oil (fig 4). • After draining oil, thoroughly clean the drain plug then secure and tighten the drain plug. • Remove oil filter cap using a 3/8" drive extension socket. K71 Transmission • Remove oil filter and dispose.
Notes: Page 23
SPECIFICATION SUMMARY D18/50 Garden Tractor MODEL ENGINE DISP D18/50 Yanmar 2V78 Diesel 749cc Engine Lubricant: TORQUE BORE STROKE 38NM @2800rpm 78mm 78.4mm POWER 13.8kw 18.5hp @3600 rpm Recommended Tyre Pressure: 2.27 litres Recommended Transmission: Front Wheels: 0.8kgf - 1.1kgf (12lb PSI* - 16lb PSI) Tuff Torq Heavy Duty Hydrostatic K71, infinitely variable speed control. Sealed for life lubrication. Rear Wheels: 0.43kgf - 0.