
Installation Guide

Order online at counterbalanceshop.com or call 1.800.220.1966
Installation Instructions
Chemical Concepts
410 Pike Road
Huntingdon Valley, PA 19006
MADE IN USA
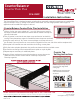
CounterBalance CounterPlate Plus Installation
style countertops. It has a 5” flange on the back of the bracket. The rear flange provides extra support in
NEVER set tops directly on plate
or bracket at an angle when
setting tops.
ALWAYS set tops from opposite
side of stud wall or from front
of cabinet.
Counter Top
Setting Instructions
CounterBalance
®
CCH-CBPP
The CounterPlate Plus is designed to attach to half walls or pony walls, supporting overhangs on breakfast bar
applications where additional support is desired.
CounterPlate Plus
®
Check out our installation videos:
youtube.com/user/ShopCB
These are general guidelines for installation methods, and may not apply to your application.
Place plate into routered area and mark holes for drilling, remove plate.
4)
Repeat steps as necessary for additional plates.
7)
Using a circular saw, set to a depth of 1", cut a 1/4" wide crosscut notch in
the top of the header board where the bracket will be located to accept the
spine of the bracket.
1)
Test, fit bracket in notch and trace shape on top and back of stud wall for
routing. Place plate where support is needed and trace shape onto stud wall.
2)
Using the router with 1/4" bit, router out traced shape on the top and rear of
the stud wall. (you may need to cut out a section of drywall from the rear side of the wall to complete this.)
3)
5)
Drill pilot holes and place plate back into position and attach with the provided screws.
6)
Conceal the rear flange of the bracket with back-splash or repair drywall.
Apply a silicone sealant to the top of the brackets to secure them to the
underside of the counter surface and set countertop into position.
Rated up to 500 lbs.
8)