Bria 2.5 for Windows User Guide www.counterpath.
CounterPath Corporation CounterPath Corporation Suite 300, One Bentall Centre 505 Burrard Street, Box 95 Vancouver, BC V7X 1M3 Tel: 604.320.3344 sales@counterpath.com www.counterpath.com © April 2009 CounterPath Corporation. All rights reserved. Windows and Windows Vista are registered trademark of Microsoft Corporation in the United States and other countries.
Contents Introduction...................................................................................................................................1 Installation and Setup....................................................................................................................3 Getting Ready .........................................................................................................................3 Installing Bria .................................................................
CounterPath Corporation ii
1 Introduction Bria is a softphone from CounterPath that enables you to make VoIP phone calls, to send and receive instant messages, to share presence (availability) information, and to exchange files. Bria implements SIP-based standards for phone calls, IM and and presence, allowing you to work with a multitude of different VoIP servers and service providers. Bria also uses XMPP-based standards for IM and presence.
CounterPath Corporation • • • • 2 XMPP compliance as follows: • RFC 3920 • RFC 3921 Supported extensions: • XEP-0004 • XEP-0016 • XEP-0022 • XEP-0077 • XEP-0085 • XEP-0092 • XEP-0115 STUN and ICE NAT traversal. XTunnels for firewall traversal. Support for DTMF (RFC 2833, inband DTMF or SIP INFO messages). Availability in other languages.
2 Installation and Setup 2.1 Getting Ready Account Information After choosing a VoIP service provider, you will need the following information: • • • • • User name Password Authorization Name (if applicable) Domain Firewall traversal and other network information; see “Configuring Accounts” on page 64. XMPP Accounts If you use an XMPP service for instant messaging or presence, you will need the following information: • • • Jabber ID: user name and domain. For example, jsantos@domainXMPP.com.
CounterPath Corporation Multimedia Device Requirements Bria requires both speakers and a microphone to make calls. Any of the following configurations are acceptable: • • • • • • External speakers and microphone Built-in speakers and microphone Dual-jack multimedia headset Bluetooth® multimedia headset USB multimedia headset USB phone.
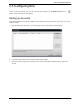
Bria 2.5 for Windows User Guide 2.3 Configuring Bria If Bria is not already running, start it as you would any other program: Use the Windows Start menu or double-click the desktop icon. Bria appears. Setting up Accounts After obtaining SIP and (if applicable) XMPP account information from your VoIP service provider, you can set up Bria accounts. 1. From the Bria menu, choose File > Account Settings. The Account Settings window appears. 2. Click Add > New SIP Account. The SIP Account window appears. 3.
CounterPath Corporation 4. Complete the remaining tabs as specified by the service provider or to suit your setup. Settings that you may need to change immediately include: • Account tab, Domain Proxy area. • Topology tab, if your computer is on a network and/or behind a firewall. • Security tab, if you want to set up secure calls. For more information, see “Configuring Accounts” on page 64. 5. On the Account Settings window, click Apply to register the newly added account. 6.
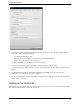
Bria 2.5 for Windows User Guide Setting up a Contact List Typically, you will want to create contacts in order to easily make phone calls and send IMs. You can set up contacts in several ways: • • • During a call that you place or receive, you can add the other party to your contact list. See “Handling an Established Call” on page 17. You can add addresses to the Contact list one by one. See “Adding a Contact” on page 34. You can import a contact list from a file or from another application.
CounterPath Corporation 8
3 Using Bria 3.1 Starting Bria If Bria is not already running, start it as you would any other program: Use the Windows Start menu or double-click the desktop icon. Bria appears. Receiving a Presence Request If availability is enabled, then at any time you may get a Presence Request dialog box. For information on this request, see “Availability” on page 41. 3.2 Shutting Down To shut down Bria, click File > Exit, or press Ctrl+Q.
CounterPath Corporation 3.3 The Onscreen Softphone Bria menu. See below. Call panel. See page 13. Address Book panel. See page 33. The Bria Menu File • • • • My Profile. See page 49. Preferences. These settings control the way that you work with Bria and apply to all accounts. See page 50. Account Settings. These settings control how Bria interacts with your VoIP service provider, and are set individually for each account. See page 64. Exit. To shut down Bria. You can also exit by pressing Ctrl+Q.
Bria 2.5 for Windows User Guide Actions Lists the actions that you can perform, depending on the current “state” of Bria. For example, if a contact is selected, it lists all the actions that can be performed on that contact. Help Provides access to various service-related features. Showing and Hiding Parts of the Softphone Show/hide Dial pad Show/hide Video panel Display as Deskbar. See page 12 Close to System Tray Close Call panel (only Call entry field will remain). Click again to open.
CounterPath Corporation The Deskbar To display the softphone as a deskbar, click the Deskbar button. Deskbar The Deskbar provides a compact GUI for performing many Bria actions. It is assumed that you will work in this mode after you are quite familiar with Bria and its features.
Bria 2.5 for Windows User Guide 3.4 Placing a Call You can contact someone using: • • A softphone address (for example, kpereira@domainA.com) A traditional phone number, if supported by your VoIP service provider. You can place a call when another call is already in progress. There is no limit to the number of calls you can make, although eventually the quality of audio and video will degrade because of limitations on the computer. We recommend no more than six concurrent calls.
CounterPath Corporation How Keying From the... Dialpad or computer keyboard Description 1. If another call is currently in progress, click on the Call toolbar. A new Call Entry area appears. The current call is put on hold. 2. Enter the softphone address or number in the Call entry field using the dialpad or the computer keyboard. For the name, you can enter the entire softphone address (kpereira@domainA.com) or just the name (kpereira). As you type, a suggestion for completing the entry may appear.
Bria 2.5 for Windows User Guide Placing another Call To place a new call (without hanging up on the current call), click the Start another Call button. In the Current Calls bar, a tab appears for each separate call. Hiding your Identity You can hide your identity on a call, so that the other person will not see your ID on their phone. Click Options > Hide my Number for this Call. the usual way. appears on the Call control bar for this call. Place the call in Your identity is hidden only for this call.
CounterPath Corporation 3.5 Handling an Incoming Call Bria must be running to answer incoming calls. (If Bria is not running, incoming calls may be directed to voicemail; check with your VoIP service provider.) Bria rings and information about the incoming call appears in the Call entry field. In addition, the Call Alert box appears, even if Bria is minimized. For information on call alerts, see “Preferences – Alerts & Sounds” on page 51. The softphone address of the person calling you is displayed.
Bria 2.5 for Windows User Guide 3.6 Handling an Established Call While the call is in progress you can: • • • • • • Control the audio: use the speakerphone, mute the call, control volume. Record the call. Put the call on hold. Add the caller as a contact. Transfer the call. See the next page. Add video. Pause and resume video when video is already present. See “Video” on page 20 Show/hide video panel. See page 20 Conference call.
CounterPath Corporation 3.7 Transfering a Call Quick Transfer You can set up a list of phone numbers that calls can be transferred to. Then during a call, you can transfer to any of these numbers by selecting from a list. To set up the numbers: 1. Click File > Preferences from the menu. Display the Transfer panel. 2. Enter as many numbers as you want. To enter a new number, click in an empty line. To remove an entry, click in the line and delete the number.
Bria 2.5 for Windows User Guide Attended Transfer – Call then Transfer You can first speak to the target (the person you are transfering the call to), then click Transfer to complete the transfer. 1. Click Options > Call then Transfer. The first call is put on hold and a New call tab appears 2. Call the target in any of the normal ways. 3. When you are ready, click Transfer; the message Transfer Successful appears. If the target does not want to take the call, simply end the call with that person.
CounterPath Corporation 3.8 Video Show/hide video panel Adding Video Either you or the other party can add video at any time. To add video, open the Video panel and click Start My Video. When you add video, the other party may (or may not) start sending their video to you. You can add video, even if you do not have a camera, in order to start receiving the other party’s video. Other Party Adds Video If the other party starts their video, the Video panel automatically opens and the video is played.
Bria 2.5 for Windows User Guide 3.9 Voicemail If your service includes voicemail, then when you have voicemail messages, the word “new” appears beside the voicemail icon at the top of the phone. Click the icon to automatically connect to voicemail and listen to your messages. Voicemail icon 3.10 Forwarding Calls Forwarding Calls You can enable or disable forwarding so that calls will be forwarded to another number.
CounterPath Corporation 3.11 Conference Calls Starting a Conference Call You can create a conference call starting from one existing call: 1. Click the Conference icon. Bria enters “conference mode” and “Call a conference participant” appears on the call display. 2. Place the second call in one of these ways: • Right-click on a contact and choose Add to Conference Call. • Type a name or number. (Or to cancel the call, click the Cancel button.
Bria 2.5 for Windows User Guide Conference is now established Managing the Conference Adding More Participants You can add more participants to an existing conference in any of these ways: • • • • Right-click on a contact and choose Add to Conference Call. From the tab that contains the conference, click the Conference icon. Place a call by typing a name or number. When the callee answers, the call will automatically be added to the conference.
CounterPath Corporation Suspending the Conference To suspend the conference, click the Hold button. Audio Controls Adjusting Volume. Use the speaker adjustment to adjust volume of the sound you are hearing. Mute. Click on the dialpad to prevent the other parties from hearing you. The icon appears on the call display. When you mute during a video call, you may also want to click Stop my Video to stop the video feed. Speakerphone. Click on the dialpad to put the callers on the speaker phone.
Bria 2.5 for Windows User Guide How Video Is Shared When you conference two calls together, video continues as it was before the conference call. For example, if you were sharing video with one party, and only sending your video to another party, then that is how the video will be handled when the conference call is created. The conference host serves as the “funnel” for other video. Whatever the conference host is receiving will automatically be sent to the other parties.
CounterPath Corporation 3.12 Instant Messaging Instant messages are made using softphone addresses. Therefore, you can send or receive an instant message (IM) to: • • • Any contact who has a softphone address. Any party who phoned you from a softphone address. Any party whom you phoned using a softphone address. Sending an IM 1. There are several ways to select the person to send an IM to. From the Contacts tab in the Address Book Right-click on the contact and choose Send Instant Message.
Bria 2.5 for Windows User Guide Receiving an IM When an IM is received, either the IM window or a Call Alert pops up. (To control which window appears, see “Preferences – Application” on page 50.) If the IM window is already displayed during an IM session with another person, the message from the new person appears in another tab in that window. (You can set up Bria so that each person has their own IM window; see “Preferences – Application” on page 50.
CounterPath Corporation Conference IM—Group Chat Group chat allows you to exchange instant messages with a group of people in the same session. All people must have XMPP accounts configured in order to participate in group chat. Group chat differs from a broadcast IM in that all parties see everyone’s messages, and the messages each party sends are seen by everyone else.
Bria 2.5 for Windows User Guide Managing a Group Chat Inviting More Participants To invite more participants to a group chat, select online contacts from your Contact List and drag them to the Group Chat window. Any participant in the group chat can invite more participants. Leaving a Group Chat To leave group chat, close the group chat window. If you have started the group chat and you leave the session, the session continues with the remaining participants.
CounterPath Corporation Viewing the IM Archive You can view your recent IM activity for any contact or group chat session. Do one of the following: • • Right-click a contact and choose View Instant Message Archive. On the menu, click View > Instant Message Archive. In the Archive window, click the desired contact under Conversations With. Right-click to delete all chat history for a person. 30 Right-click to delete the selected conversation or conversations.
Bria 2.5 for Windows User Guide 3.13 Sending and Receiving Files Sending Files If you have an XMPP account, you can send files to any contact who also has an XMPP account. 1. From the Contacts tab, right-click a contact and choose Send Files. (If the contact does not have an XMPP address, then this menu does not appear). Or from an existing IM window, choose Send a File.
CounterPath Corporation Receiving Files If you have an XMPP account, another person with an XMPP address may send you files. The following dialog appears, to allow you to save the file. 3.14 E-mail You can send an e-mail to one or more contacts, or to all the contacts in a group. The contacts must have e-mail addresses included in their Contact Profiles. Select the contact, contacts or group, right-click and choose Send E-mail. A new e-mail message opens in your default e-mail application.
4 Using the Address Book The Address Book panel, which is divided into tabs, provides access to the following: • • • Contacts. Call history. See page 40. Contact availability (presence). See page 41. 4.1 Contacts Tab Add a Contact Search field Display all contacts Display only contacts who are set up for Availability and who are currently online The availability of others. See page 41.
CounterPath Corporation Setting up Contacts Adding a Contact Click , or right-click a group and choose Add Contact to Group. The Contact Profile dialog box appears. See the table on page 38. This button is always displayed for a new contact. It also appears once you enter a new address for an existing contact. Table 1: Contact Profile Fields Field Description Contact name Only the “Display as” name is required.
Bria 2.5 for Windows User Guide Contact Profile — Advanced Dialog This dialog lets you fine tune the presence sharing information for this contact and change the account that each address is associated with. Presence Sharing You can configure which accounts will be used for presence sharing: none, some or all. • • If you disable all items, this contact will not have an availability icon beside its name in the Contact list.
CounterPath Corporation Take the appropriate action: • • Create a new contact: Click Create. Change the display name, contact method, and group if desired. Click OK. Update an existing contact. Click Update. Choose a different contact, if necessary. Change the contact method and group, if desired. Click OK. If the contact method is Softphone or Jabber, an online status request is sent to this person. Importing Contacts You can populate the Bria contact list by importing from an external file or files.
Bria 2.5 for Windows User Guide Setting up an Excel File for Import 1. Remove any introductory text or headings from the top of the file. (You can keep text at the end of the file; it will be ignored during the import.) 2. Insert a blank row as the first row, then insert the headings that Bria will use to interpret the meaning of each column. The columns can be in any order. The most popular headings are: • display-name • entry_id • given_name • surname • postal_address.
CounterPath Corporation Managing Contacts Changing Contact Information To change the information for a contact, right-click the contact and choose View Profile. The Contact Profile dialog box appears (see page 34). Some of the changes you can make are: • • • • • Change any contact details. Add, delete or change a contact method. Move a contact to another group by selecting a different group. Add an existing contact to more groups by selecting one or more extra groups.
Bria 2.5 for Windows User Guide Contact Flyout Left-click on a contact to show the Contact flyout. This flyout shows all the contact methods set up for the contact and has icons you can click to perform an action that is valid for that contact method. This contact is online on their domainA account but offline on their domainXMPP account Click an icon to perform the action. Finding a Contact If the contact list is long, use the all contacts again, click field to filter the contacts that are displayed.
CounterPath Corporation 4.2 History Tab Display all calls Missed calls Received calls Dialed calls Canceled outgoing Answered call (incoming or outgoing) Missed or blocked incoming Managing the Lists of Calls You can right-click on an entry in a list to: • • • • • Delete the call. Delete all entries in this list. Block this person to control whether they can send you phone calls or instant messages, or see your online availability. You can change these privacy settings at any time; see page 52.
Bria 2.5 for Windows User Guide 4.3 Availability Availability refers to the ability to see whether a person is available or not: online, on phone, busy, and so on. Your availability information is displayed below on the main menu. The availability of others is displayed in the Contacts tab. You can publish your availability to contacts who have softphone address, and you can set up Bria to view the availability of other contacts.
CounterPath Corporation Sharing Availability Watching Others’ Availability When you create a contact by entering details in the Contact Profile, the contact is automatically set up so that you share availability. If you created a contact by importing a contact list, it is not automatically set up to shared. You must display the Contact Profile and click the Advanced button. See “Contact Profile — Advanced Dialog” on page 35.
Bria 2.5 for Windows User Guide • If you do not yet have a privacy rule set up for this person or for their domain, this request appears to you as a Presence Request. You must respond to the request: • Block the request. This person will not be able to contact you from this address. • Allow the request and create a new contact using this address. • Allow the request and add this address to an existing contact (if Bria has found an appropriate match).
CounterPath Corporation Setting your Availability Changing your Availability Click the down arrow beside the availability indicator on Bria, and select the desired availability. See Table 2, below. When your availability changes, the new availability is sent to everyone who has permission to see your availability, according to the Privacy Settings (see “Preferences – Privacy” on page 52).
Bria 2.5 for Windows User Guide Table 2: Availability Indicators Indicator Do not disturb Meaning for your Availability Meaning for Others’ Availability You have set your availability to this status. Bria will never automatically You cannot make phone calls switch you out of this status; you must switch yourself. or IMs to this person. Both incoming phone calls and incoming IMs will be directed to voicemail. However, you can still make phone calls and IMs.
CounterPath Corporation 4.4 Privacy You can control how contacts and other people can contact you by phone or IM, and you can control whether your contacts can see your availability information (whether you are online, one the phone, and so on). You can set up controls in advance or “on the fly” (as phone calls and presence requests come in). Setting up Controls in Advance To set up controls in advance, see “Preferences – Privacy” on page 52.
Bria 2.5 for Windows User Guide To later unblock this person, remove them from your Blocked List. Or, if the person is a contact, right-click their name on the contact list and choose Unblock this Person. Via the Presence Request Dialog Box Another party can send you a presence request, to request that they be able to see your availability, as described on page 41.
CounterPath Corporation 48
5 Configuring Bria You can configure Bria in several ways: • • • Set up your personal profile. See below. Configure global behavior. See “Configuring Preferences” on page 50. Configure the behavior on a per-account basis. See “Configuring Accounts” on page 64. 5.1 Configuring your Profile To set up information about yourself, choose File > My Profile.
CounterPath Corporation 5.2 Configuring Preferences Choose File > Preferences. The Preferences window appears. The Preferences panels let you control the way that you work with Bria. Preferences – Application This panel lets you set your preferences for general GUI behavior.
Bria 2.5 for Windows User Guide Preferences – Alerts & Sounds This panel lets you control the Call Alerts box and lets you assign sounds. Enable alert displays You can control whether the Call Alert box is displayed in different situations. Assigning Sounds You can assign specific sounds to a variety of actions or “events”. 1. Select the Enable sounds check box and select the check boxes for each desired event, or clear the Enable sounds check box to disable all sounds. 2.
CounterPath Corporation Preferences – Privacy You can control how contacts and other people can contact you by phone or IM, and you can control whether your contacts can see your availability information (whether you are online, on the phone, and so on). Choose one. If you choose “Allow only”, then all contacts will be able to contact you unless they or their domain are in the Blocked list (below). This section is optional. It lets you enter addresses and domains that will be prevented contacting you.
Bria 2.5 for Windows User Guide Preferences – Quick Transfer This panel lets you set up a list of phone numbers that calls can be transferred to. Then during a call, you can transfer to any of these numbers by selecting from a list. Enter as many numbers as you want. To enter a new number, click in an empty line. To remove an entry, click in the line and delete the number. Set one of the numbers as the default. See “Quick Transfer” on page 18 for information on using this feature.
CounterPath Corporation Preferences – Devices Bria automatically detects devices at each startup, and selects the most appropriate device for each purpose. If you do not like this selection, you can override it on this panel. If you override a selection, it will apply the next time you start Bria, unless the device is no longer available, in which case Bria will again select the device to use.
Bria 2.5 for Windows User Guide Field Description Headset Mode Speaker Change these fields only if you want to override the devices that Bria automatically selected. Microphone In both these fields, select the headset you are using. The headset is the device that is usually used for audio out (the sound you hear) and audio in (recording your voice). The only situation in which the headset is not used is when the Speaker Phone button on the dialpad is pressed.
CounterPath Corporation Preferences – Network Field Network Connection Speed Description Select the type of network connection for your computer. The sliders move to show the bitrate that will be used for sending and receiving. These rates are typical rates for the selected configuration. If you know that your computer and network can handle a faster sending speed, click Custom and move the slider. It is recommended that you not change the receiving speed.
Bria 2.5 for Windows User Guide Preferences – Audio Codecs This panel shows all the codecs that are included in the retail version of Bria. You can enable or disable codecs as desired. With only one codec enabled, all calls made will use that codec. With more than one codec enabled, Bria automatically chooses the best codec based on the other party’s capability, the available bandwidth, and network conditions. You cannot change the properties of any codecs.
CounterPath Corporation Supported Codecs Bria supports a wide range of codecs. See the table. Codec Narrowband Wideband Included in Retail Bria Royalty-bearing AMR Wideband (G.722.2) 3 Broadvoice-32 3 3 Broadvoice-32 FEC 3 3 DVI4 3 3 DVI4 Wideband 3 3 3 EVRC 3 G.711aLaw * 3 3 G.711uLaw * 3 3 G.722 3 3 G.723 3 G.726 3 3 3 3 G.
Bria 2.5 for Windows User Guide Preferences – Video Codecs Video codecs describe the format by which video streams are compressed for transmission over networks. Some codecs require less bandwidth than others, but may result in lower video quality. You can enable or disable codecs as desired. You may decide to disable a codec even though your VoIP service provider supports it. With only one codec enabled, all calls made will use that particular compression format.
CounterPath Corporation Preferences – Quality of Service These fields appear only on versions of Bria that include video. The Quality of Service panel lets you request a specific transport service for audio, video and signaling traffic. There are two types of services. The service to use depends on what your internet service provider supports: • • GQoS, which is available for audio and video. DSCP (also known as ToS), which is available for audio, video and signaling.
Bria 2.5 for Windows User Guide Preferences – Contact Storage These settings let you set up a remote storage system for your contact list via WebDAV or XCAP. (The contact list is always stored locally, even when you set up for remote storage.) The contact list holds general information for contacts. It is automatically loaded at startup, and is loaded even if no accounts are enabled.
CounterPath Corporation Preferences – Diagnostics This panel lets you enable logging to files. Logging uses computer resources, so you should only enable it when instructed by a customer support representative. To set up logging: 1. Click Enable diagnostic logging. 2. Set the logging level. 3. Specify the folder where logs will be saved. 4. Click OK. Activity on Bria will be logged to.csv files in the specified folder. A new set of files is started each time you log on.
Bria 2.5 for Windows User Guide Preferences – Advanced Field Reduce echoes Description Turning this feature on improves sound quality. This feature is typically on. Use slower but more compatible video format Turning this field on may improve performance when running Bria on older hardware.
CounterPath Corporation 5.3 Configuring Accounts Choose File > Account Settings. The Account Settings window appears. Accounts Settings Window To work with accounts, choose File > Account Settings from the menu. The Account Settings window appears, showing all the accounts set up. You can: • • • • Add or remove an account. Enable one or more accounts. See below for details. Set one account as the default. See below for details. Set or change the properties of an account.
Bria 2.5 for Windows User Guide Setting the Default Account When multiple SIP accounts are enabled, the first account listed is always the default. Use the Move Up and Move Down buttons to set the desired account as the default. The dial plan rules may select the default SIP account in order to place an outgoing call, as described on “Which Account Is Used?” on page 15.
CounterPath Corporation XMPP Account A red dot appears here to alert you when the Jabber ID field is blank or when the Jabber ID is incomplete. The alert disappears after you type “@” in the Jabber ID. A red dot appears here to alert you when the Password field is blank. The alert disappears after you enter a password. Table 4: XMPP Account Properties – Account Field Account name Protocol Description If desired, change the account name to something that is meaningful to you.
Bria 2.5 for Windows User Guide Table 4: XMPP Account Properties – Account Field Resource Priority Description Optional resource, as specified in RFC 3920. For example "/home". If this setting is blank and the Jabber ID includes a resource, the value from that ID is used. If both are specified, the value from this Resource field is used. If no resource is specified, the XMPP server will assign a temporary resource. The priority, as per RFC 3921. The default is 0.
CounterPath Corporation SIP Account Properties – Account A red dot appears here to alert you when the User ID field is blank or when the User ID is incomplete. The alert disappears after you type “@” in the User ID. Table 5: SIP Account Properties – Account Field Account name Protocol Description If desired, change the account name to something that is meaningful to you. For example, the name of the VoIP service provider. Read-only. Always specifies SIP.
Bria 2.5 for Windows User Guide Table 5: SIP Account Properties – Account Field Send outbound via Description Choose the setting specified by your VoIP service provider: • Domain: If your VoIP service provider requires that traffic be directed to proxies that are discovered via the domain. • Proxy Address: If your VoIP service provider has an outbound proxy address and requires that you provide the address to Bria. For the address enter a domain name (for example, domain.
CounterPath Corporation SIP Account Properties – Voicemail Complete these settings only if your service provider offers voicemail. These settings let you set up Bria to forward calls in several situations. Your service provider may also provide the ability to set up for voicemail outside of Bria, for example, by phoning a softphone address and following the voice prompts, or by accessing a website. Check with your service provider to determine if another setup mechanism is available.
Bria 2.5 for Windows User Guide Table 6: SIP Account Properties – Voicemail Field Number for sending calls to voicemail Description Complete only if your VoIP service includes voicemail. This is the number that incoming calls will be forwarded to if they are unanswered after the specified interval (below), or when you click the icon on the call display. If you leave this field empty, then this icon will not be displayed. However, leaving this field does not mean that voicemail does not work.
CounterPath Corporation SIP Account Properties – Topology Table 7: SIP Account Properties – Topology Field Description Firewall Traversal IP Address This setting controls how your IP address is presented. • Discover global address: Let Bria determine your public IP address. This is the recommended setting unless your VoIP service provider advises otherwise. • Use local IP address: use the IP address of the Bria computer. STUN Server The recommended setting is Discover global address.
Bria 2.5 for Windows User Guide Table 7: SIP Account Properties – Topology Field Description Server Address Optionally, specify the name or IP address of the XTunnels server to use. Username and Password • If the field is completed, Bria will use that server. • If it is blank, Bria will perform a DNS lookup to discover the server. Check this box to use the username and password from your SIP account in order to log into the XTunnels server.
CounterPath Corporation SIP Account Properties – Presence Presence allows other softphone users to see your online availability, and also allows you to see the online availability of others. This tab lets you set up to share presence information with contacts who have addresses associated with this SIP account (for information on account association, see “Contact Profile — Advanced Dialog” on page 35). (Note that you do not have to set up to share presence information on an XMPP account.
Bria 2.5 for Windows User Guide SIP Account Properties – Storage These settings let you set up a remote storage system for the buddy list for this SIP account. (Note that the buddy list for an XMPP account is always stored on the XMPP server; no configuration is required). Table 9: SIP Account Properties – Storage Field Storage method Description The storage method to be used for the buddy list and presence rules. The file can be stored locally or both locally and on a remote computer.
CounterPath Corporation SIP Account Properties – Security Table 10: SIP Account Properties – Security Field Signaling Transport Description Contact your VoIP service provider to identify the types of transport that are supported. Then choose a supported transport: • Automatic: Bria sets up the transport based on the capabilities of the network and the Bria computer. Choose this option if you do not care which transport is used. • TCP: This transport provides no signaling security.
Bria 2.5 for Windows User Guide SIP Account Properties – Advanced Table 11: SIP Account Properties – Advanced Field Description Register Settings Reregister every The time interval between Bria’s attempts to reregister in order to refresh the account registration with the VoIP service provider for this account. A value of zero means not to reregister after the initial registration. This value is placed in the “Expires” header field of the REGISTER message. Minimum time The factory setting is 3600.
CounterPath Corporation Table 11: SIP Account Properties – Advanced Field Maximum time Description This is the maximum wait time between attempts to reregister. Once this maximum is reached, Bria will wait this time for all subsequent attempts. For example, the min. time is 20 secs, the maximum time is 120 secs. Bria will attempt to reregister as follows: • • • • • • • • • Wait 20 secs. Attempt to connect. If fail, wait 40 secs. Attempt to connect. If fail, wait 80 secs. Attempt to connect.
A Application Hot Keys Function Keyboard Shortcut Answer Enter Exit Ctrl+Q Hang up Esc Hold Period Mute Spacebar 79
CounterPath Corporation B Dial Plan When a call attempt is made, the call input (what you type, select or drag onto the call entry field) is compared to the dial plans that exist in order to select the SIP account to use and in order to determine if the input must be modified to ensure that the call can succeed.
Bria 2.5 for Windows User Guide B.1 How Dialing Plans Are Used When you place a phone call, Bria takes the phone number (the input) and performs the following: Cleanup This step is not part of the dialing plan: it is always performed even when there is no dialing plan. Input is cleaned up by removing spaces, dashes, open brackets, and close brackets. Matching The input is compared to the patterns defined by the dial plan for each enabled account.
CounterPath Corporation Spaces are allowed only in the items. Remember that dial plans are applied after the input has been cleaned up (page 81)! Example \a\a.T|xxxxxxxxxx;match=1;prestrip=2;match=2;pre=8; where: • • • • \a\a.Tis the first pattern. xxxxxxxxxx;is the second pattern. match=1;prestrip=2;is the first match-transformation pair. match=2;pre=8;is the second match-transformation pair.
Bria 2.5 for Windows User Guide Element T Origin Digit map rules Description A timeout period will take place before automatic dialing starts. The T timer forces Bria to wait after a match is made. This timer should always be included in these situations: • Any pattern that uses the . (dot). For example, if the pattern is xxxx. then adding a timer lets you type three or more digits. If there is no timer, then as soon as you type three digits, Bria makes the match as soon as you type three digits.
CounterPath Corporation B.3 How the Input Is Processed Comparing Input to the Dial Plan Patterns The input is compared to each dial plan in turn, starting with the first listed account. The process is slightly different depending on how the call is placed: • If the input was dragged or selected, then the entire input is compared to each dial plan. If a complete match is found, then that account is selected and the associated transformation is performed.
Bria 2.5 for Windows User Guide B.4 Examples Example 1 \a\a.T|xxxxxxx.T;match=2;pre="9" This simple example shows how to differentiate between a PSTN number and a softphone address, and how to add a “9” dialing prefix only to the PSTN number. Example 2 3xxT|1xxxxxxxxxx|[2-9]xxxxxxxxx|+x.T;match=2;pre="9"; match=3;pre="91";match=4;prestrip=1;pre="9011" 3xxT The first pattern is any three-digit number beginning with 3. No transformation. The assumption is that this is an internal extension.
CounterPath Corporation • Handling of the account prefix (#1), if you are upgrading from Bria 1.1 and are accustomed to entering the account number. Use of # to identify the account is now deprecated. The dial plan should be capable of determining the account to use for this number. However, since users may still be in the habit of entering the account prefix, you may want to include this pattern to handle such a scenario.
Bria 2.5 for Windows User Guide C Contact List Headings Following is a list of all the headings that are used in the Bria contact list. This list can be useful when formatting a contact list in order to import it into Bria.
CounterPath Corporation D Location of Files System files get copied to the installation directory specified when installing Bria. The default installation directory is: C:\Program Files\CounterPath Corporation\Bria Data files are saved in the Counterpath folder in the standard location for application data, as defined in Windows.
Bria 2.5 for Windows User Guide E Other Ways to Run Bria E.1 From a Hyperlink You can attach a hyperlink to a phone number or softphone address that, when clicked, starts Bria and dials the number. Attach a hyperlink with this format: dial For example: dial kpereira@domainA.com E.2 From the Command Line You can start Bria from a DOS prompt. You may need to add Bria.exe to the PATH. Then type: Bria.
CounterPath Corporation F Glossary AEC AGC AVI Broadband Codec Default account Dial plan DTMF IM IP IP address Media MWI Narrowband Presence Proxy PSTN 90 Acoustic echo cancellation. Processing of the audio or video signal to reduce the echo effect that can arise with a speakerphone or that can arise if the sound from the speakerphone or headphone leaks into the microphone. Automatic gain control.
Bria 2.5 for Windows User Guide RFC RTP Signaling SIMPLE protocol SIP SIP account softphone address SRTP TCP TLS UDP URI URL USB device VAD vCard VoIP VoIP service provider WAV Request for Comment. A document that describes an aspect of an internet technology. An RFC may be a proposed, draft or full internet standard. Real-time Transport Protocol. A protocol for delivering the media portion of a data transmission over an IP network. SRTP is another media protocol.
CounterPath Corporation 92