Bria 3 for Mac User Guide Enterprise Deployments
CounterPath Corporation CounterPath Corporation Suite 300, One Bentall Centre 505 Burrard Street, Box 95 Vancouver, BC V7X 1M3 Tel: 604.320.3344 sales@counterpath.com www.counterpath.com © February 2012 CounterPath Corporation. All rights reserved. This document contains information proprietary to CounterPath Corporation, and shall not be used for engineering, design, procurement, or manufacture, in whole or in part, without the consent of CounterPath Corporation.
Contents Introduction................................................................................................................................ 1 Installation and Setup................................................................................................................. 3 Getting Ready ...................................................................................................................... 3 Starting Bria .........................................................................
CounterPath Corporation iv
1 Introduction Read this manual if you who are working in an enterprise and your system administrator. It is assumed that your system administrator has either configured Bria on your behalf or has give you instructions on configuring it yourself. If you are not working in an enterprise, read the user guide “Using Bria for Mac – for Retail Deployments”.
CounterPath Corporation DVI4, DVI4 Wideband, G.711aLaw, G.711uLaw, G.722, G.729, GSM, iLBC, L16 PCM Wideband, Speex, Speex FEC, Speex Wideband, Speex Wideband FEC. • Support for the following video codecs: H.263, H.263+ 1998, H.264. • Automatic selection of the best codec based on the other party’s capability, the available bandwidth, and network conditions. Bria switches the codec within a call in response to changing network conditions.
2 Installation and Setup 2.1 Getting Ready Multimedia Device Requirements Bria requires both speakers and a microphone to make calls. Any of the following configurations are acceptable: • • • • • External speakers and microphone Built-in speakers and microphone Dual-jack multimedia headset USB multimedia headset USB phone. Bria is optimized to work with Apple iSight camera.
CounterPath Corporation 2.2 Starting Bria First-time Startup If Bria is not already running, start it as you would any other program. The Bria Login dialog appears with the Profile set to “Manually configure login server”. 1. Set the profile to the value specified by your system administrator and click Continue (or Log in). Typically: • • • 2. No login required: Used if you will manually configure Bria, as described below.
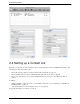
Bria 3 for Mac User Guide – Enterprise Deployments 2.3 Configuring Bria Read this section if your system administrator advises you that you must either configure Bria or complete the configuration. (If your administrator advises you that configuration is already done, go to “Setting up a Contact List” on page 6.) Setting up Accounts 1. From the menu bar, choose Bria > Preferences > Accounts. The Account list appears with a Mac Address Book account already set up. 2.
CounterPath Corporation 2.4 Setting up a Contact List Typically, you will want to create contacts in order to easily make phone calls, send IMs and transfer files. You can bring in contacts from other sources: • • • From a file such as a vCard or comma-separated-values (CSV) file. See page 38. From your Mac Address book, by enabling the Mac Address Book account. See page 55. From a corporate directory, if your system administrator has set one up.. See “The Directory Tab” on page 53.
Bria 3 for Mac User Guide – Enterprise Deployments 2.5 Troubleshooting Bria includes tools for helping you troubleshoot problems. From the menu, choose Help > Troubleshooting. • • • • • Audio tab: While you are on a phone call, you can test the quality of the audio. Note that to perform a valid test, you should be on an established call (not a call attempt). Video tab: You can verify that your camera is working. Network tab: You can verify that you are successfully connected to the network.
CounterPath Corporation 8
3 Making Phone Calls 3.1 The Onscreen Softphone Minimize to dock Close window The dashboard menu Show/hide dial pad The Call button Call entry field See page 11. Resources. See page 51 Resize softphone Compact View To display a compact view of the softphone, hide the dialpad and hide all the resources tabs (View > Hide).
CounterPath Corporation The Bria Menu The menu contains the following items that are specific to Bria: • • • • • Bria > Preferences. See page 60. View. Changes how Bria looks. Also lets you view the message archive and chat rooms (if you are a member of one; see page 31). Contacts. Lets you work with contacts. Actions. Lists the actions that you can perform, depending on the current “state” of Bria. For example, if a contact is selected, it lists all the actions that can be performed on that contact.
Bria 3 for Mac User Guide – Enterprise Deployments 3.2 Placing a Call Place the call as described in the table below. The outgoing call opens in its own call panel, below any other existing call panels. You will hear a ringing tone while Bria attempts to make a connection. Option Keying From the... Dialpad or computer keyboard Description 1. Enter the number or address in the call entry field using the dialpad or the computer keyboard. To turn letters to numbers, see page 13.
CounterPath Corporation Call entry field Click to place the call Auto complete suggestions For information on working with the call, see “Handling an Established Call” on page 16. Dealing with an Auto Attendant If you know that your call will be answered by an auto attendant and you know what menu items you will choose, you can include those menu items (DTMF) in the phone number when you dial it: • • • Before the first DTMF number, include at least one capital P. You can include other Ps.
Bria 3 for Mac User Guide – Enterprise Deployments Selecting the Account to Use This information applies only if you have more than one SIP account set up and enabled. When you place a call, you can explicitly specify the account to use for that call. The account selection options appear only if you have two or more SIP accounts that are enabled and being used for phone calls.
CounterPath Corporation Hiding your Identity (Anonymous Calling) You can hide your identity on a call, so that the other person will not see your name or number on their phone. Your ID will be hidden for all outgoing calls until you turn off Hide my number mode Anonymous Calling is automatically turned off when you shut down. Turn Hide my number on or off Placing another Call You can place another call.
Bria 3 for Mac User Guide – Enterprise Deployments 3.3 Handling Incoming Calls Bria must be running to answer incoming calls. (If Bria is not running, incoming calls may be directed to voicemail; check with your system administrator.) The new call appears in its own call panel. In addition, the Call Alert box appears, even if Bria is minimized. For information on call alerts, see page 62. Click. If you are on another call, that first call is automatically put on hold.
CounterPath Corporation 3.4 Handling an Established Call Place another call Audio Controls The current call is automatically put on hold). See page 14 Speakerphone Speaker control, microphone control and mute Voicemail See page 24 Add as Contact If a plus symbol appears here, you can add the current caller as a contact. See “Adding a Contact using an Existing Address” on page 43. Transfer. See page 17 Video.
Bria 3 for Mac User Guide – Enterprise Deployments 3.5 Transfering a Call Basic (Unattended) Transfer – Transfer this Call Click the Transfer button The call is put on hold and a call entry field appears. Type a name or number, or drag a contact into the field. Then click Transfer The call may end immediately. Or it may show “calling”, In this case, do not hang up immediately: if the other person does not answer, the call will come back to you.
CounterPath Corporation Attended Transfer – Call then Transfer You can first speak to the target (the person you are transfering the call to), then click Transfer to complete the transfer.
Bria 3 for Mac User Guide – Enterprise Deployments 3.6 Handling Video Calls Placing a Video Call From the Dashboard Click the down arrow and choose Video call. If you mostly make video calls, you can Option-click this down arrow to reveal the “Set Video Call as default action” menu item. From the Contact List or History Choose Video Call Adding Video If you have a camera, you can click Start Video to add video to an established call.
CounterPath Corporation Pausing and Resuming Video Click Stop Video on the call panel or close the video window to pause sending your video. Click Start Video to resume sending your video; the video window will open.
Bria 3 for Mac User Guide – Enterprise Deployments 3.
CounterPath Corporation Managing the Conference Mute. When you mute during a video call, you may also want to click Stop Video to stop the video feed. Participant menu Conference call menu Adding More Participants You can add more participants to an existing conference in any of these ways: • • • Control-click on a contact and choose Add to Conference Call. In the conference call panel, enter a name in the call entry field and click Add.
Bria 3 for Mac User Guide – Enterprise Deployments Video Conference Calls “Video” appears beside each person you are currently sending video to To start or stop video for one person, use the participant menu Closing the video window stops sending video. Start and stop sending your video to all participants Starting a Conference with Video When you start a conference from established calls, video is included if at least one of the calls already includes video. Video is sent to all the participants.
CounterPath Corporation 3.8 Voicemail If your service includes voicemail and you have set up voicemail options (page 57), then when you have voicemail messages, the voicemail icon appears at the top of the phone (the icon may include a number). You can click the icon to automatically connect to voicemail and listen to your messages. Voicemail icon 3.9 Forwarding Calls You can enable or disable forwarding so that calls will be forwarded to another number.
3.10 Working in Deskphone Mode If you have a SIP deskphone, you can use Bria in deskphone mode. In this mode: • • You can initiate calls from Bria and then pick up the deskphone receiver in order to speak to the person. You can then control the call using the deskphone controls. You can also hang up the call using Bria. Information about incoming, outgoing and established calls is displayed in Bria in read-only mode. Set up for Deskphone Mode 1.
CounterPath Corporation 26
4 Other Bria Features 4.1 Instant Messaging Sending an IM 1. There are several ways to select the person to send an IM to. From the Contacts tab Control-click on the contact and choose Send IM. The contact must have a softphone address. Or click on the IM icon that appears to the right of the contact name. An active phone call If the person is a contact, choose Send Instant Message from the call panel menu.
CounterPath Corporation 4.2 Sending a Broadcast IM You can send an IM to several people at one time. A broadcast IM is not a conference IM. • • 1. With a broadcast IM, each recipient can reply to the IM, but only you will see these replies; the other recipients will not see these replies. With a conference IM, all parties see everyone’s messages and the messages each party sends are seen by everyone. See “Group Chat (Conference IM)” on page 29. Select two or more contacts. 2.
Bria 3 for Mac User Guide – Enterprise Deployments 4.3 Group Chat (Conference IM) Group chat allows you to exchange instant messages with a group of people in the same session. All people must have XMPP accounts configured in order to participate in group chat. Group chat differs from a broadcast IM in that all parties see everyone’s messages, and the messages each party sends are seen by everyone else.
CounterPath Corporation Rejoining a Group Chat If you leave a group chat, you will be able to rejoin it so long as the session is still active (at least one other person is in the chat). 1. View > Chat Rooms. Even if you do not normally belong to any chatrooms (next page), the chatroom popup appears to show you the group chats you had joined that are still open. 2. Select this group. The Group Chat window reappears. This is a group chat that you were in and that is still open with other people.
Bria 3 for Mac User Guide – Enterprise Deployments 4.4 Chat Rooms Chat rooms are set up to allow the same group of people to have a group IM session, usually on a regular basis. For example, your system administrator may create a chat room called “Marketing” and add the marketing staff as members. Every Monday at 8:00 a.m., each member opens the chat room on Bria and joins the conference. You can only use chat rooms if your system administrator has set up chat rooms and added you as a member.
CounterPath Corporation 4.5 Viewing the Message Archive You can view your recent IM activity for any contact or group chat session. Control-click a contact and choose View Message Archive. Or go to the menu bar and choose View > Message Archive.
Bria 3 for Mac User Guide – Enterprise Deployments 4.6 Sending and Receiving Files Sending Files If you have an XMPP account, you can send files to another contact who has a Jabber address (meaning that they have an XMPP account). 1. Control-click a contact and choose Send Files; a standard Open dialog box opens. 2. Select the files to send and click Open. The Send Files dialog appears with a “waiting” message. If you want, you can cancel the send before the other person retrieves the file.
CounterPath Corporation 34
5 The Contacts Tab The Contacts tab displays your contacts. Each contact is shown with presence information and icons for singleclick phoning and IMing. If the Contacts tab is not showing, go to the menu bar and choose View > Show Contacts. Add a Contact Search field Contacts are typically organized into groups. Bria includes built-in groups. Yo can add more groups, as desired. The online status of contacts. See page 45.
CounterPath Corporation 5.1 Populating the Contact List At any time, but particularly when you first deploy Bria, you may want to populate the contact list with contacts from an external source. Populating from an LDAP Directory If your system administrator has set up an LDAP directory, you can create contacts from it: 1. Make sure Bria is configured to connect to this directory (page 67). 2. From the menu bar choose View > Show Directory. 3.
Bria 3 for Mac User Guide – Enterprise Deployments Populating from the Mac Address Book You can populate the Bria contact list by pulling in the contacts from your Mac Address book. Enabling the Mac Address Book Enable the Mac Address book account that is has automatically set up in Bria. See “Configuring Accounts: the Accounts Tab” on page 55 for more information.
CounterPath Corporation Populating by Importing Contacts You can populate the Bria contact list by importing from an external file or files.Your system administrator may have placed a file on a server for you to import. You can also import your own file or files, as many as required. The new contacts will be added to the existing contacts. Importing You can import a contact list from: • • CSV A comma-separated file. Use this method to import from a Microsoft® Excel® file.
Bria 3 for Mac User Guide – Enterprise Deployments Populating from another XMPP Account If you already have an XMPP account independent of Bria (for example, a Gmail™ webmail service account), you can create an account in Bria and pull your contacts into the Bria contact list. You will be able to IM these contacts directly from Bria. 1. Choose Softphone > Account Settings. The Account Settings window appears. 2. Click Add > New XMPP Account. The XMPP Account window appears. 3.
CounterPath Corporation 5.2 Managing Contacts and Groups Adding a Contact Click , or control-click a group and choose Add Contact to Group. The Contact dialog appears. To enter a phone number, select the type, enter the number, and click + The new number appears in the list Field Description Contact Summary Group Click to show the list of groups. Check each group this contact should belong to. Primary Call If the contact has more than one number, select the primary number.
Bria 3 for Mac User Guide – Enterprise Deployments Example – Contact in an Enterprise that Uses SIP for Presence This example shows how to add a co-worker when your enterprise uses SIP for instant messaging and presence. This example assumes that presence/IM is allowed on your SIP account; see page 55. Enter the person’s office number or extension in the Softphone field As soon as you add a Softphone entry, this field automatically appears.
CounterPath Corporation Example – Contact in an Enterprise that Uses XMPP for Presence This example shows how to add a co-worker when everyone has an enterprise extension plus a separate XMPP address for instant messaging and presence. Enter the XMPP address in the Instant Message field. Include the domain (@domainA.
Bria 3 for Mac User Guide – Enterprise Deployments Adding a Contact using an Existing Address You can add a contact by capturing existing information: • • If you are on a phone call with a person who is not a contact, click the Add to Contacts icon in the call panel. On the History tab, select an entry that is not a contact. Control-click and choose Add Contact. The Contact Profile dialog appears. Complete the dialog as desired and press OK.
CounterPath Corporation 5.3 Using Contacts Hover to reveal icons. Click the phone icon to call using the primary phone number. Or click the IM icon to send an IM using the primary presence address for this contact. You can watch the contact’s online status, if the contact has a softphone address. See page 47 for the meaning of the online status icons. See “Sharing Online Status” on page 45 for information on obtaining online status information.
Bria 3 for Mac User Guide – Enterprise Deployments 5.4 Sharing Online Status You can publish your online status to contacts who have softphone address, and you can set up Bria to view the online status of other contacts. Typical online statuses are available, on the phone, busy, and so on.
CounterPath Corporation Allowing Other Parties to See your Status (Publishing your Status) Continuing from above, when the other person allows the notification request, your name is added to their contact list. As soon as you are added to their list, a request is sent back to you requesting that they be able to see you. Bria accepts this request automatically, and the other person can now see your status.
Bria 3 for Mac User Guide – Enterprise Deployments Setting your Online Status Changing your Status Click the down arrow beside the online status indicator on Bria, and select the desired value. See the table below. Setting up Online Status Indicators Indicator Available Meaning for your Status Either: Meaning for Others’ Status You can contact this person. • You have set your status to this value. • Bria has determined that you are logged on but not on the phone or idle.
CounterPath Corporation Adding Contacts to the Alert List (Buddy Pounce) You can add a contact to the Alert List in order to request to be notified when the online status of a contact changes. In the contact list, control-click the selected contact or contacts and choose Add to Alert List. The Alert List icon appears beside the contact. When the contact’s status changes, a notification appears.
Bria 3 for Mac User Guide – Enterprise Deployments 5.5 Privacy You can control how contacts and other people can contact you by phone or IM, and you can control whether your contacts can see your availability information (whether you are online, one the phone, and so on). You can set up controls in advance or “on the fly” (as phone calls and presence requests come in). Setting up Controls in Advance To set up controls in advance, see “Preferences – Privacy” on page 61.
CounterPath Corporation 50
Bria 3 for Mac User Guide – Enterprise Deployments 6 Using Other Resources 6.1 The History Tab Incoming missed call Outgoing call, either attempted or established Incoming call that was answered From the menu bar, choose View > Show History. Managing the List of Calls You can control-click on an entry in a list to: • • • • Delete the call. Delete all entries in this list. Edit the profile if the entry is a contact. Add as contact. The Contact dialog appears.
CounterPath Corporation 6.2 The Favorites Tab To view the Favorites tab go to the menu bar and choose View > Show Favorites. You can create favorites from your contact list. They will be displayed in both the contact list and in the Favorites tab. Select the desired contacts, then control-click and choose Add to Favorites. Quick links to IM or phone this person Menu for other actions You can perform nearly all the same actions on the contact in Favorites as you can in the contact list.
Bria 3 for Mac User Guide – Enterprise Deployments 6.3 The Directory Tab The Directory tab is available only if your system administrator has set up Bria to access a corporate directory. To view the Directory tab go to the menu bar and choose View > Show Directory. Only one number appears for each entry. There may be other numbers that will show if you try to call this person. Phone a Person Control-click an entry and choose Call or Video Call. The call is placed immediately.
CounterPath Corporation 54
7 Configuring Bria From the menu bar, choose Bria > Preferences. The Preferences window appears. • • When configuring Bria the first time, click the Accounts tab and set up the account. Then complete other tabs as desired. After the initial setup, display whichever tab you want. 7.1 Configuring Accounts: the Accounts Tab Choose Bria > Account Settings from the menu bar. The Account Settings window appears, showing all the accounts set up.
CounterPath Corporation • • • You will create an XMPP account at startup if your enterprise uses XMPP for presence. Again, you will follow instructions from your system administrator. If you already have an XMPP account independent of Bria (for example, a Gmail account), you can create an account in Bria and pull your contacts into the Bria contact list. You can then IM these contacts directly from Bria. Enable the Mac Address Book account, if desired.
Bria 3 for Mac User Guide – Enterprise Deployments SIP Account Properties – Voicemail In general, your system administrator will provide the values for fields in this tab. The only fields that you can set to suit yourself are: • Always forward to this address: To always forward phone calls, click the box and enter the address to forward to. Phone calls received on other accounts (if you have them) are not affected by enabling this field. Always forward works only when Bria is running.
CounterPath Corporation XMPP Account Typically, you create an XMPP account if: • • Your enterprise uses XMPP for presence. You already have an XMPP account independent of Bria (for example, a Gmail account). When the account is created, those contacts are pulled into the Bria contact list. You can then IM these contacts directly from Bria.
Bria 3 for Mac User Guide – Enterprise Deployments Table 1: XMPP Account Properties – Account Field Outbound proxy Resource Priority Description The value in User ID and in this setting may be used by Bria to compose a valid jid: • If User ID=bob@ABC.com and Outbound proxy is empty, jid=User ID: bob@ABC.com • If User ID=bob@ABC.com/home and Outbound proxy is empty, jid=User ID: bob@ABC.com • If User ID=bob@ABC.com and Outbound proxy=XYZ.com, ignore the Outbound proxy; User ID=bob@ABC.
CounterPath Corporation 7.2 General Preferences From the menu bar, choose Bria > Preferences. The Preferences window appears. All the tabs on this window except for “Accounts” are preferences tabs. These tabs let you control the way that you work with Bria. Preferences – Application This panel lets you set your preferences for general GUI behavior and lets you set up for login.
Bria 3 for Mac User Guide – Enterprise Deployments Preferences – Privacy You can control how contacts and other people can contact you by phone or IM, and you can control whether your contacts can see your presence information (whether you are online, on the phone, and so on). General Tab In “Global Contact Settings”, choose one option. If you choose “Only people in my contact list”, then all contacts will be able to contact you unless their name or their domain is in the Blocked list (below).
CounterPath Corporation Preferences – Alerts & Sounds This panel lets you control the alert box and lets you assign sounds. Enable Alert Displays You can control whether the Call Alert box is displayed in different situations. You can also control how you are alerted to an incoming IM: either with a small IM Alert box or with the IM window itself. Assigning Sounds You can assign specific sounds to a variety of actions or “events”. 1.
Bria 3 for Mac User Guide – Enterprise Deployments Preferences – Devices Bria automatically detects devices at each startup, and selects the most appropriate device for each purpose. If you do not like this selection, you can override it on this panel. If you override a selection, it will apply the next time you start Bria, unless the device is no longer available, in which case Bria will again select the device to use.
CounterPath Corporation Field Description Headset Mode Microphone, Speaker Change these fields only if you want to override the devices that Bria automatically selected. In both these fields, select the headset you are using. The headset is the device that is usually used for the speaker (the sound you hear) and microphone (recording your voice). The only situation in which the headset is not used is when the Speaker Phone button on the dialpad is pressed.
Bria 3 for Mac User Guide – Enterprise Deployments Preferences – Network Select the type of network connection for your computer. The sliders move to show the bitrate that will be used for sending and receiving. These rates are typical rates for the selected configuration. If you know that your computer and network can handle a faster sending speed, click Custom and move the slider. It is recommended that you not change the receiving speed.
CounterPath Corporation Preferences – Media Quality Field Description Audio Quality Reduce echo Reduce background noise Turning this feature on improves sound quality. This feature is typically on. Automatically attempts to remove background noise. Typically on for the speakerphone. Automatic gain control This feature is typically on. Preserve bandwidth When this feature is on, Bria stops sending audio when you are not talking.
Bria 3 for Mac User Guide – Enterprise Deployments Preferences – Call Automation These settings let you configure how you want auto answer to handle incoming calls, when Auto Answer is enabled. (To enable Auto Answer, see page 15). Preferences – Directory Generally, change the settings on this panel only if advised to do so by your system administrator.
CounterPath Corporation Preferences – Advanced Field Description Audio DTMF Set this field as directed by your system administrator. RTP Set this field as directed by your system administrator. Call Recording The folder where files for recording of phone calls will be saved. File Transfer The folder where received files will be saved. Web Page Tabs You can set up a web page as a new tab in the Resources panel; it will appear alongside Contacts, History and so on.
A Troubleshooting From the menu bar, choose Help > Troubleshooting. The Troubleshooting window appears. Testing Audio Quality While you are on a phone call, you can test the quality of the audio. Note that to perform a valid test, you should be on an established call (not a call attempt).
CounterPath Corporation Testing Video Quality While you are on a phone call, you can test the quality of the video. Note that to perform a valid test, you should be on an established call (not a call attempt).
Bria 3 for Mac User Guide – Enterprise Deployments Testing the Network Connection You can verify that you are successfully connected to the network.
CounterPath Corporation Testing Audio Devices You can verify that your microphone and speakers are working and can set the volume to a comfortable level without having to actually place a phone call.
Bria 3 for Mac User Guide – Enterprise Deployments Diagnostics Only use this panel if instructed to do so by your system administrator. To start logging Bria activity and send a logging report to CounterPath customer support: 1. Click Start Logging. The first Diagnostics Logging window appears. 2. Select the problem you are experiencing and click Start Logging. 3. On the second Diagnostics Logging screen, click Finish. Logging will start. 4.
CounterPath Corporation B Contact List Headings Following is a list of all the headings that are used in the Bria contact list. This list can be useful when formatting a contact list in order to import it into Bria. For details, see “Populating by Importing Contacts” on page 38. s Heading Description business_number business_numbern, where n is 2 to 6 categories Maps to Bria groups default_address Maps to the Presence field default_address_comm Always specifies IM, if default_address is specified.
Bria 3 for Mac User Guide – Enterprise Deployments C Glossary Broadband Codec Dial plan DTMF Firewall IM MWI Narrowband Presence PSTN SIP account Softphone address USB device vCard VoIP service provider Broad or wide bandwidth. In data transmission, the wider the band, the more data it is possible to transmit in a given time span. A cable, DSL and ADSL connection to the network provide broadband for data transmission.
CounterPath Corporation 76