THE INSTALLATION AND OPERATING INSTRUCTIONS IN THIS MANUAL APPLY TO THE FOLLOWING WOODFIRES:Free standing models:- MASPORT TALISMAN MASPORT HORIZON MASPORT LE 2000, 2000/S, 2000/W MASPORT LE 3000, 3000/S, 3000/W (Series 2 models) MASPORT LE 5000, 5000/S, 5000/W (Series 2 models) MASPORT LE 7000, 7000/S, 7000/W (Series 2 models) MASPORT LE 7000 MASPORT COLORADO (Series 2) MASPORT PANORAMA (Series 2) and (Series 3) MASPORT GRANDVIEW MASPORT TORONTO In-built models:- MASPORT LE 3000 PROVINCIAL (Series 2) MA
CONTENTS INTRODUCTION............................................................................2 FREE-STANDING MODELS — INSTALLATION UNPACKING ..................................................................................3 ASSEMBLY ....................................................................................3 POSITIONING ............................................................................4, 5 HEARTH (FLOOR PROTECTOR) REQUIREMENTS...................6 CORNER HEARTHS (FLOOR PROTECTORS)....
INTRODUCTION In the interests of your safety, most building regulatory Authorities in Australia and New Zealand require any woodfire installation to comply with the relevant National Standard. They may also have local requirements in addition to those in the Standard so you should approach your local Building Authority before commencing installation to establish whether you will require a Permit and whether you will need to meet extra requirements.
FREE-STANDING MODELS (See page 11 for in-built models) UNPACKING After removal of the shipping carton, open the door and take out all loose parts except the polystyrene packers above the top baffle. Do NOT discard the top baffle. You may find it more convenient to lift the door from its hinges at this stage. Remove and discard the four bolts holding the woodfire to the shipping pallet. Remove the woodfire from the pallet, lifting only from the lower edge of each side.
POSITIONING YOUR FREE-STANDING WOODFIRE Free-standing woodfires must not be installed in a fireplace or alcove, or under a ceiling of less than normal height. No wall or other immovable object may be closer to the front of the woodfire than one metre. If a water heating accessory is to be fitted, a further positioning restraint is the need to be close to your hot water storage cylinder (See page 10).
g Note: Clearances are for fire hazard only. For durability of finishes or surfaces you should contact the relevant manufacturer for their specification. MASPORT accepts no responsibility for the deterioration of surfaces or finishes.
HEARTH (Floor Protector) REQUIREMENTS — FREE-STANDING MODELS Unless your woodfire will be standing on an un-covered fireproof floor which extends at least as far as the minimum hearth areas shown below, it will be necessary to provide a hearth for floor protection. See page 8 for construction details. Where the minimum requirements bring the edge of the hearth nearly to a wall, it is better to extend the hearth to meet the wall.
6
CORNER HEARTHS (Floor Protectors) While the information in the previous section details the MINIMUM size of hearth necessary to comply with the Safety Standards, it may often be desirable to use a somewhat larger area of hearth for æsthetic reasons. A particular example is when the woodfire is installed diagonally in a corner. A neater appearance will result if the hearth is carried right into the corner and is shaped as shown below.
HEARTH (Floor Protector) CONSTRUCTION In Australia the minimum hearth construction requirement is a sheet of 6mm fibre cement board. It is usually fastened directly to the floor. In New Zealand, only the LE 3000 Series 2, the Panorama and the Grandview models require an insulating hearth. All other current models may be installed on an ash hearth. Naturally, all models may be installed on insulating hearths if desired.
FINAL ASSEMBLY Before using the woodfire, the internal firebox components must be placed in their correct positions. No force should be required to fit them, and they can be removed, if desired, for flue cleaning. However, they MUST be in place, and in good condition, before lighting the fire. All Masport models are supplied with either fire-bricks or insulating board to line the firebox. The LE 2000 has insulating board already fixed in position at the factory.
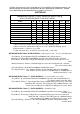
INSTALLING A WATER HEATING BOOSTER Water heating booster tubes can be fitted to woodfires sold in New Zealand. Fitting a water booster tube converts an /S model into a /W type. If a tube is retro-fitted, in some cases the air metering plate must be changed to ensure that emission requirements are still met. In addition, the LE 3000 and LE 5000 in the ‘Christchurch’ clean air zone will require a special secondary air tube (see table below).
IN-BUILT MODELS (See page 3 for free-standing models) All current LE Provincial models (Australian and New Zealand), can be fitted with threespeed air circulating fans. (Fans are not permitted in Provincial fires installed in the Clean Air Zones of Christchurch and Canterbury). These are mounted inside the ash shelf which protrudes below the firebox door.
HEARTH (FLOOR PROTECTOR) LE 3000 Provincial hearths should be at least 900mm wide, and LE 7000 Provincial hearths must be at least 1080 wide. MINIMUM HEARTH EXTENSIONS, measured from the face of the masonry surround:AUSTRALIA — 375mm for the LE 3000 Provincial, and 430mm for the LE 7000 Provincial. ( Both regardless of hearth height). NEW ZEALAND — For LE 3000/S and /W Provincials:Hearth Elevation 60 or more 50 mm 25 mm Zero Min.
With the ash shelf removed, fit the fascia to the firebox case, keeping a gap of about 2mm between the hearth and the lower edge of the fascia. (See illustration) DOOR Hook the bottom pivot over the lower end of the hinge pin and lift the door up until the top pivot drops over the top end of the hinge pin. ASH SHELF Hang this on the posts at the bottom of the fascia, taking care to feed the mains flex for the fan through the fascia side panel as the shelf is lowered into position.
OPERATING INSTRUCTIONS — ALL MODELS BASIC INFORMATION DOOR HANDLE Front mounted handles. Swing the door open and shut with the handle in the 12 o’clock position. Latch the door shut by pushing in on the handle and turning it to the 3 o’clock position. Side mounted handles. The door is opened by pulling forward on the lower part of the handle. Hold the handle in this forward position when shutting the door, finally pushing it back to vertical to lock the door.
LIGHTING UP (Continued) When the kindling is well alight, open the door slowly and add some larger pieces of wood. Do not throw fuel pieces into the firebox as this could damage the top baffle and the insulating boards or firebricks. Close and latch the door firmly. Move the heat output control away from the maximum position only after the fire is well established. We recommend running at full heat for up to one hour after lighting as this will minimise creosote build-up in the flue.
SAFETY • Always keep children well away from the woodfire when it is alight. • Do not put furniture, clothing, firewood or other combustibles near the woodfire. The minimum safe distance is 420mm from the sides and 1 metre from the front. • Do not leave the fire unattended with the door open. • Accidental fires can be caused by wrapping seemingly cold ashes in paper. It is much safer to place ashes outside in a metal container with a close fitting lid.
MAINTENANCE ASH REMOVAL This should be necessary only very occasionally. Simply shovel out any excess, always leaving a bed of sand or ash to the tops of the ribs on the bottom of the firebox. CLEANING THE GLASS A good hot fire will burn away any deposits left from a long slow burn. If desired, a NONCAUSTIC oven cleaner can be used. CLEANING THE CABINET OR FASCIA A damp rag with a touch of household detergent is sufficient to maintain the finish.
BEFORE EACH HEATING SEASON. To ensure continued safety, check the condition of the following items, replacing, if necessary, with only Masport approved spare parts. 1. The flue system, particularly flue sections nearest the firebox. 2. The firebox top baffle. 3. The firebox liners (bricks and boards). 4. The door gasket. MASPORT WOODFIRES ARE MANUFACTURED IN NEW ZEALAND BY MASPORT LTD. 1/37 MT WELLINGTON HIGHWAY. P.O. BOX 14-349 PANMURE, AUCKLAND NEW ZEALAND.