
Operating instructions


10 DR
®
POWER GRADER™
Unpacking the DR POWER GRADER
NOTE: Unpacking the DR POWER GRADER is a two-person job. We recommend you have an extra set of
hands available before you begin, as the DR POWER GRADER weighs about 230 lbs.
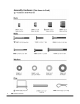
Tools Required:
• Metal Shears (Side Cutters)
• Knife
• Eye Protection
• 9/16" Wrench
WEAR EYE PROTECTION WHEN CUTTING THE BANDING. THE BANDING MAY HAVE A LOT OF
TENSION ON IT AND MAY SNAP AND CUT YOU. ALWAYS STAND TO ONE SIDE WHEN CUTTING THE
BAND.
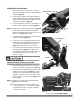
1. Place the carton near a flat surface large enough to hold the uncrated DR POWER GRADER.
2. Stand to one side and cut the banding around the shipping carton, and then remove the top of the
carton.
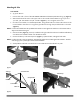
3. Cut the ties on the Yoke Assembly and remove the Yoke with the Control Cable attached.
NOTE: The excess Control Cable is coiled and tied in the Weight Tray ready for connection to the Battery and
Linear Actuator.
4. Cut the ties and remove the Tow Bar and Linear Actuator.
5. Remove the Small Parts Box and the Battery Assembly from the Weight Tray.
6. For now, leave the DR POWER GRADER on the shipping pallet for ease of assembly.
7. Check the parts supplied against the Parts Checklist on the next page. Most of the assembly
hardware is loosely assembled to the frame and major components.
NOTE: Do not discard the packaging material until you are fully satisfied with your new machine.
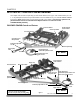
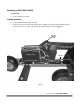
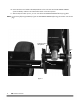
Figure 2
Tow Yoke
w/Receptacle Mount
Yoke tied to Frame. Tie
Power Cord and Control Cable
Tow Bar
Small Parts Box
w/Linear Actuator
Drag Screen
(Optional Accessory)
Weight Tray
Battery Assembly
in Weight Tray
Shear-Bolt