
Operating instructions


CALL TOLL FREE 1-800-DR-OWNER 21
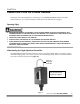
Figure 17
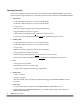
Figure 18
Attaching the DR POWER GRADER Control Box w/Rocker Switch
The following procedure includes the steps necessary for attaching the DR POWER GRADER Control Box
w/Rocker Switch to your Tow Vehicle. There are two (2) options for attaching the Control Box:
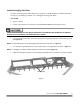
1. Hang the Control Box by the attached U-Bolt (Figure 16) in an accessible and comfortable position
on your Tow Vehicle from which you can operate the Height Adjustment Control Box w/Rocker
Switch, or
2. Attach the Control Box on a clean flat surface using the self-adhesive Hook and Loop strips
provided with the DR POWER GRADER (Figure 16).
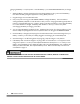
NOTE: Under some conditions, where very tight turning radii are encountered, the tension on the Control Box
exerts a side thrust which can cause the Control Cable to be pulled from the Quick Disconnect Receptacle
Box. In addition, if the Shear-Bolt should shear, the Control Cable must pull straight out of the Receptacle
Box to disconnect freely. To assure this, tie the Control Cable to the Tow bar using the following procedure.
1. Install a Safety Snap Pin into the hole in the Tow Bar and around Control Cable (Figure 17).
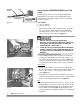
2. Run a Wire Tie around the Control Cable and through the Yoke on the Safety Snap Pin (Figure 18).
3. Put the end of the Wire Tie into the Wire Tie Catch and draw the Tie closed, but do not tighten it
completely (Figure 18). The Control Cable should be free to slip through the Tie during turns.
Figure 16
A
ttached U-Bolt
Control Box
Hook Strip attached to
back side of Control Box.
Clean flat surface
on Tow Vehicle.
Loop Strip
Mate up and
push together.
Safety Snap Pin
Control Cable
Wire Tie
Yoke of Safety Snap Pin