
Road-towable Safety & Operating Instructions


CALL TOLL FREE 1-800-DR-OWNER 39
Tools Needed:
• 5/16" Wrench
• 3/16" Allen wrench
• 1/2" socket and ratchet
1. Using a 5/16" Wrench, remove both Access Covers (Chipper and Drive Side) from the Chipper Box
(Figure 1 on page 15).
2. Rotate the Chipper Disk using a stick until the three (3) countersunk Allen Screws and Lock Nuts
attaching the Knife to the Flywheel are visible through the Access Openings.
3. Clean out the heads of the Allen Screws with an awl or sharp tool.
4. Insert a 3/16” Allen wrench into the head of a screw.
5. While holding the Allen wrench, remove the Lock Nut using a 1/2" socket.
6. Repeat Steps 4 and 5 for the remaining two (2) Allen screws.
7. Remove the dull or damaged Knife and visually inspect the Chipper Disk Slot and Knife mounting area
and be sure they are clean and that the replacement Knife will be able to mount flush against the
Chipper Disk.
8. Install a new or sharpened Knife and finger tighten the Allen screws and Lock Nuts (new hardware is
supplied with a new Knife) to hold the Knife to the Chipper Disk.
9. Using a 3/16" Allen wrench and 1/2" socket, tighten the center Screw and Nut, then tighten the outer
Screw and Nut, and finally tighten the inner Screw and Nut.
11. Double-check all three (3) screws for tightness one more time.
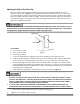
12. Check the gap between the Knife and Wear Plate. See “Adjusting the Knife to Wear Plate Gap” on page
40.