DISHWASHER INSTALLATION GUIDE S P E C I F I C AT I O N S , I N S TA L L AT I O N , A N D M O R E
C OVE DIS HWAS HE R Contents Important Note 3 Cove To ensure this product is installed and operated as safely and efficiently as possible, take note of the following types of highlighted information throughout this guide: Dishwasher 4 Specifications Door Panel 6 7 Installation Troubleshooting 11 Features and specifications are subject to change at any time without notice. Visit coveappliance.com/specs for the most up-to-date information.
C OVE DIS HWAS HE R Product Information Important product information, including the model and serial number, are listed on the product rating plate. The rating plate is located on the left side wall of the unit. Refer to the illustration below. If service is necessary, contact Cove Factory Certified Service with the model and serial number.
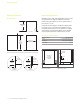
S PECIF ICAT IO NS Opening Dimensions Electrical Requirements D I S HWAS HER Installation must comply with all applicable electrical codes. Any opening into the adjacent cabinet must meet the following: the longest dimension of the opening shall not be more than 11/2" (38). 24" (610) MIN OPENING DEPTH Locate the electrical supply in an adjacent cabinet, within reach of the power cord. Refer to the illustrations below. A separate circuit servicing only this appliance is required.
S PECIF ICAT IO NS Electrical Requirements Plumbing Requirements G RO UNDING INSTRUCTIONS Installation must comply with all applicable plumbing codes. Any opening into the adjacent cabinet must meet the following: the longest dimension of the opening shall not be more than 11/2" (38). This appliance must be grounded. In the event of a malfunction or breakdown, grounding will reduce the risk of electric shock by providing a path of least resistance for electric current.
D OO R PANEL Door Panel S TAINLES S S T E E L PANE L C U S TO M PAN EL M O U N TI N G Stainless steel accessory door panels are available through an authorized Cove dealer. For local dealer information, visit the find a showroom section of our website, coveappliance.com. 1 Remove C U S T O M PANEL the template from the dishwasher door by extracting the screws, then discard the screws. 2 Place the custom panel face down on a protected work surface.
I N S TALLAT IO N Installation P REPAR AT IO N R AC K R EM O VAL 1 Place Remove the racks prior to anchoring the unit. the unit in front of the opening. 2 Measure the height of the opening, then adjust the leveling legs until the unit height is slightly less than the opening height. Refer to the illustration below. To adjust the front, turn the leveling legs clockwise to raise and counterclockwise to lower the unit.
I N S TALLAT IO N Installation P L UMB ING CO NNE CTIONS I N S TALLATI O N 1 Connect Insert the unit into the opening and pull the excess water and drain lines through the access hole as the unit is being installed. the drain line following local code. The drain connection will accommodate 1" (25), 3/4" (19) and 5/8" (16) drain connections. The connection must be cut to fit 3/4" (19) and 5/8" (16) connections.
I N S TALLAT IO N Installation D OO R T ENS IO N ADJUSTME NT K I C K P LATE C LEAR A N C E The door tension can be adjusted to accommodate multiple panel weights. Panel weight can not exceed 16 lb (7 kg). Turn the adjustment nut clockwise to increase tension and counterclockwise to decrease tension. Refer to the illustration below. It is possible to adhere a decorative kickplate to the existing kickplate. The height and thickness can vary, provided it does not impede the door panel rotation.
I N S TALLAT IO N Installation Water Softener C OMPLET IO N 2 For For water softener models only, a salt compartment is located at the bottom of the interior. Refer to the illustration below. Softener salt is available through an authorized Cove dealer. 3 Install Prior to filling the salt compartment for the first time, fill the compartment with water. Water does not have to be added with subsequent refills. 1 Turn the water and electrical supply on.
I N S TALLAT IO N Water Softener Troubleshooting WAT ER HAR DNESS Dishwasher does not operate. For water softener models only, use the test strip provided and the chart below to determine the appropriate water hardness setting. Refer to the chart below to determine the water hardness setting. • Verify power is on.
COVE APPLI ANCE , I NC. P. O. BOX 44848 MA D I SO N , WI 5 3 7 4 4 9013808 REV-B 12 / 2017 C O V EA P P L I A N C E. C O M 8 0 0 . 2 2 2 .