KSC-52 Micro DVR User Guide 1. 2. 3. 4. 5. 6. 7. Getting Started: Basic Functions .................................................................................................................... 2 Uploading Video Files to a PC ....................................................................................................................... 3 Viewing the Files ............................................................................................................................................
1. Getting Started: Basic Functions a) First, charge the KSC52’s internal battery: With both KSC52 slide switches (Power and Remote) in the OFF position, connect the KSC52 to an active USB port on a PC (or use the wall charger). The PC must be powered up for the USB port to be active. The LED light on the KSC52 will light Red, indicating the internal battery is charging. When the Red light goes out, the battery is fully charged. Out of the box, it will take a few hours to charge.
2. Uploading Video Files to a PC The very first time you connect the KSC52 to a PC, Windows has to recognize the KSC52, then load driver files so it can communicate with the KSC52. a) With both the Remote and Power slide switches in the off position, connect the KSC52 to an active USB port on the PC. Use the short USB cable supplied with the KSC52 (a longer cable will not work): This end plugs into the PC’s USB port b) Slide the KSC52 Power switch to the on position.
Folder icon for the KSC52 c) Click on the Folder to open it, the contents look as follows: d) Don’t worry about MicroVi8002.exe and mpegable DS decoder v2.1 Setup .exe, right now just click on the DCIM folder to open it. Inside there is another folder called Video. KSC-52 Micro DVR 4 User Guide v1.
e) Open the Video folder, inside will be the files you recorded. Their icons will look like this: f) Select the video files and drag them onto your desktop, or move them to wherever you want to store them. You can copy, move, rename, and delete the video files just as with any other file in the Windows environment. To delete the files from the KSC52 memory, go back into the Video folder, select, and delete the files. g) To disconnect the KSC52 from the PC, slide the KSC52 Power switch to the off position.
green light will continue to flash even after the KSC52 Power switch is off. Don’t worry, when you unplug the USB cable the LED will stop flashing. PC Connectivity Troubleshooting When you connect any device to a PC USB port, Windows detects, then establishes a basic communications link with the device. The device tells Windows what it is, plus provides information such as the data rate it is designed to operate with. Windows then adjusts settings so it can work with the device.
3. Viewing the Files The video files generated by the KSC52 are in MPEG-4 format, and your PC must be capable of playing this type of video file. If Windows Media Player is installed on the PC, it will play the files after you run a software utility named mpegable DS decoder v2.1 Setup .exe that updates Windows Media Player. Remember mpegable DS decoder v2.1 Setup .exe and MicroVi8002.exe and from #2(d) previously? With the KSC52 connected to the PC, open the KSC52’s folder in Windows (as in step 2(c)).
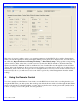
This series of screens is what you use to set operating parameters for the KSC52 (if you wish to change them). When you start this application, the System Option Setting screen shown above displays first. You can click on the other tabs (Operation Password Setting, ID Setting, or Date/Time Setting to bring up their corresponding options windows. Most of the time you will not need to use this; the KSC52 defaults to automatic time/date update (from the PC), 640x480 resolution, and Remote Control enabled.
But the remote control makes the KSC52 more covert; you can have the remote in your pocket and completely control the KSC52 without ever removing your hand from that pocket. Remote control is also the only way to use the KSC52’s picture taking function. Here’s an overview of the remote: The antenna does NOT extend out, so don’t pull on it. The controls you will use most are the PWR button, Video Recording button, and the Photo Shooting button.
not nearly fast enough to capture moving subjects. The KSC52 is not a substitute for a point and shoot digital camera for still photos. Think of this function as an additional, “bonus” feature. You must use the Remote Control function to take photos. See Section #5 above for information on using the Remote Control. The default (and highest) resolution is 1280 x 1024; you can change that using the setup software (see Section #4).
the situation. Up until now that’s all we’ve had as a portable tool for patrol officers; digital voice recorders that could be worn on the duty belt or hand held. 7. Additional Information Refer to the documentation that comes with the KSC52 for more information on the Remote Control status light functions, or for reference only; the operating instructions are confusing. Use the operating instructions in this document. S. Oster Covert Systems, LLC October, 2009 KSC-52 Micro DVR 11 User Guide v1.