BA13-AR/AE BA13-BR/BE 1210964 BA13 사용설명서_수출영문_(09.03.23).indd 1 2009.3.
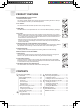
Product features BA13-AR/AE/BR/BE Common Functions 1. Instant warm water system The water is instantly heated when using the rear and front cleaning functions so that you can immediately use water at your desired temperature. 2. Air+ function The water stream with air bubbles provides softer, stronger cleansing. 3. MESH Filter The MESH filter is a semi-permanent item. You can use the filter repeatedly by cleaning it. 4.
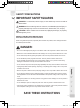
Safety precautions IMPORTANT SAFETYGUARDS Danger: If not observed, serious injury or even death may occur as a result of electrocution. WARNING: If these warnings are not observed, considerable physical injury or property damage may occur as a result of burns, electrocution, fire, or injury. CAUTION: If these cautions are not observed, slight physical injury or property damage may occur. READ ALL INSTRUCTIONS BEFORE USING. Save these instructions for future reference.
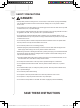
Safety precautions Danger: • If the product produces a strange noise, a burnt smell, or emits smoke, unplug it immediately from the electrical outlet and call our service center. Failing to do so may result in electric shock or fire. • Do not insert a wire or sharp object in any product gaps or the warm air outlet. This may result in electric shock, fire, or product damage. • Do not place an electric heater near the product or dispose of any burning materials such as a lit cigarette in the toilet.
Safety precautions WARNING: • Do not operate or store the unit in locations where flammable or combustible materials are used. This may result in electric shock or fire. • Use main water supply as the supplied water. Industrial water or gray water, if used as supply water may cause skin damage or disease. • Do not block the warm air outlet with your hand. This may result in burns or fire. • Please turn off the main water supply valve when cleaning the filter.
Safety precautions CAUTION: • Do not connect the main water to the hot water pipe. This may result in a malfunction or accident (Make sure to connect it to the cold main water supply pipe). • After the installation, make sure to check the water supply connections for leaks. Rubber packing should be applied to the connection hose. • Do not install the air purifier in a location exposed to direct sunlight. This may result in deformation or discoloration.
Safety precautions GROUNDING INSTRUCTIONS • This product should be grounded. In the event of an electrical short circuit, grounding reduces the risk of electric shock by providing an escape route (wire) for the electric current. This product is equipped with a cord consisting of a grounding wire with a grounding plug. The plug must be plugged into an outlet that is properly installed and grounded. The improper use of the grounding plug can result in electric shock.
Part Names Dimensions The bidet has the following dimensions. Do not install the bidet when the dimensions of the bidet differ from those of the toilet. >> BA13-AR/BR (Round shape) 202 mm 382 mm 411 mm (7.9 inch) (15 inch) (16.2 inch) 202 mm 382 mm 411 mm (7.9 inch) (15 inch) (16.2 inch) 202 mm 382 mm 411 mm (7.9 inch) 134 mm 350 mm (5.3 inch) (13.8 inch) 134 mm 350 mm (15 inch) (16.2 inch) (5.3 inch) inch) >> BA13-AE/BE (Elongated(13.8 shape) 134 mm 350 mm (5.3 inch) (13.
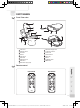
Part Names Front / Rear view 1 12 2 3 13 4 14 15 5 7 8 17 6 11 9 10 16 1 2 3 4 5 6 7 8 9 Seat cover Warning sticker IR sensor Nozzle Seat sensor Bidet seat Water tank hose Bidet hose Main water supply pipe Main water supply valve connector 12 Power cord 13 Product sticker 14 Drain plug 15 Button 16 Installation plate 17 MESH filter 10 11 T-shaped Remote control BA13-AR/AE BA13-A BA13-BR/BE BA13-A BA13-B BA13-B 8 1210964 BA13 사용설명서_수출영문_(09.03.23).indd 8 2009.3.
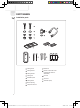
Part Names Installation parts 1 9 8 2 3 7 4 6 5 10 11 12 13 1 2 fixing screws 9 Bidet hose 2 2 fixing rubbers 10 3 2 fixing washers 4 2 fixing nuts Remote control wall mount (including the sticker for attachment) 11 2 screws 12 2 anchors 5 6 7 8 Installation plate 2 fixing sliders Rubber packing 13 3 batteries (AAA) T-shaped connector 9 1210964 BA13 사용설명서_수출영문_(09.03.23).indd 9 2009.3.
Check before using your product Please keep in mind! Connect the power. Plug the power cord into the electrical outlet. The bidet only works normally when the electricity is connected. Tips T his product is for 120 V~ / 60 Hz only. Make sure to connect the power plug to a grounded electrical outlet (120 V~ / 60 Hz) dedicated to the product. Open the main water supply valve. The bidet only works normally when water is supplied. Check whether the product is in eco mode before using it.
Check before using your product Configuring a special mode Selecting/cancelling silent mode 1. P ress and hold down the ‘Power’ and ‘Rear Cleansing’ buttons simultaneously for at least 1 second when the power cord is plugged into the electrical outlet (an alarm sound is generated). 2. Set the mode by pressing the ‘Power’ button on the operation part. - If the power indicator is turned on this indicates that silent mode has been set.
Checking the CONTROL PANEL ※ You can use the basic functions such as rear cleansing and nozzle cleaning from the bidet’s control panel without using the remote control. Display Control panel 21 51 31 41 3 2 11 1 11 Display 11 51 Remote control signal receiver This receives the signals from the remote control. 21 Remote control signal receiver This receives the signals from the remote control.
Checking the CONTROL PANEL Display / Control panel Display Remote control 1 signal transmitter Control panel 1 ‘Rear’ button 2 ‘Front’ button 3 ‘Stop’ button 4 ‘Dry’ button 5 ‘Move’ button 6 ‘Water Pressure/Dry Temp.’ button 7 ‘Nozzle Position’ button ‘Water Temp.’ indicator 2 ‘Seat Temp.’ indicator 3 8 ‘Wide’ button ‘Wide’ indicator 4 9 ‘Water Temp.’ button 10 ‘Seat Temp.
Checking the CONTROL PANEL Display 1 Remote control signal transmitter Transmits the signal when a remote control button is pressed. 3 ‘Seat Temp.’ indicator Whenever the ‘Seat Temp.’ button is pressed, the temperature control indicator cycles through the following options: L(Blue) M(Pink) H(Red)Off. 21 ‘Water Temp.’ indicator Whenever the ‘Water Temp.’ button is pressed, the temperature control indicator cycles through the following order: L(Blue) M(Pink) H(Red) Off.
Using your bidet Using the rear nozzle Using the rear nozzle 1. Sit down on the seat and press the ‘Rear Cleansing’ button on the operation part. 2. Self-cleaning for the rear cleansing nozzle is performed, removing the cold water remaining inside the nozzle before the water stream is ejected so that the water can be set to a desired temperature for cleansing. T he cleansing water ejection time may be delayed while the above functions are performed. Tips 3.
Using your bidet Using the front nozzle Using the front nozzle 1. Sit down on the seat and press the ‘Front Cleansing’ button on the operation part. 2. Self-cleaning for the front cleansing nozzle is performed, removing the cold water remaining inside the nozzle before the water stream is ejected so that the water can be set to a desired temperature for cleansing. T he cleansing water ejection time may be delayed while the above functions are performed. Tips 3.
Installing your bidet Removing existing toilet seat 1. Remove the existing toilet seat ① and seat cover ② by removing the fixing nuts. 2 1 Tips K eep the removed toilet seat in a shaded location to prevent it from being damaged. Installing the product A s the bidet should be installed on the toilet, ensure that water is not splashed onto the bidet. Tips T here may be some water remaining inside the filter which was used to test the product during the inspection process at the factory.
Installing your bidet Installing the product 3. P lace the fixing slider over the installation plate on the toilet, insert the fixing bolts, and fasten the nuts so that the installation plate is fixed. 4. Align the back of the bidet to the installation plate and push the bidet backwards while pressing the button to the left of the bidet. (Hold the bidet with both hands and push it backwards until it clicks into place). Check if the bidet moves to the left or right.
Installing your bidet Installing the remote control wall mount M ake sure to install the remote control wall mount on the wall using the supplied screws. Failing to do so may result in the product falling and being damaged. Tips I f the bathroom has 3 sides in a black or similar color, use the remote control while fixing it to the wall holder. F ailing to do so may result in the product not working properly due to the remote control signal reception ratio being too low. 1.
Cleaning and maintaining your bidet Cleaning the nozzles I f excessive force is exerted on the nozzles when cleaning them, the nozzles may no longer work properly or break. Hold the nozzles lightly when cleaning them. W hen cleaning the nozzles, Nozzle cleaning water is emitted. (However, when main water supply is not supplied (main water supply stop status), no nozzle cleaning water is emitted and only the nozzle is extended). Tips 1.
Cleaning and maintaining your bidet Removing the product 1. Unplug the power cord from the electrical outlet. 2. Close the main water supply valve. 3. P ull the product forwards by holding both sides of the product while pressing the button at the bottom left of the product, to separate the product from the installation plate. Tips Unplug the product if it will not be used for a long time. 4.
Cleaning and maintaining your bidet Cleaning the MESH filter 3. Clean the MESH filter by shaking it under flowing water. - Removing foreign substances from the MESH filter with a toothbrush is more effective. - Do not clean the MESH filter excessively, as it may damage the MESH. 4. Reinstall the cleaned MESH filter into the product. - Check that the MESH filter is installed correctly.
SPECIFICATIONS Product name Coway Bidet Model no. BA13-AR/AE/BR/BE Standard power voltage 120 V~ 60 Hz Power consumption 1 200 W Supply water pressure 0.11 MPa - 0.68 MPa Dimensions BA13-AR/BR 382 mm (Width) × 493 mm (Depth) × 144 mm (Height) BA13-AE/BE 382 mm (Width) × 528 mm (Depth) × 144 mm (Height) Weight Maximum 0.5 L/min, automatic nozzle self-cleaning function Front cleansing Maximum 0.
TROUBLESHOOTING The bidet may operate abnormally due to minor causes not because of a product malfunction but because the user is unfamiliar with using the product. In such a case, problems can be easily solved even without the help of the Service Center by checking the following. If you cannot solve the problem after checking the following items, please call the Service Center. PROBLEM SOLUTION The product is not working. • Make sure the bidet is plugged in. • Check if there was a power failure.
Model: Serial Number: Customer Name: Date of Purchase: WARRANTY CARD OR WARRANTY LETTER ONE YEAR LIMITED WARRANTY BIDET BA13-AR/AE/BR/BE (‘PRODUCT’) (‘OWNER’) What This Warranty Covers: Limitations and Exclusions: Commencing with the date of purchase of the Product and continuing for a period of one year, if manufacturing defects in the Product cause the Product to not operate properly for its intended use, then subject to the exclusions, conditions, and limitations contained herein, COWAY at its sole
Limitations on Implied Warranties: Any implied warranty of merchantability or fitness for a particular purpose or use, shall be limited to the Waiver: COWAY’s failure at any time to enforce or rely upon any of the terms or conditions stated herein shall not duration of the foregoing express written warranty. be construed to be a waiver of its rights hereunder.
1210964 001 Made in Korea www.coway.com 1210964 BA13 사용설명서_수출영문_(09.03.23).indd 27 2009.3.