USER GUIDE ver.2.0E Downloaded from www.Manualslib.
COPYRIGHT NOTICE General • iAUDIO is the registered trademark of COWON SYSTEMS, Inc. • This product is for home use only and cannot be used for business purposes. • COWON SYSTEMS, Inc. has the exclusive copyright for this User Guide. It is prohibited to distribute this User Guide in part or in whole without permission. • COWON SYSTEMS, Inc. has the copyrights for JetShell and JetAudio. It is prohibited to distribute or commercially use them without written permission from COWON SYSTEMS, Inc.
Downloaded from www.Manualslib.
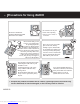
Precautions for Using iAUDIO Do not use iAUDIO for purposes other than specified here in the User’s Guide. Do not let the unit get wet or leave it in a damp place for prolonged periods. If the product is damaged from moisture as described above, product failure is then classified as failure by submersion, and no longer covered by warranty. Moreover, it may not be even be possible to repair the unit with charged for service, and you may no longer be able to use the product.
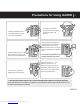
Precautions for Using iAUDIO Touching iAUDIO with wet hands may damage the unit and cause malfunctions. Using iAUDIO in places with high occurrences of static electricity may cause malfunctions. Always use the USB cable supplied by Cowon Systems. 5 Listening to iAUDIO at high volumes for extended periods may harm your hearing. Always backup important files. All data stored in iAUDIO may become deleted when being serviced. Our after-service center does not backup files in iAUDIO units.
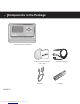
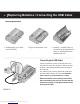
Components in the Package iAUDIO (MP3 Player Main Body) Install CD (JetShell, JetAudio) User’s Guide USB Cable iAUDIO G2 Downloaded from www.Manualslib.
Features 7 MP3, MP2, OGG,WMA, ASF, and WAV (48khz, Stereo) Playback, Voice Recording, FM Radio Receiver and Recording, Direct ADPCM Encoding, Removable Disk Basic Flash Memory Embedded (256MB) 4 Line Graphic LCD USB 1.
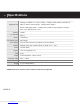
Specifications All ranges of MPEG 1/2/2.5 layer 3 (8kbps ~ 320kbps) (8kHz~48kHz) and VBR All Supported Files ranges of WMA7 WMA (20kbps~ 192kbps) (8kHz~48khz) WMA9 CBR (5Kbps Mono ~ 320kbps Stereo) VBR (Average 48kbps to 256kbps)* WAV (Up to 48KHz Stereo), OGG Memory PC Interface 256MB USB 1.1 Battery 1 AA Battery File Transfer Speed Max. 6Mbps Power Supply Up to 40 hours, based on our company’s test environment.
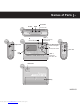
Names of Parts REC/A B button MODE Top Front Left ◀◀ (REW) Previous Title, Rewind Earphone Jack PLAY/STOP button Power On/Off + (VOL +) Volume Up, Cursor Up, Setting Value Up Right Lever (Menu/Navigation) Enter Menu/Navigation ▶▶ (FF) Next Title, Fast Forward MIC LCD Display Back 9 USB Line-in Jack - (VOL -) Volume Down, Cursor Down, Setting Value Down HOLD Switch Battery iAUDIO G2 Downloaded from www.Manualslib.
Replacing Batteries / Connecting the USB Cable Inserting Batteries 1. Push down the cover on the back of iAUDIO. 2. Flip over and open the cover. 3. Insert the – terminal of the AA size battery to the right where the spring is, and then push in the + terminal to the left. Connecting the USB Cable When you open the USB cover on the left of iAUDIO, there is a built-in USB port. Connect iAUDIO to the PC while paying attention to the direction of the USB port.
LCD Display 11 Album Name Song Title Left and Right Output Graphics Progress Bar Current Track / All Tracks JetEffect (BBE, M3B, 3D, MP) 5 Band EQ Battery Charge Indicator BIT RATE Loop Play Sequence Hold Mode The Battery Charge Indicator icon indicates the remaining time for use. Fewer bars are displayed as the battery charge decreases. For some dry or rechargeable batteries, the bars of the battery charger indicator may become unstable while the charge is being measured, but this is normal.
Basic Operations Power On/Off / Connecting USB Basic Operations 1. Power On/Off • When you press and hold the PLAY button, the iAUDIO logo appears and iAUDIO turns on. • When you press and hold the PLAY button again, iAUDIO turns off. (You cannot power off iAUDIO while recording or in USB mode.) • You can turn off iAUDIO automatically by setting Auto Off or Sleep Timer. Push the PLAY button iAUDIO powers on and the iAUDIO logo appreas. To turn iAUDIO off, press and hold the PLAY button. 2.
Basic Operations Basic Operations for Mode Change 13 3. Basic Operations for Mode Change There are three modes: Digital Audio, Voice Recorder, and Line-in Recorder Digital Audio Mode • • • • • • • To change to another mode, press the MODE button to enter Mode menu. 3 modes are displayed for you to select from. Press ◀◀or ▶▶to move to the desired mode. After navigating to the desired mode using menu, press the lever or PLAY button to select the mode.
Basic Operations Basic Operations for Using Menu 4. Basic Operations for Using Menu Example: Changing the JetEffect EQ from NOR (Normal) to ROC (Rock). Menu JetEffect PlayMode Menu JetEffect PlayMode Menu JetEffect PlayMode Digital Audio Mode To enter the menu screen, press the lever briefly. • To move up and down the menu, press + or –. • To enter submenus, press the lever or push ▶▶. • To move up the menu, push ◀◀.
Basic Operations Basic Operations for Using Navigator 15 • Navigator Popup Window • When you press the lever, an appropriate popup window appears according to the folder, file, or Dynamic PlayList file • Press + or – to select a popup item. • Press the PLAY button or press ▶▶ select a popup item. • When you press the REC button, the popup window is canceled and closed.
Simple Operations by Mode MP3 Player Mode MP3 Player Mode 1. Power On and Play • When you press and hold the PLAY button, the iAUDIO logo appears and iAUDIO powers on. • When iAUDIO powers on, it starts playing automatically if Autoplay is set. • When the Resume feature is set, iAUDIO saves the last played track and position, and playback begins from there. • When you want to go to MP3 Player mode and listen to music, turn iAUDIO power on and press the MODE button.
Simple Operations by Mode MP3 Player Mode 4. Setting Loop: 5. HOLD: 17 Use the REC (A B) button while playing tracks in MP3 Player mode. Press the button to set the loop start point. The (A ) icons appears at the bottom middle of the LCD. Press the button again to set the loop end point. The icon changes to (A B). This audio block starts to play repeatedly. When you wish to release this feature, press the REC button again. Push the HOLD switch to the left.
Simple Operations by Mode Voice Recorder Mode Voice Recorder (Recording Voice with Built-In Mic) When iAUDIO is not in Voice Recorder, press the lever to enter the Mode menu and select Voice Recorder from the menu. Press the REC button to start recording. The sound is recorded in a pre-defined recording quality, and the file is saved as V***.wav in the 『VOICE』 folder under the 『RECORDS』 folder. (“***” represents a 3-digit consecutive number.) To finish recording, press the REC button again.
Simple Operations by Mode Line-in Recorder Mode 19 Connect the headphone jack of CDP with the Line-In jack of iAUDIO with a bi-directional stereo jack cable. Press the REC button to switch iAUDIO to recording standby status. iAUDIO automatically monitors the LINE-IN jack and pauses recording until audio signals are received. When you press the PLAY button of CDP, iAUDIO detects signals coming in through the LINE-IN jack and starts recording. The file is recorded as L***.
Troubleshooting Symptom iAUDIO does not power on. There is no sound. Characters in LCD are distorted. Action Description Check if the HOLD button is in the locked position. Try again after pushing the HOLD button to OFF. When the HOLD button is in locked status, iAUDIO buttons do not work. Check if the battery is loaded in the right direction. Replace the battery with a new one. iAUDIO does not work if the polarity of the battery is reversed. iAUDIO does not work when the battery is exhausted.
Troubleshooting Symptom Action I filled my memory capacity, and iAUDIO malfunctions or does not play at all. Initialize iAUDIO, and save the files again but leave 1 to 2 MB of free memory space. There is a “settings.dat” file in the root folder in Flash Memory which is an important system file. When this file is not saved properly, or deleted/damaged during file transfer, malfunctions may occur. After saving hundreds of files in the Root folder, iAUDIO does not work or malfunctions.
Using Buttons MP3 Player Mode MP3 Player Mode Button Operation When iAUDIO is stopped When iAUDIO is playing Play the current track.
Using Buttons Voice Recorder / Line-in Recorder Mode 23 Voice Recorder / Line-in Recorder Mode Button Operation Play/ Pause When iAUDIO is stopped When iAUDIO is playing Play the previous recorded file Pause / Continue Recording Power Off Power Off FF REW MENU Setting Menu Navigator + Volume Up - Volume Down REC/A B Start Recording Stop Recording Mode Menu Select Mode MODE iAUDIO G2 Downloaded from www.Manualslib.
Using Buttons Navigator Navigator Button Operation When a file is selected When a folder is selected Play the selected file and change to MP3 Player mode Expand the folder Play the selected file and the Navigator Mode is retained Expand the folder REW Move to the higher folder Move to the higher folder MENU Pop up Menu Pop up Menu Enter Navigator mode Enter Navigator mode + Move cursor up Move cursor up - Move cursor down Move cursor down Change to MP3 Player mode Change to MP3 Pla
What is JetShell? 25 The current manual was written based on JetShell Pro version. Please be informed that JetShell Basic version does not contain MP3 Encoding and file converting features. What is JetShell? JetShell is the iAUDIO manager program providing the following features: • Downloading/Uploading files from/to iAUDIO.
Connecting iAUDIO and Installing JetShell 1. When you insert iAUDIO installation CD in the CD-ROM drive, the installation program starts automatically. It may not start automatically depending on the settings of Windows. In this case, run x:\setup.exe or x:\JetShell\setup.exe. (where x is the letter of your CD-ROM drive) 2. When the installation finishes, Start -> Program -> COWON -> iAUDIO G2 program group is created. 3. You are now ready to connect iAUDIO to PC (Don’t run JetShell at this time).
Connecting iAUDIO and Installing JetShell 27 For Windows 98 / 98 SE The E:\ drive shown in the illustration is an example, and it may be different from the actual drive name used by your PC. It was given for your reference only. 1. Connect the USB ports of iAUDIO to your PC using the provided USB cable. As soon as the cable is connected, "Add New Hardware Wizard" window is displayed. Click Next. 2. Check "Search for the best driver for your device" and click Next. iAUDIO G2 Downloaded from www.
Connecting iAUDIO and Installing JetShell 3. Check "Specify a location" and click Browse. From the "Browse" window, select the [Win98] folder on the iAUDIO Installation CD, and click OK. 4. USB driver file for iAUDIO is found. Click Next. iAUDIO G2 Downloaded from www.Manualslib.
Connecting iAUDIO and Installing JetShell 29 5. The driver files are copied and installed from the Installation CD. When the installation finishes, a message notifying you of completion appears as shown in the picture. Click Finish. 6. Finally, make sure that installation of iAUDIO was completed normally by checking "iAUDIO G2 Digital Audio Player" displayed under "Harddisk controller" of "Control Panel / System / Hardware / Device Manager". iAUDIO G2 Downloaded from www.Manualslib.
Introducing JetShell The Whole View Play and MP3 Management Section File Management Section File Management Window Flash Memory Management Section Download List Management Section When JetShell is running, it controls the iAUDIO. Make sure to exit JetShell before performing the following tasks: • Installing iAUDIO's USB driver • Formatting iAUDIO in Windows Explorer • Upgrading iAUDIO's firmware iAUDIO G2 Downloaded from www.Manualslib.
Introducing JetShell 31 Player Section Double click an MP3, MP2, WAV, WMA, ASF, Audio CD track, or Playlist (m3u) file in the "File Management Window", or drag and drop files on the "Player Window" shown above. You can also select multiple files and then press the Play button. On the black screen in the middle, various information of current file is displayed, and two types of spectrum screens appear.
Introducing JetShell Flash Memory Management Section The bottom part of JetShell consists of "Flash Memory Management Window" and "Download List Window". When iAUDIO is working normally, the red lamp is turned on with the message "iAUDIO is working" as shown in the figure. The files in iAUDIO displayed in the middle window. The "Memory used" bar shown at the bottom right indicates the used memory size of the total flash memory of iAUDIO.
Introducing JetShell 33 JetShell displays visually cool spectrums. When you click on the spectrum display area, the screen changes as follows. You can also enjoy various equalizers and sound effects. Various Equalizers Various Sound Effects iAUDIO G2 Downloaded from www.Manualslib.
Downloading Music files to iAUDIO Downloading Music files to iAUDIO If you want to download secure WMA files (WMA files from online music store) to iAUDIO, please refer to “Downloading secure WMA files to iAUDIO”. JetShell does not support downloading secure WMA files. You can use Windows Explorer or other file management programs to download music files to iAUDIO. 1. Downloading music files to iAUDIO is very simple. Select files to download from the "File Management Window" and click down arrow. 2.
Downloading Music files to iAUDIO 35 4. Another method is to put the files in the "Download List Window" first, and transfer them later. This is useful when you wish to download files in different folders. 5. You can also download the files existing outside of JetShell by dragging and dropping them onto the "Flash Memory Window". iAUDIO G2 Downloaded from www.Manualslib.
ConvertingAudioCDTrackstoMP3FilesandDownloadingThemtoiAUDIO Converting Audio CD Tracks to MP3 Files and Downloading Them to iAUDIO With JetShell, you can easily convert your Audio CD into MP3 files and download them to iAUDIO. 1. Before getting started, you must choose the quality of the MP3 files to create. Click [Setup] –[MP3 Encoder Option] to set the desired bitrate of the MP3 files. (The files compressed in a high bitrate have a higher sound quality and a bigger file size.
ConvertingAudioCDTrackstoMP3FilesandDownloadingThemtoiAUDIO 37 2. From the File Management section, select the CD-ROM drive in which the Audio CD is inserted. Select the audio tracks from the right window and click or [File] –[Convert CD to MP3] from the menu. 3. Specify the path to save the MP3 files in. Choose a folder in iAUDIO to directly download MP3 files onto iAUDIO. iAUDIO G2 Downloaded from www.Manualslib.
ConvertingAudioCDTrackstoMP3FilesandDownloadingThemtoiAUDIO 4. The converting process is displayed as shown below. iAUDIO G2 Downloaded from www.Manualslib.
Other Features 39 1. Ripping Enhanced CD For some enhanced CDs, you cannot directly select the tracks on the CD. In this case, you can right click your mouse on button and select a track to convert to file as shown in the picture below. However, for some Audio CDs for which copy protection technology is applied, this ripping method may not work. What is an enhanced CD? This is an audio CD that contains video or data for a PC. The tracks appear when you right click your mouse. 2.
Other Features 3. Editing ID3 Tag You can edit the ID3 tag of a MP3 file by selecting [Tools] – [Edit MP3 ID3 Tag] from the JetShell menu. iAUDIO G2 Downloaded from www.Manualslib.
Other Features 41 4. Changing MP3 Bitrate You can change the bitrate of MP3 files by selecting [MP3 Bit Rate Conversion] from the menu. 5. Downloading Logo File You can download a logo file to change the logo screen that appears when iAUDIO powers on. Select [Download Logo File] from the menu. When the "Open" window appears, select the desired logo file and click Open. Then the logo file is downloaded and applied. iAUDIO G2 Downloaded from www.Manualslib.
Installing and Using JetAudio Installing and Using JetAudio The worldwide renowned integrated multimedia player ‘JetAudio’ is included in the iAUDIO Installation CD. To install ‘JetAudio’, run the file "CD-ROM:\JetAudio\setup.exe." For detailed information on using JetAudio, refer to the JetAudio ‘Help’ after installation, or post your question on the Q&A board at the site "http://www.JetAudio. com." iAUDIO G2 Downloaded from www.Manualslib.
Guide to Firmware Upgrade 43 Guide to Firmware Upgrade A. What is Firmware? Firmware is a program embedded in the hardware, which activates various features. By upgrading the firmware, you can enhance the features of the product and eliminate the bugs. B. Notice for Legal Limitations and Responsibilities Regarding Firmware • The performance and menu of iAUDIO may change without prior notice through firmware upgrades. • When you upgrade the firmware, all the data in the flash memory may be deleted.
Guide to Firmware Upgrade D. Upgrading Firmware * You can download the latest firmware from “www.jetaudio.com” or “www.iaudio.com” ① Decompress the downloaded file and run the "setup.exe" file from among the decompressed files. Then the following window appears. If you have already installed firmware setup program before, the following window may appear. In this case, click OK to remove previous firmware setup program, then run "setup.exe" again. iAUDIO G2 Downloaded from www.Manualslib.
Guide to Firmware Upgrade 45 ② Read the License Agreement. To continue installation, click Yes. ③ Specify the destination folder, theck click Next. iAUDIO G2 Downloaded from www.Manualslib.
Guide to Firmware Upgrade ④ Specify a group name, then click Next. ⑤ The files are copied. iAUDIO G2 Downloaded from www.Manualslib.
Guide to Firmware Upgrade 47 ⑥ The installation is complete. ⑦ Connect the USB ports of iAUDIO to your PC using the provided USB cable. (We recommend to connect iAUDIO to the PC directly, not using USB hub) iAUDIO G2 Downloaded from www.Manualslib.
Guide to Firmware Upgrade ⑧ Run the firmware upgrade program by selecting "Firmware Download" icon in "Start / Programs / COWON iAUDIO G2 / Firmware Download". ⑨ Firmware upgrade program searches iAUDIO. Make sure that iAUDIO is properly connected to the PC. If the program cannot find iAUDIO for a long time, click Cancel, disconnect iAUDIO from PC and try again from step 7. iAUDIO G2 Downloaded from www.Manualslib.
Guide to Firmware Upgrade 49 ⑩ When firmware upgrade program finds iAUDIO, the following screen appears. If you check [Format Data Area] option, all the data stored in the flash memory is deleted. Therefore, be sure to back up important files in iAUDIO before upgrading. Furthermore, NEVER remove the USB cable during firmware upgrade, since it may cause malfunctions. After upgrading firmware, make sure that the status has changed to READY on the iAUDIO LCD window before disconnecting USB cable.
iAUDIO G2 Downloaded from www.Manualslib.
iAUDIO G2 Downloaded from www.Manualslib.