
Product Manual


INSTALLATION AND MAINTENANCE MANUAL FORM #PM-003 REV E 09/13
Page 3 of 4
For assembly drawings, parts lists, or specific repair instructions, refer to web site at www.coxreels.com or consult factory.
Coxreels, Inc., 5865 S. Ash Ave., Tempe, Arizona, USA, 85283 Tel: 1-800-269-7335
INSTALLATION OF OUTLET HOSE
NOTE: Before proceeding, ensure that you are installing the proper
size, length and type of hose that the reel is rated for. Consult factory if
unsure of rating.
• Securely install hose reel prior to installing outlet hose.
• Apply thread sealant to male hose fitting and insert into the drum
opening. Note: It is recommended that a swivel type connector be
used to ease installation of outlet hose.
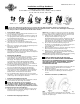
• Thread male hose fitting into outlet riser(s) (Refer to FIGURE 1.0).
Challenger series 100W
• Using a wrench, firmly hold on to riser fitting while tightening hose
connector.
NOTE: The hose clamp restrains the hose when fully extended,
preventing strain on the fitting.
CAUTION: FULLY EXTEND AND CHARGE HOSE BEFORE
INITIALLY WINDING ON TO REEL. THIS PREVENTS FLATTENING
OF HOSE AND EXCESSIVE PRESSURE ON DRUM WHEN HOSE IS
FULLY CHARGED DURING OPERATION.
• Wind hose on to reel. Hold onto crank handle and turn. The operator
should hand guide the hose on to reel to achieve maximum capacity.
• Flush fluid through system. Inspect hose, connections, and swivel for
leaks.
INSTALLATION OF CABLE (1125WC SERIES)
NOTE: Before proceeding, ensure that you are installing the proper size,
length and type of cable that the reel is rated for. Refer to label to
determine amperage rating.
CAUTION: ENSURE THAT THE CABLE CONNECTOR IS SECURELY
CRIMPED, SOLDERED, OR CLAMPED TO CABLE.
• Place connector over stud (FIGURE 2.0) and install brass nut
(supplied).
• Using a wrench, firmly hold onto the nut under the connector while
tightening the outer nut.
• Connect the supply line in the same manner.
FIGURE 1.0
FIGURE 2.0
CAUTION: ENSURE THAT ALL OPERATION CHECKS HAVE BEEN
COMPLETED BEFORE RELEASING FOR USE.
OPERATIONAL CHECK
• Check for correct operation by pulling out some of the hose/cable. A
slight friction or drag should be noticed. This drag is to prevent
backlash when pulling out hose/cable.
• Adjust drag brake. Turn clockwise to add tension and counter-
clockwise to decrease tension. See figures 3.0-6.0.
SWIVEL SEAL REPLACEMENT
• Remove inlet hose from swivel.
• Remove swivel from reel by unscrewing swivel from reel axle.
Disconnect hose from swivel.
• Remove retaining ring on swivel; pull out spool from body.
• Replace the seals, Apply O-ring lubricant and reassemble swivel.
• Fit hose to swivel then fit swivel to reel.
DO NOT OVER TIGHTEN!
• Reconnect inlet hose and test for leakage.
NOTE: Swivels designs vary depending on the reel model. Refer to repair
procedure shipped with individual seal replacement kits or consult factory.
CAUTION: Release line pressure prior to making repairs or adjustments to reel.
SLIP RING BRUSH REPLACEMENT (1125WC SERIES)
• Remove cable completely from drum of reel.
• Remove access panel on drum by removing four screws.
• Remove brush retaining nut to access worn brushes.
• Replace with new copper brushes.
• Reverse above procedure to re-assemble reel.