
Product Manual

INSTALLATION AND MAINTENANCE MANUAL FORM #PM-122 REV A 12/09
Page 3 of 5
For assembly drawings, parts lists, or specific repair instructions, refer to web site at www.coxreels.com
or consult factory.
Coxreels, Inc., 5865 S. Ash Ave., Tempe, Arizona, USA, 85283 Tel: 1-800-269-7335
SPECIFICATIONS & LISTINGS
• The identified Series of Cable Reel products within this manual are not certified or listed by any independent certifying or regulatory body.
• This series of cable reels is intended for industrial use and are provided with permanent mounting means, with the exception of the portable reel models.
PRESSURE & TEMPERATURE RATING
• Cable reels should not be used at temperatures below or above the rating of the cable.
• The operational rating of a reel not equipped with cable is determined by the capacity of the installed cable. (Please refer to the COXREELS catalog, website or
contact Customer Service for reel/hose specific data). Variations in the OD of higher rated cable will affect the operational capacity of the reel.
• PSI ratings are not applicable to the operation of this series of reels.
LABELS & MARKINGS
Cable Reels with and without cable
• The marking of the cable reel provided with or without cable includes the following
o The label on the frame includes the COXREELS name and Logo, the product catalog number, the individual product serial number, rating and what
type and length of cable intended for use on the reel.
o The maximum rating for every cable reel supplied without cable is marked on the COXREELS Identification Label. In the absence of this information,
refer to website, catalog, or customer service. Actual rating is determined by the installed cable and is not to exceed the indicated maximum
operational rating. The rating of the cable installed on reels provided without cable must be marked on the cable/label upon installation.
PERSONAL SAFETY
• Ensure reel has been properly installed before connecting supply line.
• Before connecting to reel, be certain supply line does not exceed rated pressure of the hose reel or voltage / amperage rating on cable reel.
• Thoroughly review the “Cable Installation” instructions to properly install Cable.
• Perform “Operational Check” per instructions to ensure reel is operating properly.
WARNING: Prevent static sparking. When working around flammables, ensure that the cable reel, cable, and equipment are properly grounded.
WARNING: READ THESE INSTRUCTIONS CAREFULLY BEFORE ATTEMPTING TO INSTALL, OPERATE, OR MAINTAIN THIS PRODUCT. ONLY QUALIFIED
PERSONNEL SHOULD UNDERTAKE THE INSTALLATION AND COMMISSIONING OF THIS PRODUCT. FAILURE TO COMPLY WITH INSTRUCTIONS COULD
RESULT IN PERSONAL INJURY AND/OR PROPERTY DAMAGE.
INSTALLATION
MOUNTING OF REEL / FASTEN CRANK HANDLE
• The 100WC Series welding cable reel should be mounted to a solid structure before installation of cable and operation using (4) 3/8” bolts, nuts, and washers (not
included).
• The reel base is equipped with four mounting holes to utilize 3/8” diameter hardware (not included).
• Reels are supplied with plastic crank handle uninstalled. Remove handle and supplied hardware from plastic bag and install onto crank arm.
INSTALLATION OF INLET CABLE
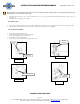
• Install inlet cable onto copper stud underneath the first ½-13 brass nut as shown in Figure 1.
• Route cable through cable keeper slot and use a wrench on brass nut under the connector to hold firmly in place while tightening.
• The cable keeper will help prevent inlet cable rotation during reel operation.
INSTALLATION OF OUTLET CABLE
NOTE: Before proceeding, ensure that you are installing the proper size, length and type of cable that the reel is rated for. Consult factory if unsure of rating. Damage
may occur if wrong cable and/or length is installed.
• Securely stabilize the reel.
• Fasten the cable to the slip ring assembly with the supplied ¼-20 brass bolt and nut as shown in Figure 2.
• Route the cable along the drum and secure supplied cable clamps. Figure 3 shows proper cable routing.