
Product Manual


INSTALLATION AND MAINTENANCE MANUAL FORM #PM-001 REV E 09/13
Page 3 of 4
For assembly drawings, parts lists, or specific repair instructions, refer to web site at www.coxreels.com or consult factory.
Coxreels, Inc., 5865 S. Ash Ave., Tempe, Arizona, USA, 85283 Tel: 1-800-269-7335
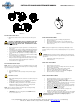
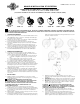
FIGURE 1.0 FIGURE 2.0
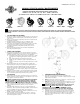
INSTALLATION OF INLET HOSE
• Apply thread sealant to inlet hose and connect to the swivel joint on
reel.
CAUTION: IT IS IMPORTANT TO USE A “FLEXIBLE” INLET HOSE.
DO NOT USE SOLID PIPING OR RESTRAIN INLET HOSE AS TO
CAUSE ANY SIDE FORCE ON SWIVEL JOINT. THE WARRANTY IS VOID IF
NOT PROPERLY INSTALLED.
• Flush some product through the system before connecting inlet hose
to the source.
• Install inlet hose into swivel assembly by hand tightening, followed by
½ turn with wrench. DO NOT over tighten as it may damage swivel.
• If reel includes hose (Otherwise, See Installation of Hose), flush
some product through system before connecting end fitting, nozzle,
or tool.
• (Reel supplied less hose) Apply thread sealant to outlet hose fitting.
Connect end, nozzle, or tool as desired.
• If a hose stopper adjustment is required to allow easy reach of end
fitting or tool; latch reel at approximate desired location, loosen (two)
ball stop bolts. Move ball stop and tighten bolts. Unlatch reel.
• Connect Inlet hose to supply source.
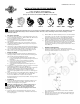
INSTALLATION OF OUTLET HOSE
NOTE: Before proceeding, ensure that you are installing the proper size, length
and type of hose per the reel rating. Consult factory if unsure of rating. Damage
may occur if wrong hose is installed.
• Securely stabilize the reel.
• Wind the reel drum clockwise (facing the swivel) until the spring is
tight.
Use Extreme Caution!
• Back off approximately two turns and lock the reel drum to keep from
rotating.
• Insert the MALE fitted end of the hose through the roller guide arm
and through the cutout in the side of the drum flange.
• The MALE hose fitting should now be on the outside of the drum.
Apply thread sealant, connect hose fitting to the swivel joint and
secure the hose rigid with the (two) hose clamps.
NOTE: The hose clamps restrain the hose when fully extended, preventing
strain between the fittings and swivel joint.
• CAREFULLY release the locking ratchet and SLOWLY allow the
hose to retract onto the reel.
SPRING TENSION ADJUSTMENT
• Release line pressure prior to making spring adjustments.
• Disconnect inlet hose.
• Pull out approximately 6 feet (2m) of hose and latch the drum.
• Add or subtract one wrap of hose as desired to acquire the proper
tension on the reel.
NOTE: Spring tension adjustment is accomplished by adding wraps of hose
around the drum (to increase tension) or subtracting wraps of hose (to decrease
tension).
CAUTION: Improper tensioning of spring or adding too many pre-wraps may
cause damage to spring mechanism. Only authorized personnel should make
adjustments.
• Unlatch drum and check for proper tension.
• Connect Inlet hose.
SWIVEL SEAL REPLACEMENT
• Remove inlet hose from swivel.
• Remove swivel from reel by unscrewing swivel from the axle shaft.
Disconnect hose from swivel.
• Remove retaining ring on swivel; pull out shaft from body.
• Replace the seals, lubricate and reassemble swivel.
• Fit hose to swivel then fit swivel to reel. Do not over-tighten.
• Reconnect inlet hose and test for leakage.
SPRING CANISTER REPLACEMENT
• Pull out approximately 3 feet (1m) of hose and latch the reel.
• Remove outlet nozzle, gun or tool and hose stopper.
• Carefully unlatch the reel and firmly hold the drum. Allow the drum
to slowly unwind until it stops.
• Remove the retaining ring, spacer and swivel unit. Note: on T-Series
reels, the outboard support arm must first be removed.
• Remove the two or four nuts located on the support post side inside
the drum cavity. Do not attempt to remove the spring canister nuts.
• Pull spring canister off drum and axle shaft.
• Reverse above procedure to re-assemble.
• Re-tension the reel by turning the drum three complete turns
clockwise (from swivel side) and latch the drum.
• Feed the hose through the hose guide. Fit hose stopper, then unlatch
the drum. Hose stopper should sit snugly against the hose guide.
CAUTION: Release line pressure prior to making any repairs or
adjustments to the reel.