
Product Manual


INSTALLATION AND MAINTENANCE MANUAL FORM #PM-005 REV D 12/09
Page 3 of 6
For assembly drawings, parts lists, or specific repair instructions, refer to web site at www.coxreels.com
or consult factory.
Coxreels, Inc., 5865 S. Ash Ave., Tempe, Arizona, USA, 85283 Tel: 1-800-269-7335
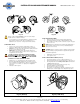
F
ig. 1.0 Fig. 2.0
NOTE: On SD models ground path is from end of cable clamp to
unpainted surface on bottom of reel base.
• Loosely fit two pieces of mounting hardware to ceiling/floor/or wall so
that reel can be slid into position. Fit reel. Install two pieces of
hardware in other end of reel. Securely fasten all bolts and nuts.
OPERATIONAL CHECK
• Check reel for correct operation by slowly pulling out cable. A
clicking noise will be heard after each half revolution of the drum.
• LATCH the reel. Pull out the cable and allow it to slightly retract after
the first, second or third “click” is heard.
• UNLATCH the reel. Slowly pull the cable until the clicking noise
stops, and then allow the cable to retract. The hose stopper should
rest against the roller hose guide.
CAUTION: DO NOT
ALLOW CABLE TO RETRACT WITHOUT
RESTRAINING RECOIL SPEED. NEVER LET GO OF THE CABLE
WHEN REWINDING. NOTE: EZ-COIL™ MODELS ARE DESIGNED
TO RETRACT AT A SLOW CONTROLLED SPEED.
• Apply power to reel. Periodically check cable for improper wear.
• Reels are shipped with approximately three pre-wraps of tension.
This is adequate for most applications. However, if your application
requires more or less tension, see “Spring Tension Adjustment”
instructions.
• Lubrication is NOT required.
SPRING TENSION ADJUSTMENT
• Remove power from reel prior to making spring adjustments.
• Pull out approximately 6 feet (2m) of cable and latch the drum.
• Add or subtract one wrap of cable as desired to acquire the proper
tension on the reel.
NOTE: Spring tension adjustment is accomplished by adding wraps of
cable around the drum (to increase tension) or subtracting wraps of
cable (to decrease tension).
CAUTION: Improper tensioning of spring or adding too many pre-wraps
may cause damage to spring mechanism. Only authorized personnel
should make adjustments.
• Unlatch drum and check for proper tension.
• Connect power source.
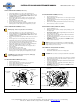
SPRING CANISTER REPLACEMENT (SD Series)
• Pull out approximately 3 feet (1m) of cable and latch the reel.
• Release all spring tension by removing five wraps of cable from reel.
• Carefully unlatch the reel and firmly hold the drum. Allow the drum
to slowly unwind until it stops.
• Remove two nuts from spring cartridge. (See figure 3.0)
• Pull spring cartridge off center axle shaft.
• Reverse above procedure to re-assemble.
• Re-tension the reel by turning the drum three complete turns and
latching in place. Follow “Spring Tension Adjustment” procedure.
Fig 3.0 (SD Reel) Fig 4.0 (P-WC Reel)