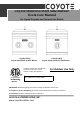
Coyote Stainless Steel Side Burner Use & Care Manual For Liquid Propane and Natural Gas Models C1DB (LP/NG) Coyote Dual (Slide in) Side Burner C1SB (LP/NG) Coyote Single (Slide in) Side Burner Conforms to ANSI STD Z21.58-2015 Certified to CSA STD 1.6-2015 Outdoor Cooking Gas Appliance For Outdoor Use Only PUT SERIES NO. LABEL HERE 4004477 IMPORTANT: Read the lighting instruction on Page 13 before first time use! To installer or person assembling: Leave this manual with burner for future reference.
Welcome & Congratulations Congratulations on your purchase of a new side burner! We are very proud of our products and we are completely committed to providing you with the best service possible. Your satisfaction is our #1 priority. Please read this manual carefully to understand all the instructions about how to install, operate and maintain for optimum performance and longevity. We know you’ll enjoy your new side burner and thank you for choosing our product. We hope you consider us for future purchases.
Table of Contents Safety Instructions ........................... 2 Locating the Side burner .................... 4 Gas Requirements.............................. 6 Lighting the Side Burner ................... 12 Operation and Features ..................... 14 Care & Maintenance .......................... 15 Troubleshooting Your Burner............ 19 Limited Warranty .............................. 21 Parts Listings ...................................... 22 • WARNING IF YOU SMELL GAS: 1.
Safety Instructions WARNING: Improper installation, adjustment, alteration, service or maintenance can cause injury or property damage. Read the installation, operating and maintenance instructions thoroughly before installing or servicing this equipment. General Safety Instructions 1. 2. 3. 4. 5. 6. 7. 8. 9. 10. 11. 12. 13. 14. 15. 16. 17. 18. 19. 20. For Household Outdoor Use Only – DO NOT use indoors or in any type of enclosed area such as a garage, shed or breezeway.
21. Grease is extremely flammable. Let hot grease cool down before attempting to handle or dispose of it. 22. In the event that a burner goes out, turn burner knobs to the full OFF position. Do not attempt to use the side burner until the gas has had time to dissipate. 23. Do not use side burner until leak check has been made. 24. Turn off the cylinder valve when your side burner is not in use. 25. Ensure the control knobs are in “OFF” position when not in use.
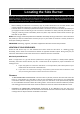
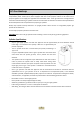
Locating the Side Burner Check your local building codes for the proper method of installation. In the absence of local codes, this unit should be installed in accordance with the National Fuel Gas Code No. Z223.1‐1998 USA or CAN/CGA‐B149.1/.2 Natural Gas/Propane Code (Canada) latest edition or the National Electrical Code ANSI/NFPA No. 70 or the Canadian Electrical Code CSA C22.1, 1990 or latest version.
The two top illustrations demonstrate how the slide‐in type unit is designed to fit into open‐ front enclosures, and supported at the Countertop. Do not install this unit under unprotected flammable surfaces. Do not install or use this appliance inside a building, garage, or any other covered area. It must not be used in or on recreational vehicles or boats. INSTALLER NOTE: This unit should be installed so that it can be removed at a later date if factory service is required.
WIDTH DEPTH HEIGHT Double Burner 12 1/2” (318mm) 20 1/2” (521mm) 10 1/4” (260mm) Single Burner 10 1/2” (267mm) 14” (356mm) 10 1/4” (260mm) Gas Requirements NOTE: Always have a qualified service technician perform difficult conversions or modifications. WARNING: Never attach an unregulated gas line to the appliance. Connection to an unregulated gas line can cause excessive heat or fire. IMPORTANT: Before connecting side burner to gas source, make sure burner control knobs are in “OFF” position.
LP Gas Hook-up This propane gas side burner is designed to operate on propane gas ONLY, at a pressure regulated at 11”(279.4mm) water column (W.C.) when equipped with the correct propane orifices on the valves and a propane regulator on the supply line regulated at the residential meter. The LP gas side burner is designed to be used with a standard 20 lbs gas cylinder and must be constructed and marked in accordance with specifications of the US Department of Transportation for propane gas cylinders.
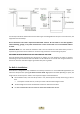
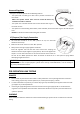
Hose and Regulator The Type 1 connection system has the following features: The system will not allow gas to flow until a positive connection has been made. NOTE: The cylinder control valve must be turned off before any connection is made or removed. The system has a thermal element that will shut off the flow of gas in the event of a fire. The system has a flow limiting device which, when activated, will limit the flow of gas to 10 cubic feet per hour.
Before Testing DO NOT smoke while leak testing. Extinguish all open flames. Never leak test with an open flame. Mix a solution of equal parts mild detergent or liquid soap and water. Leak Testing Valves, Hose and Regulator 1. Turn all side burner control knobs to OFF. 2. Be sure hose is tightly connected to LP tank. 3. Completely open LP tank valve by turning cylinder valve knob counterclockwise (right to left). If you hear a rushing sound, turn gas off immediately. There is a major leak at the connection.
LP Tank Filling - Use only licensed and experienced dealers. LP dealer must purged tank before filling. Dealer should NEVER fill LP tank more than 80% of LP tank volume. Volume of propane in tank will vary by temperature. A frosty regulator indicates gas overfill. Immediately close LP tank valve and call local LP gas dealer for assistance. Do not release liquid propane (LP) gas into the atmosphere. This is a hazardous practice.
Natural Gas Regulator IMPORTANT: NEVER use side burner without leak testing this connection. Natural gas regulator model: GR120 Gas pressure: 4” (101.6mm) Maximum rate working pressure: 1/2 Psig Natural Gas Supply and Connection 1. Make sure all burner valves are in the “OFF” position 2. All NG units need to have a regulator and shut‐off valve on the supply line. 3. All Pipe threads need to have proper, gas rated, outdoor rated thread sealant. Flare ends do not need or utilize pipe sealant. 4.
Lighting the Side Burner DANGER • Failure to open the lid while igniting the burners, or not waiting 5 minutes to allow the gas to clear if the barbecue does not light, may result in an explosive flame-up which can cause serious bodily injury or death. WARNING • • • DO NOT use the burner if gas odor is present. DO NOT stand with head, body, or arms over the burner when lighting. Inspect the hose before using the burner.
Lighting Instructions Using the Ignition System: 1. Open the lid. 2. Keep your body, arms and face as far away from the burners and cooking surface as possible 3. Depress and rotate the knob counter clockwise to the "High" position. a. As you are nearing the "High" position, you will notice the valve getting tougher to turn. This is the spring inside the valve building up energy to create the spark.
Operations and Features When initially bringing turning the burners on, burn the burners to get rid of any odors or debris by operating at “HIGH” setting Preparing Food for the Side Burner WARNING: Always observe safe food-handling and safe food-preparation practices when using this burner, to prevent food-borne illnesses. - Always cook foods adequately. Undercooked foods can retain bacteria, especially if thawed or exposed to - warm conditions prior to cooking.
Care & Maintenance CAUTION: All cleaning and maintenance should be done only when side burner is cool & with the fuel supply turned off at the cylinder. If your side burner is set up for use with Natural Gas, turn off gas supply at the system manual shut off valve. DRIP PAN The drip pan located below the burner should be cleaned periodically to prevent heavy buildup of debris. NOTE: Allow the drip pan to cool before attempting to clean.
2. Next, you will want to rinse and dry the steel thoroughly with a clean towel. Do not allow the steel to air dry as the standing water can cause surface discoloration. 3. The last thing you want to do is to protect to the unit with a good polish. There are several polishes on the market that work great (Barkeepers Friend Polish and Stainless Steel Magic are a few) and will help keep your side burner protected from the elements for a longer period of time.
any mortar or dust does come into contact with the stainless, make sure to wipe it off as soon as possible and use a stainless steel polish immediately afterwards. 3) Position your side burner away from areas that can receive water splash from a pool or hot tub. 4) Do not store pool chemicals in your island or island cabinets.
Recommended Cleaners for Specific Situations JOB Routine Cleaning Fingerprints & smears Stubborn stains & discoloration Grease & Oil Restoration/ Passivation CLEANING AGENTS Soap, ammonia, detergent Medallion Arcal 20, Lac‐O‐Nu Ecoshine Cameo, Talc, Zud First Impression Any good commercial detergent Benefit, Super Sheen 18 COMMENTS Apply with cloth or sponge Provides barrier film Rub in direction of polish lines Apply with sponge or cloth
Troubleshooting Your Side Burner GENERAL TROUBLE SHOOTING You should inspect the burners at least once a year or immediately if any of the following conditions occur: • The smell of gas. • Flames appearing mostly yellow. (Some yellow at the tips is OK) • The burners will not get hot enough. • Burners make a snapping noise. • The burners heats unevenly. SPIDER AND INSECT WARNING INSECT WARNING:Spiders and insects can nest in the burners of this and other burners, which could disrupt gas flow.
Note: You will need to remove your cooking grates to see the electrodes. Flare‐ups • Check your igniter battery and replace if needed. • Check for loose wire connections to the igniter or electrodes. • Check to see if debris is blocking the electrodes. • If the igniter is not working, can you light the burner with a lighter? • Ensure burner is not placed directly in the path of wind. Be sure drip pan is clean (do not use aluminum foil on drip pan.
Limited Warranty Coyote Outdoor warrants to the original purchaser at the original site of delivery with proof of purchase of each Outdoor Gas side burner/Side burner that when subject to normal residential use, it is free from defects in workmanship and materials for the periods specified below. This warranty excludes side burners used in rental and commercial applications. It does NOT apply to rust, corrosion, oxidation, or discoloration, which may occur due to moisture or overheating.
Dual Side Burner Parts List Dual Side Burner C1DB No. Description Qty Part No. No. Name Qty Part No.
Single Side Burner Parts List Single Burner C1SB No. Description Qty Part No. No. Description Qty Part No.