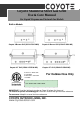
Coyote Stainless Steel Gas Grill Use & Care Manual For Liquid Propane and Natural Gas Models Built-in Models Coyote 2-Burner Grill (CC2-LP/CC2-NG) Coyote 36”Grill (CS36-LP/CS36-NG) Coyote 3-Burner Grill (CC3-LP/CC3-NG) Coyote 42”Grill (CS42-LP/CS42-NG) Conforms to ANSI STD 21.58a-2008 Certificated to CSA STD 1.6a-2008 For Outdoor Use Only PUT SERIES NO.
Welcome & Congratulations Congratulations on your purchase of a new grill! We are very proud of our product and we are completely committed to providing you with the best service possible. Your satisfaction is our #1 priority. Please read this manual carefully to understand all the instructions about how to install, operate and maintain for optimum performance and longevity. We know you’ ll enjoy your new grill and thank you for choosing our product. We hope you consider us for future purchases.
Table of Contents Safety Instructions ..................... 2 Grill Models ................................. 4 Gas Requirement ........................ 5 Locating the Grill ........................ 9 Pre Operation Leak Testing ....... 11 Parts List ................................... 12 Light the Grill ............................... 18 Operation and Features ............. 20 Care & Maintenance .................. 23 Troubleshooting Your Grill ......... 25 Limited Warranty ........................
Safety Instructions WARNING: Improper installation, adjustment, alteration, service or maintenance can cause injury or property damage. Read the installation, operating and maintenance instructions thoroughly before installing or servicing this equipment. General Safety Instructions 1. 2. 3. 4. 5. 6. 7. 8. 9. 10. 11. 12. 13. 14. 15. 16. 17. For Household Outdoor Use Only –DO NOT use indoors or in any type of enclosed area such as a garage, shed or breezeway. Keep clear of trees and shrubs.
18. 19. 20. 21. 22. 23. 24. 25. 26. Never move the grill when hot. DO NOT use while under the influence of drugs or alcohol. DO NOT store a spare gas cylinder under or near your grill. DO NOT grill without the drip tray in place, hot grease could leak downward and produce a fire or an explosion. Drip tray should be pushed all the way to the rack located just under the grill. Grease is extremely flammable. Let hot grease cool down before attempting to handle or dispose of it.
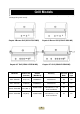
Grill Models (Need to describe their main characteristic what a feature that helps to identify or describe recognizably; a distinguishing mark or trait) Coyote 2-Burner Grill (CC2-LP/CC2-NG) Coyote 3-Burner Grill (CC3-LP/CC3-NG) Coyote 36”Grill (CS36-LP/CS36-NG) Coyote 42”Grill (CS42-LP/CS42-NG) Model No. Product Size (inch/mm) BTU/HR (Main/Back) Burner(s) Rotisserie Motor Hood Light CC2 / CC2-NG 28 (711.2) 30,000/None 2 SUS burners No No CC3 / CC3-NG 34 (863.
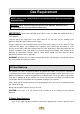
Gas Requirement NOTE: Always have a qualified service technician perform difficult conversions or modifications. WARNING: Never attach an unregulated gas line to the appliance. Connection to an unregulated gas line can cause excessive heat or fire. IMPORTANT: Before connecting grill to gas source, make sure BBQ Grill control knobs are in “OFF”position. Verify the type of gas supply to be used, either natural or LP, and make sure the marking on the appliance rating label agrees with that of the supply.
- - - - inches high. The maximum fuel capacity is 80% and is approximately 20 pounds of propane. The L.P. cylinder must have a shut-off valve (see picture) terminating in a Type 1 L.P. A Type 1 compatible cylinder with a Type 1 cylinder valve has a back-check valve which does not permit gas flow, until a positive seal has been obtained. The cylinder must be arranged for vapor withdrawal. It must also include a collar to protect the cylinder valve.
control valves on the unit to the “HIGH”position for about 20 seconds to allow the air in the system to purge before attempting to light the burners. WARNING: Always take a leak test before lighting the grill to prevent a possible fire or explosion. Never store a spare propane cylinder in the vicinity of this Grill, or in the vicinity of any other potential heat source. LP Gas Supply Cylinder Disconnection 1. Turn the burner valves off. 2. Turn the tank valve off. (Turn clockwise to stop). 3.
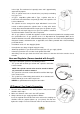
- Natural Gas Hook-up Always check the rating plate to make sure the gas supply you are hooking up to is the gas type the grill is manufactured for. This natural gas grill is designed to operate on natural gas ONLY, at a pressure regulated at 4” (101.6mm) water column (W.C.) when equipped with the correct natural gas orifices on the valves and a natural gas regulator on the supply line regulated at the residential meter. IMPORTANT: Never connect the grill to an unregulated gas supply.
Locating the Grill Check your local building codes for the proper method of installation. In the absence of local codes, this unit should be installed in accordance with the National Fuel Gas Code No. Z223.1-1998 USA or CAN/CGA-B149.1/.2 Natural Gas/Propane Code (Canada) latest edition or the National Electrical Code ANSI/NFPA No. 70 or the Canadian Electrical Code CSA C22.1, 1990 or latest version.
bottom. It is recommended that the enclosure have ventilation holes to prevent gas build-up in the event of a leak. The deck ledges and counter should be flat and level in reference to the floor. If your grill is equipped with a rotisserie, electrical service should be provided. If your grill is equipped with a rotisserie, a minimum of 24" (609.6mm) of clearance is needed on each side of the grill for the motor and skewer. LP TANK STORAGE ARE A MUST BE ISOLATED FROM GRILL AND VENTED.
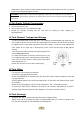
Pre Operation Leak Testing DANGER 1. 2. 3. Do not insert any tool into the valve outlet or safety relief valve. You may damage the valve and cause a leak. Leaking propane may result in explosion, fire, severe personal injury, or death. If a leak is detected at any time or you cannot stop a gas leak, immediately close pipeline valve and call LP gas supplier or you fire department! Check all gas supply fittings before each use and each time the gas supply cylinder is connected to the regulator.
Parts List COYOTE 2B 12 NG/LP
COYOTE 2B NG/LP PARTS LISTING No. Description Qty Part No. No. Description Qty Part No.
COYOTE 3B 14 NG/LP
COYOTE 4B w/ Sear Burner & IR NG/LP 15
COYOTE 4B w/ Sear Burner & IR NG/LP No. Description Qty Part No. No. PARTS LISTING Description Qty Part No.
COYOTE 5B w/ Sear Burner & IR NG/LP 17
Lighting the Grill DANGER Failure to open the lid while igniting the barbecue’ s burners, or not waiting 5 minutes to allow the gas to clear if the barbecue does not light, may result in an explosive flame-up which can cause serious bodily injury or death. WARNING DO NOT use the grill if gas odor is present. DO NOT stand with head, body, or arms over the grill when lighting. Inspect the hose before using the grill.
Lighting Instructions OPEN LID Igniter ENSURING BURNER CONTROLS ARE IN “OFF”POSITION, TURN ON Left Knob THE GAS SUPPLY VALVE. Back Burner Knob Right Knob Be sure a AA battery is inserted inside the igniter. Main Burner Lighting Infrared Back Burner Lighting 1. Push and hold the igniter, then push in and turn the last Right knob to HIGH position 3-5 seconds to light burner. 1. Push and hold the igniter, then turn the 2.
Operations and Features When initially bring your grill to cooking, burn the grill to get rid of any odors or debris by operating at “HIGH”setting with hood closed for no more than 5 minutes. Since this is a high temperature grill, closing the hood will cause heat to build up and any excessive flare-ups will cause internal damage to the grill (knobs, igniter, etc.
No. Qty Description 1 1 110V Motor 2 1 Motor Bracket 3 1 Spit Rod 4 2 Shaft Collar 5 2 4-Prong Fork 6 1 Handle 7 1 Counterbalance 8 2 Screw 9 2 Hexagonal Head Screw WARNING: Never operate Rotisserie Burner with main (other) burner(s) “ON”. Warming Rack must be removed when Rotisserie Burner is ON. Electrical Grounding Instructions: The rotisserie motor is equipped with a three-prong grounding plug for your protection against electric shock.
- Apply a light coating of cooking oil to the cooking grids before grilling, to prevent foods from sticking. Cook similar portion sizes together, so that they all cook evenly. Use tongs to turn foods on the grill. Never pierce foods while they are cooking on the Grill, as this will dry them out. Turn foods infrequently. Some chefs say that a good steak should never be turned more than once.
Care & Maintenance CAUTION: All cleaning and maintenance should be done only when grill is cool & with the fuel supply turned off at the cylinder. If your grill is set up for use with Natural Gas, turn off gas supply at the system manual shut off valve. DRIP TRAY The drip tray located below the grill should be cleaned periodically to prevent heavy buildup of debris. NOTE: Allow the drip tray to cool before attempting to clean.
of grease can gather on the surface of the stainless steel and bake on to the surface and give a worn appearance. For removal, use a non-abrasive oven cleaner in conjunction with a stainless cleaner. NOTE: Always scrub in the direction of the grain. ANNUAL CLEANING OF GRILL HOUSING Burn-off the barbecue after every cookout will keep it ready for instant use, however, once a year you should give the entire grill a thorough cleaning to keep it in top operating condition. 1.
Troubleshooting Your Grill GENERAL TROUBLE SHOOTING You should inspect the burners at least once a year or immediately if any of the following conditions occur: •The smell of gas. •Flames appearing mostly yellow. (Some yellow at the tips is OK) •The grill will not get hot enough. •Burners make a snapping noise. •The grill heats unevenly. SPIDER AND INSECT WARNING INSECT WARNING:Spiders and insects can nest in the burners of this and other grills, which could disrupt gas flow.
Note: You will need to remove your cooking grates and flavorizers to see the electrodes. Flare-ups • Check your igniter battery and replace if needed. • Check for loose wire connections to the igniter or electrodes. • Check to see if debris is blocking the electrodes. • If the igniter is not working, can you light the grill with a lighter? • Check flavorizers and cooking grates for excess food or grease build-up. • Ensure grill is not placed directly in the path of wind.
Limited Warranty Coyote Outdoor warrants to the original purchaser at the original site of delivery with proof of purchase of each Outdoor Gas grill/Side burner that when subject to normal residential use, it is free from defects in workmanship and materials for the periods specified below. This warranty excludes grills used in rental and commercial applications. It does NOT apply to rust, corrosion, oxidation, or discoloration, which may occur due to moisture or overheating.