DP8 & DP9 DOCUMENT PRINTERS OPERATORS MANUAL 7860 AIRPORT HIGHWAY, PENNSAUKEN, NJ 08108 (856) 488-0700 (856) 488-0925 (FAX) WWW.CRADEN.
DP8 & DP9 Operators Manual Table of Contents FUNCTIONAL SPECIFICATIONS 1 INSTALLATION & RESHIPMENT 3 RIBBON CARTRIDGE LOADING 3 KEYPAD & DISPLAY OPERATION 4 DOCUMENT INSERTION 5 CONFIGURATION Printer Parameters Communication Parameters Override Parameters Service Parameters 5 6 7 7 8 DIAGNOSTICS 9 SELF TEST & LOCAL PRINTING 9 ERROR CONDITIONS Document Jam Cover Open Page Overflow Carriage Fault Clear Eject Jam Narrow Document 9 9 10 10 10 10 DRIVERS Installing Craden Drivers on Windows 95
WARNING This equipment generates, uses and can radiate radio frequency energy and, if not installed in accordance with the instruction manual, may cause interference to radio communications. It has been tested with a Class A computing device and has been found to comply with Part 15 of FCC rules, which are designed to provide reasonable protection against such interference when operated in a commercial environment.
DP8 & DP9 DOCUMENT PRINTERS - FUNCTIONAL SPECIFICATIONS 1.1 Print Characteristics Print Method 24-wire dot matrix impact, automatic thickness compensation Print Spacing 5, 6, 8.5, 10, 12, 17, 20 and 24 chars/inch Fonts 96 char. ASCII, international character set Windows True Type & graphics Print Speed (chars/second) Characters/inch 10 12 Dot Graphics 60,120,180, 360 dpi horizontal; 72, 180 dpi vertical Feed Speed 50 msec.
2.0 INSTALLATION 2.1 Installation Procedure 1. Read 3.1 to 3.5.2 on Operation and Configuration. 2. Press the latches on the lower front cabinet sides & rotate the cabinet upwards. 3. Remove the foam blocks on each side of the carriage. 4. Install the ribbon cartridge (See 3.1) 5. Connect the interface cable. (See 3.11.3 for cabling information). 6. Check that the power switch on the printer rear is off (“0” side depressed). Connect the line cord between the printer and an electrical outlet.
2.2 Reshipment If possible, retain the original packing material for reshipment. If the original packing material is not used, insure that printer and the printer carriage will not move during shipment and that the printer has sufficient protective padding. 3.0 3.1 Operation Ribbon Cartridge Loading Our experience has found many “generic” ribbons causing printer malfunctions. Ribbon advance issues, poor print quality, smearing, and printhead failure have occurred.
3.2 Keypad Operation EJECT: ejects an inserted document if the print buffer is empty. A: moves a document up 1/60" with each depression. If held depressed, the document will slowly move into the printer. Also initiates document insertion if the printer is configured for key rather than automatic insertion. (See 3.5.1) B: moves a document down 1/60" with each depression. If held depressed, the document will slowly move out of the printer. FUNCT: enters previously keyed digits as a function code.
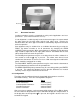
Document edge guide 3.4 Document Insertion Insertion procedures may be customized to satisfy varied applications and user preferences. (See Printer Parameters in 3.5.1). If auto alignment is enabled, gently insert the document upper left corner toward the point where the left edge guide and the feed rollers meet. Release the document when the rollers grip it and it will be automatically aligned and inserted to the first print line.
3.5.1 Printer Parameters Press 9 2 FUNCT to display the following parameters or press 9 0 0 FUNCT to print them on a previously inserted document. Changes may be made as described above. Before proceeding, see 3.4 and select the insertion sequence which best fits your application. Default settings are indicated in bold print. DISPLAY REMARKS LINES/INCH = 5 or 6 Select 5 or 6 lines per inch vertical spacing CHARS/INCH = 10, 12 or 17 Select 10, 12 or 17 characters per inch horizontal spacing.
3.5.2 Communication Parameters Press 9 3 FUNCT to display the following Communication Parameters or press 9 0 0 FUNCT to print them on a previously inserted document. Changes may be made as described in 3.5. Default settings are indicated in bold. DISPLAY REMARKS PROTOCOL = DTR, XON/XOF or PARALLEL INTRF. Select the protocol which matches your system configuration (See 3.12.2). Select PARALLEL if the parallel interface option is installed and skip the next four items.
3.5.4 Service Parameters Press 9 4 FUNCT to display the Service Parameters in the following format. These parameters are factory selected specifically for each printer and recorded on the label behind the display inside the printer. They do not usually need to be modified by the user. CAUTION: CHANGE OF THESE PARAMETERS BY UNTRAINED PERSONNEL MAY RESULT IN INCORRECT PRINTER OPERATION. DISPLAY 8 REMARKS TOP OFFSET = XX Adjusts the uppermost print line location.
3.6 Diagnostics 3.6.1 Power Up Diagnostics Diagnostics run automatically during power-up. If a fault is detected, ROM or RAM TEST BAD may be displayed. If a fault occurs, press A to advance to the next test. However, the printer should not be operated. If the problem is not a POWER FAILURE (see 3.9.1), consult your Service Personnel or Technical Manual. 3.6.2 Enhanced Diagnostics Diagnostics may be executed by pressing 9 0 FUNCT.
3.9.3 Page Overflow If the printer is commanded to move past the last printable line on a document it will eject the document and display PAGE OVERFLOW INSERT NEXT PAGE. Printing will resume when another document is inserted. 3.9.4 Carriage Fault The carriage could not move to the left margin and is probably caused by a jammed carriage or a bad left home sensor. 3.9.
4.3 Installing Craden Drivers on WINDOWS NT, 2000, XP, VISTA, OR 7 (32-bit): A firmware upgrade may be required to run the Vista/7 driver. Contact Craden for details. If the printer is connecting via a USB interface, first install the USB drivers per 3.11.3. 1. Click START, Settings, Printers. Double click Add Printer and click Next. 2. Select local or network printer (local unless the printer is not connected to this PC) and click Next. 3. Select the port where the printer is connected. Click Next. 4.
4.4 Using Printer Resident Device Fonts Printer resident device fonts should be used whenever possible because they print faster than TrueType fonts that Windows prints as raster graphics. Device fonts include letter quality Courier 10 and 12cpi, lower quality but faster printing Courier 5, 6, 17, 20cpi, NLQII 10cpi and 12cpi, and lowest quality, fastest printing draft 10 and 12cpi. Draft should not be used on passbooks.
5.2 Interface Protocols Either DTR or XON/XOF protocols may be selected from the keypad. In these modes the DTR signal will go false or a DC3 (Xmit off) will be transmitted if less than 1000 characters of space are available in the buffer when a CR or document movement command is received. Transmission from the host must then pause. DTR will later go true or a DC1 (Xmit on) will be transmitted when space becomes available and host transmission may resume.
6.3 No Document Motion If a document will not advance upon insertion: 1. Press EJECT if a previous document was manually removed without an eject. 2. Press A if configured for DOCUMENT INSERT WITH A KEY (see 3.5.1). 3. Use 9 0 FUNCT to check the front document sensor (see 3.6.2). 6.4 Carriage Fault or No Carriage Motion If the carriage will not move after a document is inserted: 1. Remove the foam packing blocks from both sides of the carriage. 2.
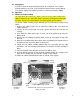
6.11 Ribbon Shield Removal / Replacement 1 2 Carriage Shaft Lifter Ring Open the cabinet, center the carriage and pull the lifter ring out and down to raise the carriage. Remove the ribbon cartridge. Lift the carriage shaft with one hand and pull the shield down and out to the right with the other. 3 4 Carriage Ribbon Guide Plate Shield Tips Tabs Pull the ribbon guide plate tabs toward you.
6.11.1 Ribbon Shield Face Inspection The ribbon shield prevents ribbon fabric from rubbing on and smearing printed documents. It is a consumable. A high percentage of printers sent to Craden for repair has a ribbon shield that has reached end of life and is the primary cause of the printer’s problem. Document jams, damaged documents, streaking, poor print quality, and document skewing can often be alleviated by replacing ribbon shields after four to five ribbon replacements.
7.0 Lubrication And Cleaning 8.1 Lubrication There are no lubrication points in the printer. All parts are either permanently lubricated or are designed to operate dry. No lubricants should be used. They may adversely affect operation. 7.2 Document Feed Roller Cleaning 1. Open the cabinet. 2. Moisten a lint-free cloth with isopropyl alcohol and wipe the front rollers while rotating the gear on the end of the roller shaft. Do not use any strong solvents in place of alcohol. 3.
8.