Pen-Tablet User Manual UW-403B Wintime
FCC Compliance Statement This equipment has been tested and found to comply with the limits for a Class B digital device, pursuant to Part 15 of FCC Rules. These limits are designed to provide reasonable protection against harmful interference when the equipment is operated in a residential installation. This equipment generates, uses, and can radiate radio frequency energy and if not installed and used in accordance with the instruction manual may cause harmful interference to radio communications.
Table of Contents Chapter 1 Introduction ......................................................... Suggested uses for Pen Tablet ............................. System Requirements ........................................... Package Contents ................................................. 1 1 2 2 Chapter 2 Preparing for installation of the driver .............. 3 Chapter 3 Installing the device driver into Windows 98.... 4 Chapter 4 Installing the device driver into Windows Me and Windows 2000 ...
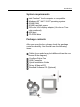
Chapter 1 Introduction A pen tablet is the perfect tool for creating art on your computer, it replaces a traditional mouse with a flexible pen, giving you a more natural way to draw, trace, write, and design. It also comes bundled with advanced software that will get you started right away. Suggested uses for a Pen Tablet A pen tablet is a powerful aid in creating computer graphics and for any application that requires the accuracy of hand-held writing tools.
Introduction System requirements TM Intel Pentium level computer or compatible. Windows 98 / Me / 2000 operating system. 32 MB RAM 80 MB hard disk space 256 color VGA display adapter (Hi-color or Truecolor preferred) USB port CD-ROM drive TM TM TM Package contents After you open the box, please check the package contents carefully.
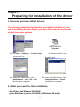
Chapter 2 Preparing for installation of the driver 1. Remove previous tablet drivers: If you have previously had another pen tablet installed, or you are reinstalling the pen tablet, you must first remove its present driver from your system. 1. Click Start > Settings > Control Panel Windows98 / Me 2. Double-click this icon Windows 2000 3a. Select the tablet driver. Click Add/Remove > OK > OK > OK. Restart your computer. 3b. Select the tablet driver. Click Change/Remove > Finish.
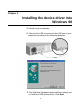
Chapter 3 Installing the device driver into Windows 98 1. Switch on your computer. 2. Connect the USB connector to the USB port of your computer according to the following diagram: 3. The Add New Hardware wizard will then prompt you to install the USB device driver. Click Next.
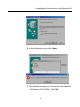
Installing the device driver into Windows 98 4. Select “Display a list of all drivers in a specific location, so you can select the driver you want” and click Next. 5. The USB device driver should already be selected. Click Next.
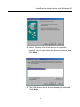
Installing the device driver into Windows 98 6. In the following screen click Next. 7. This will then prompt you to insert the disk labeled “Windows 98 CD-ROM”. Click OK.
Installing the device driver into Windows 98 8. Insert your Windows 98 CD-ROM in the CD-ROM drive. 9. In the dialog box that opens, click on the Browse button. In the Drives field select your CD-ROM drive (e.g. e:) In the Folders field select Win98. Click OK and then OK again. 10. In the next screen click on the Finish button.
Installing the device driver into Windows 98 11. Remove your Windows 98 CD-ROM and replace it with the Driver and Manual CD-ROM. 12. If your CD-ROM drive has the “Autorun” function enabled, your screen will display this Pen Tablet menu. If the above menu did not appear, double-click My computer on the Windows desktop, and then the CD-ROM icon and the Autorun.exe file in succession.
Installing the device driver into Windows 98 13. In the language selection choose English. Then the following screen will appear. Choose Driver Installation. 14. Choose Windows 98 as the operating system.
Installing the device driver into Windows 98 15. In the Wintime Tablet Setup screen click the Finish button.This will then install the relevant driver. If you are prompted to restart your computer click Yes. 16. Setup is complete and you may now use your pen tablet.
Chapter 4 Installing the device driver into Windows Me and Windows 2000 1. Switch on your computer. 2. Connect the USB connector to the USB port of your computer according to the following diagram: 3. The New Hardware Found wizard will find the tablet and install the USB Human Interface Device.
Installing the device driver into Windows Me and Windows 2000 4. Insert the Driver and Manual CD-ROM in the CDROM drive. 5. If your CD-ROM drive has the “Autorun” function enabled your screen will display the following Pen Tablet menu: If the above menu did not appear, double-click My computer on the Windows desktop, and then the CD-ROM icon and the Autorun.exe file in succession.
Installing the device driver into Windows Me and Windows 2000 6. In the language selection choose English. Then the following screen will appear. Choose Driver Installation. 7. Choose Windows Me or Windows 2000 as the operating system.
Installing the device driver into Windows Me and Windows 2000 8. In the Wintime Tablet Setup screen click the Finish button.This will then install the relevant driver. Please Note: (for Windows 2000 only) - In some setups a Microsoft Digital Signature warning may appear on your screen. You can ignore this warning and click on the Yes button to continue the installation. - To finalise Driver Installation it is recommended to restart your computer. Click Yes. 9.
Chapter 5 Customising the Pen Tablet Stylus Pen buttons There are three buttons on the Stylus Pen : Stylus Tip -This button works like the left button of a mouse. Lower Barrel -This button works like the right button of a mouse. Upper Barrel -This button works like the centre button of a mouse. Note: You may set the function of the buttons in the Control Panel (see description under the buttons tab further in this chapter).
Customising the Pen Tablet After you have installed your pen tablet, you can easily customise it according to your own personal preferences. The pen tablet icon can be found in the Windows Control Panel. Click on the Tablet Control Panel icon, and the tablet’s parameter window will appear. There are four tabs in this window: Info, Buttons, Tracking, Response and Pressure.
Customising the Pen Tablet . Buttons The buttons of the pen tablet are freely programmable,and you may add or customise their functions.If you press the Use default button, the action of these buttons will be set back to manufacturer default settings. These are: the Stylus Tip will act as the left button of a mouse, the Lower Barrel as the right button and Upper Barrel as the middle button of a mouse. .
Customising the Pen Tablet . Response Here you can adjust the double-click speed as well as the size of the double-click area. . Pressure The pressure sensitivity of the pen tablet can be adjusted in this tab. There is a test area to see the thickness of a line at a certain pressure of the pen on the pad.
Appendix A Taking Care of Your Pen Tablet Working environment The pen tablet must be installed at temperatures between 41o F to 104o F (5o C to 40o C), and humidity of 10 to 80 percent. Please do not place the pen tablet on top of any metallic object. Do not place a very hot object (like a cup of coffee) on the pen tablet’s surface. Important: The pen tablet may not function properly if these conditions are not met.