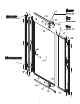
COVE by COPY THE MODEL NUMBER FOR YOUR RECORDS HERE # FRAMELESS PIVOT SHOWER DOOR AND PANEL READ THE INSTRUCTIONS CAREFULLY Familiarize yourself with all the parts as shown in the exploded view. The exploded view will also provide a helpful reference when relating to the location of the various parts and how they are mounted. LEFT PIVOT INSTALL RIGHT PIVOT INSTALL Please visit us on YouTube and view our shower door installation videos. One may be available for your installation. www.youtube.
1” PAN HEAD SCREW 1 1/2” PAN HEAD SCREW -1-
PARTS LIST WALL PLUG (6 PCS) 1 1/2" PAN HEAD SCREW (6 PCS) SCREW CAP (11 PCS) 3/8" SCREW (8 PCS) 5/8" SCREW (4 PCS) 1" PAN HEAD SCREW (4 PCS) ALUMINUM GASKET (2 PCS) PIVOT (2 PCS) HANDLE (1 PC) DOOR MAGNETIC PLASTIC (2 PCS) PIVOT SIDE SPLASH GUARD (1 PC) PLASTIC SWEEP (2 PCS) MAGNETIC WALL JAMB (1 PC) WALL JAMB (2 PCS) TOP / BOTTOM TRACK (2 PCS) FIXED PANEL (1 PC) DOOR (1 PC) BOTTOM PIVOT PIVOT WASHER BLOCK (1 PC) (2 PCS) WASHER (2 PCS) TOP PIVOT BLOCK (1 PC) STOPPER (1 PC) 5/16" SCREW
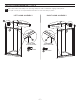
INSTALLATION PROCEDURE / STEP 1 / STEP 2 / STEP 3 1 2 Set the level on the walls to ensure that they are plum. Then set the wall jambs (14) in place and mark the hole locations. STEP 1 Next drill holes in the wall and using a rubber mallet, insert the wall plugs (1). STEP 2 2.1 FOR ACRYLIC & FIBERGLASS SHOWER ENCLOSURES Using a 1/8 inch drill bit, drill a hole about 1-1/2 inch deep at each of the previously marked locations.
INSTALLATION PROCEDURE / STEP 4 / STEP 5 4 Connect magnetic wall jamb (13) to the top and bottom track (15) with aluminum gasket (7) and 1" pan head screws (6). Screws get attached from the back side of the jamb into the top and bottom. RIGHT HAND ASSEMBLY LEFT HAND ASSEMBLY 1” PAN HEAD SCREW 5 1” PAN HEAD SCREW Insert frame ends into the top and bottom opening of fixed panel (16) and slide until entire assembly is roughly 4" narrower than overall opening width.
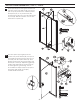
INSTALLATION PROCEDURE / STEP 6 6 Lift entire frame assembly into opening and push ends outward to engage wall jambs. Use 3/8" screw (4) on top and bottom frame to lock assembly in place.
INSTALLATION PROCEDURE / STEP 7 / STEP 8 7 5 Insert pivots (8) over the glass and screw together. Set pivot washer (19) over pivot pin on top of pivot block. Carefully lower door panel (17) on to pivot block (18) inserting pivot pin into corresponding hole in pivot (8). Slide decorative covers over both faces of pivots (8). 5/8” SCREW 8 5 Tilt door panel (17) slightly into the shower. Set pivot washer (19) over pivot block (18) pin and insert pin into top of pivot (8).
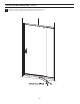
INSTALLATION PROCEDURE / STEP 9 9 Attach magnetic door plastic (10) to outside of glass door panel (17). Next, attach pivot side splash guard (11) to opposite end of glass and sweep (12) on the bottom. INSTALLATION PROCEDURE / STEP 10 10 Make adjustments to fit opening. Insert 3/8" screws (4) into the framework and cover screws with caps (3).
INSTALLATION PROCEDURE / STEP 11 11 Caulk the inside sides of the shower door frame to seal. Keep the entire area dry for a minimum of 24 hours.
ATTENTION CONSUMER: IMPORTANT SHOWER ENCLOSURE WARRANTY INFORMATION PLEASE DO NOT DISCARD Thank you for your purchase of a shower door from FGI Industries, Ltd. In order to be eligible for product warranty, please register your door on our website within two (2) weeks of installation. Go to: https://craftandmain.com/warranty/ and follow the instructions. For any questions or comments about your new shower door, please contact our Customer Service at: US CUSTOMERS: 1-888-620-3667 CustomerService.
COVE by COPIA EL NÚMERO DE MODELO PARA TUS REGISTROS AQUÍ # PANEL Y PUERTA PARA DUCHA SIN MARCO Y CON PIVOTE LEE DETENIDAMENTE LAS INSTRUCCIONES Familiarízate con todas las piezas tal como se muestran en la vista ampliada. La vista ampliada sirve también como útil referencia para conocer la ubicación de varias piezas y cómo se instalan. INSTALACIÓN CON PIVOTE HACIA LA DERECHA INSTALACIÓN CON PIVOTE HACIA LA IZQUIERDA Visítenos en YouTube y vea nuestros vídeos de instalación de la puerta de la ducha.
TORNILLO DE 5/8” TORNILLO DE CABEZA PLANA BISELADA DE 1” TORNILLO DE 5/16” TORNILLO DE 3/8” TORNILLO DE CABEZA PLANA BISELADA DE 1 ½” -1-
LISTA DE PIEZAS TACO PARA PARED (6 PIEZAS) TORNILLO DE CABEZA PLANA BISELADA DE 1 ½" (6 PIEZAS) TAPAS DE TORNILLO (11 PIEZAS) TORNILLO 3/8" (8 PIEZAS) TORNILLO 5/8" (4 PIEZAS) TORNILLO DE CABEZA PLANA BISELADA DE 1” (4 PIEZAS) JUNTA DE ALUMINIO (2 PIEZAS) PIVOTE (2 PIEZAS) MANIJA (1 PIEZA) PLÁSTICO MAGNÉTICO DE LA PUERTA (2 PIEZAS) PROTECTOR LATERAL CONTRA SALPICADURAS DE PIVOTE (1 PIEZA) GUARDAPOLVO PLÁSTICO (2 PIEZAS) JAMBA MAGNÉTICA DE PARED (1 PIEZA) JAMBA DE PARED (2 PIEZAS) RIEL SUPERIO
PROCEDIMIENTO DE INSTALACIÓN / PASO 1 / PASO 2 / PASO 3 1 2 2.1 Coloca el nivel en las paredes para asegurarte de que están a plomo, luego coloca las jambas de la pared (14) en su lugar y marca las ubicaciones de los orificios. PASO 1 LÁPIZ A continuación, taladra orificios en la pared y, con un martillo de goma, introduce los tacos de pared (1).
PROCEDIMIENTO DE INSTALACIÓN / PASO 4 / PASO 5 4 Conecta la jamba de pared magnética (13) al riel superior e inferior (15) con una junta de aluminio (7) y tornillos de cabeza plana biselada de 1" (6). Los tornillos se fijan desde la parte posterior de la jamba hacia la parte superior e inferior.
PROCEDIMIENTO PARA LA INSTALACIÓN / PASO 6 6 Levanta todo el conjunto del marco en la abertura y empuja los extremos hacia afuera para enganchar las jambas de la pared. Utiliza un tornillo de 3/8" (4) en el marco superior e inferior para fijar el conjunto en su lugar.
PROCEDIMIENTO DE INSTALACIÓN / PASO 7 / PASO 8 7 5 Inserta los pivotes (8) sobre el vidrio y atorníllalos. Coloca la arandela de pivote (19) sobre el pasador de pivote en la parte superior del bloque de pivote. Baja con cuidado el panel de la puerta (17) sobre el bloque de pivote (18) insertando el pasador de pivote en el orificio correspondiente en el pivote (8). Desliza las cubiertas decorativas sobre ambas caras de los pivotes (8).
PROCEDIMIENTO PARA LA INSTALACIÓN / PASO 9 9 Fija el plástico magnético de la puerta (10) al exterior del panel de vidrio de la puerta (17). A continuación, coloca el protector lateral contra salpicaduras del pivote (11) en el extremo opuesto del vidrio y barra (12) en la parte inferior. PROCEDIMIENTO PARA LA INSTALACIÓN / PASO10 10 Haz los ajustes necesarios para que quepa en la abertura. Inserta tornillos de 3/8” (4) en la estructura y cubre los tornillos con tapas (3).
PROCEDIMIENTO PARA LA INSTALACIÓN/PASO 11 11 Aplica pasta selladora a los lados interiores del marco de la puerta de la ducha para sellar. Mantén toda el área seca durante un mínimo de 24 horas.
ATENCIÓN CONSUMIDOR: IMPORTANTE ANEXO SOBRE LAS DUCHAS INFORMACIÓN DE LA GARANTÍA POR FAVOR, NO DESECHAR Gracias por comprar una puerta de ducha de FGI Industries, Ltd. Para ser elegible para la garantía del producto, registra la puerta en nuestro sitio web dentro de las dos (2) semanas posteriores a la instalación. Ir a: https://craftandmain.com/warranty/ y sigue las instrucciones.
COVE by COPIEZ LE NUMÉRO DE MODÈLE ICI POUR VOS DOSSIERS INSTALLATION PIVOTANTE À DROITE PORTE DE CABINE DE DOUCHE PIVOTANTE SANS CADRE ET PANNEAU LISEZ LES INSTRUCTIONS ATTENTIVEMENT Familiarisez-vous avec toutes les pièces illustrées dans la vue éclatée. La vue éclatée servira également de référence utile pour l’emplacement des différentes pièces et la façon dont elles sont installées.
VIS DE 5/8 PO VIS À TÊTE CYLINDRIQUE BOMBÉE DE 1 PO VIS DE 5/16 PO VIS DE 3/8 PO VIS À TÊTE CYLINDRIQUE BOMBÉE DE 1 1/2 PO -1-
LISTE DES PIÈCES BOUCHON MURAL (6 PCES) VIS À TÊTE CYLINDRIQUE BOMBÉE DE 1 1/2 PO (6 PCES) CACHE-VIS (11 PCES) VIS DE 3/8 PO (8 PCES) VIS DE 5/8 PO (4 PCES) VIS À TÊTE CYLINDRIQUE BOMBÉE DE 1 PO (4 PCES) JOINT D’ÉTANCHÉITÉ EN ALUMINIUM (2 PCES) PIVOT (2 PCES) POIGNÉE (1 PCE) PLASTIQUE MAGNÉTIQUE POUR PORTE (2 PCES) PARE-ÉCLABOUSSURES LATÉRAL POUR PIVOT (1 PCE) BAS DE PORTE EN PLASTIQUE (2 PCES) PIÉDROIT MURAL MAGNÉTIQUE (1 PCE) PANNEAU FIXE (1 PCE) PORTE (1 PCE) BLOC-PIVOT INFÉRIEUR (1 PCE)
PROCÉDURE D’INSTALLATION/ÉTAPE 1/ÉTAPE 2/ÉTAPE 3 1 2 2.1 Placez le niveau sur les murs pour vous assurer qu’ils sont aplombés, puis mettez les piédroits de porte (14) en place et marquez l’emplacement des trous. ÉTAPE 1 CRAYON Ensuite, percez des trous dans le mur et insérez les bouchons muraux (1) à l’aide d’un maillet en caoutchouc.
PROCÉDURE D’INSTALLATION/ÉTAPE 4/ÉTAPE 5 4 Raccordez le piédroit mural magnétique (13) aux rails supérieur et inférieur (15) en utilisant un joint d’étanchéité en aluminium (7) et des vis à tête cylindrique bombée de 1 po (6). Les vis sont enfoncées à partir du dos du piédroit en haut et en bas.
PROCÉDURE D’INSTALLATION/ÉTAPE 6 6 Soulevez l’ensemble du cadre et placez-le dans l’ouverture, puis poussez les extrémités vers l’extérieur pour enclencher les piédroits muraux. Utilisez une vis de 3/8 po (4) en haut et en bas du cadre, pour verrouiller l’ensemble en place.
PROCÉDURE D’INSTALLATION/ÉTAPE 7/ÉTAPE 8 7 5 Insérez les pivots (8) par-dessus le vitrage et vissez-les ensemble. Placez la rondelle de pivot (19) sur la cheville du pivot sur le dessus du bloc-pivot. Abaissez le panneau de porte inférieur (17) avec précaution sur le bloc-pivot (18) en insérant la cheville du pivot dans le trou correspondant du pivot (8). Faites glisser les couvercles décoratifs sur les deux faces des pivots (8).
PROCÉDURE D’INSTALLATION/ÉTAPE 9 9 Fixez le plastique magnétique pour porte (10) à l’extérieur du panneau de porte en verre (17). Ensuite, fixez le pare-éclaboussures latéral pour pivot (11) à l’extrémité opposée du vitrage et le bas de porte (12) en bas. PROCÉDURE D’INSTALLATION/ÉTAPE 10 10 Ajustez à l’ouverture. Insérez des vis de 3/8 po (4) dans le cadre et recouvrez les vis avec les cache-vis (3).
PROCÉDURE D’INSTALLATION/ÉTAPE 11 11 Appliquez du mastic sur les côtés intérieurs du cadre de la porte de cabine de douche pour assurer l’étanchéité. Veuillez maintenir la surface tout entière sèche pendant au moins 24 heures.
AVERTISSEMENT POUR LES CONSOMMATEURS : RENSEIGNEMENTS DE GARANTIE IMPORTANTS POUR ENCEINTE DE DOUCHE VEUILLEZ NE PAS JETER Nous vous remercions de votre achat d’une porte de cabine de douche de FGI Industries, Ltd. Afin de vous prévaloir de la garantie du produit, veuillez enregistrer votre porte sur notre site web dans les deux (2) semaines suivant l’installation. Allez sur : https://craftandmain.com/warranty/ et suivez les instructions.