
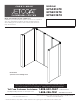
Instructions / Assembly


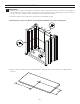

INSTALLATION PROCEDURE / STEP 6
- 9 -
6
INSTALL BACK RIGHT WALL PANEL
Important Note: The arrows on the label on the back of each panel indicate the TOP of the Panel.
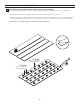
1. Locate the panel labeled (3) Third Panel and lay it down on a flat surface.
2. Based on your measurements from Step 1 (Measuring) cut the panel to the appropriate size and
make any required plumbing cut-outs according to the instructions in Step 2 (Cutting).
IMPORTANT: If you are using the optional corner trim or not, be sure to measure and cut appropri-
ately for the existing space needed to complete your corner. You may have to cut more or less of
the tongue to ensure proper fit and finish. We strongly recommend that you re-measure to verify
your final panel width before cutting this panel.
3. Apply the double-sided tape and construction adhesive as explained in Step 3.
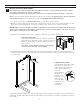
4. Peel o back of double-sided tape from the back of the panel. Position the panel at an angle of
approximately 45 degrees, and carefully push the tongue edge into the groove in the trailing
edge of the (3) Second Panel. Move the panel gently while exerting forward pressure and
carefully push it toward the back wall.
Important Note: Great care must be taken when installing this panel. The watertight seal depends
on the tongue being firmly inserted into the groove before the panel is pushed back into position
and height alignment cannot be adjusted once the panel clicks into place.
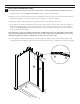
6. Press against the wall smoothing out any air bubbles along the entire area and then lightly tap on
wall panel with a rubber mallet from top to bottom to ensure it is tightly connected to the wall.
3
3
3
3
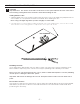
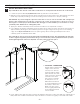
OPTIONAL CORNER TRIM
Apply caulk to both back
edges of the internal
corner piece. Fill the
channel that the back
panel will fit into with
caulk. Insert the optional
internal corner trim
45° into the end side
of wall panel. Use a
flathead screw driver
to exert forward pressure
and snap in with ease.
Make sure the corner
trim is tightly attached
to the wall panel and
corner of wall.
5.
3
3