
Instructions / Assembly


INSTALL LEFT BACK WALL PANEL
Important Note: Failure to install the back wall panels in the correct order may cause the pattern
across the back wall not to appear continuous.
Important Note: The arrows on the label on the back of each panel indicate the TOP of the Panel.
Note: Your kit contains 3 back wall panels (labeled on the back as (3) First Panel, (3) Second Panel
and (3) Third Panel) and two end panels (labeled (4) Right Panel & (4) Left Panel).
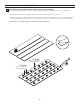
1. Locate the panel labeled (3) First Panel and lay it down on a flat surface.
2. Based on your measurements from Step 1 (Measuring) cut the panel to the appropriate size and
make any required plumbing cut-outs according to the instructions in Step 2 (Cutting).
IMPORTANT: If you are using the optional corner trim or not, be sure to measure and cut appropri-
ately for the existing space needed to complete your corner. You may have to cut more or less of
the tongue to ensure proper fit and finish.
3. Apply the double-sided tape and construction adhesive as explained in Step 3.
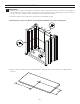
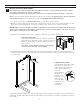
4. Optional Corner Trim
If using the optional corner trim, apply construction
adhesive to the backside of the internal corner trim
and push it into place as shown (left corner only
at this time).
Important: Corner Trim should not be used if the
corner is more than 1/4" out of square.
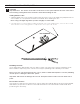
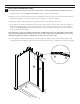
5. Peel o back of double-sided tape from the back of the panel. Position the panel at approxi-
mately 30 degrees, push the cut edge into the corner and then carefully push the panel towards
the back wall.
6. Push panel firmly against the wall smoothing out any air bubbles along the entire area and then
lightly tap on wall panel with a rubber mallet from top to bottom to ensure it is tightly connected
to the wall.
1
INSTALLATION PROCEDURE / STEP 4
4
- 7 -
3
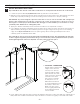
Optional Corner Trim
Peel o back of double-sided
tape from the back of the
panel. Fill the channel with
caulk, then position the
panel at
approximately
30 degrees,
push the cut
edge into the
channel and
then carefully
push the panel
towards the
back wall.
5.
3