
Installation Guide


page 8
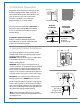
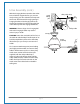
Remove finial and finial plate from threaded
rod at bottom of light kit fitter. Raise glass
shade in order to align threaded rod on light kit
fitter with hole in middle of glass shade and
push up gently, allowing threaded rod to come
through hole. Replace finial plate and finial that
were previously removed. Secure glass shade to
light kit fitter by tightening finial. Do NOT
overtighten finial as glass may crack or break.
8. Light Kit Assembly (Optional). (cont.)
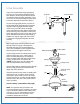
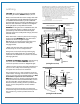
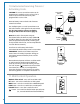
9. Alternate Final Assembly, Without Light Kit.
motor
assembly
threaded rod
light kit
fitter
finial
finial plate
glass shade
If you do NOT wish to use the light kit, remove
1 screw from motor plate on underside of
motor assembly and partially loosen the other
2 screws. Align slotted holes in small fitter
plate with loosened screws in motor plate,
allowing molex connections from motor
assembly to come through hole in middle of
small fitter plate. Twist small fitter plate to lock.
Re-insert screw that was previously removed
and securely tighten all 3 screws with Phillips
screwdriver.
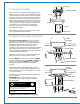
Remove 3 screws from outer edge of small
fitter plate.
Align holes in metal cover with holes in small
fitter plate. Secure metal cover with 3 screws
that were just removed.
motor
assembly
motor plate
small fitter plate
small fitter
plate
molex connections
metal cover
motor
assembly