
Owners manual


28
SERVICE AND MAINTENANCE
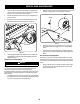
2. Locate the drive control lever stop adjustment bolts on the front of the seat
frame. See Figure 35.
Figure 35
3. To decrease the forward speed, turn the bolt clockwise. To increase the
forward speed, turn the bolt counter-clockwise. Turn the bolt in the
necessary direction ⁄-turn at a time. After turning the bolt, check the
adjustment by driving the tractor.
4. Continue the adjustment until the wheel speeds are in sync and the tractor
drives straight with the drive control levers fully extended forward in the
full-speed position.
Deck Removal
Remove the mower deck from the tractor as follows:
1. Move the tractor to a level surface, disengage the PTO, stop the engine, and
set the parking brake.
2. Move the deck gauge wheels to their highest setting (lowest deck setting).
3. Remove the ‘V’ belt from the PTO pulley, located on the bottom of the
engine, using one of the following two methods.
WARNING
The muffler at the rear of the tractor may be extremely hot, and could
cause serious burns. Use extreme caution when near the muffler. Allow the
muffler to fully cool before removing the belt from the PTO pulley.
4. Releasing Belt Tension with the Idler Pulley
a. Using the deck lift handle, raise the deck to the position that provides
the most horizontal run of the belt between the deck idler pulleys and
the PTO pulley on the bottom of the engine. See Figure 36.
Transport Position/
Highest Mowing
Position
Lowest Mowing
Position
Deck Removal/
Installation Position
Figure 36
b. Working from the middle of the tractor, pivot the idler bracket and
movable idler pulley rearward away from the backside of the ‘V” belt
(a) just far enough to lift the belt up and over the idler pulley (b). See
Figure 37.
b
a
Figure 37
c. From beneath the rear of the tractor, slide the belt off of the PTO
pulley on the bottom of the engine.
d. Lower the deck into the deck removal/installation position using the
deck lift handle. See Figure 36.
e. Skip ahead to step 6.