
Owners manual


7
ASSEMBLY
Set-Up
NOTE: Remove the deck wash system nozzle adapter from the manual bag and store
for future use.
Moving The Riding Mower Manually
Your riding mower’s transmission is equipped with a hydrostatic relief valve for
occasions when it is necessary to move the riding mower manually. Opening this
valve permits the fluid in the transmission to bypass its normal route, allowing the
rear tires to “freewheel.” To open the hydrostatic relief valve, proceed as follows:
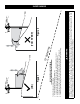
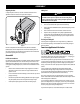
1. Locate the hydrostatic bypass rod in the rear of the riding mower. See Figure 1.
a
a
b
Figure 1
2. Engage the bypass rods by pulling each one out (a) and to the right (b) to
lock it into place. See Figure 1.
3. Disengage the bypass rods by reversing steps a & b after moving the tractor.
See Figure 1.
NOTE: The transmission will NOT engage when the hydrostatic bypass rod is
pulled out. Return the rod to its normal position prior to operating the riding
mower.
CAUTION
Never attempt to move the riding mower manually without first opening
the hydrostatic relief valve. Doing so will result in serious damage to the
riding mower’s transmission.
Install Operator’s Seat
To install the seat proceed as follows:
NOTE: The seat is shipped with the seat switch and seat pan attached.
1. Cut any straps securing the seat assembly and the drive control levers to the
riding mower. Remove any packing material.
NOTE: Be careful not to cut the wiring harness connecting the seat and the
seat switch.
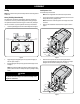
2. Remove the two shoulder bolts and lock nuts in the seat pan as shown in
Figure 2.
Wire Harness
Seat Pan
Shoulder
Bolt
Lock
Nuts
Shoulder
Bolt
Figure 2
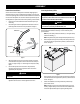
3. Rotate the seat into position and secure the seat into place with the
previously removed shoulder bolts and lock nuts. Be careful not to crimp or
damage the wire harness while installing the seat. See Figure 3.
Wire Harness
Seat Bracket
Shoulder Bolts
Lock Nuts
Figure 3