
Operating instructions
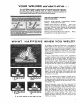
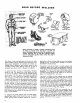

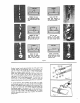
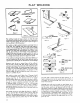
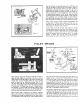
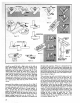
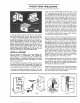


Figure 11
Figure 8
Figure 9
Figure tO
_UTTING
Figure 12
_ _ EXCESSWELD_
Figure 13
LAPWELDS
LAPWELDS
Figure 14 Figure 15
Figure+ 16
INTERMITTENT
WELOS
STAGGEREO
iNTER+
WELDS
Figure 17
WELD_'\OHBOTHSIRES
ATENDOF JOINT
should be nearly flat with a slight radius at the sides or
toes. Avoid excessive concave or convex surfaces of the
fillet (fig. 7). Undercuts and cold-laps are caused by not
holding the rod in the center of the seam (fig. 8). If the
desired fillet weld cannot be made with a single pass,
several passesare usedto build it upto required size(fig. 9).
Slag must be cleaned from each pass before depositing
the next. Fillet welds over 1/2-inch in size are rarely used
because ioints requiring more strength can be made more
economically by beveling and groove+welding, followed
by a small concave fillet weld to provide a radius in the
corner,
Horizontal fillet welding is used when the side or edge of
one member of the joint isinthe vertical positionparticularly
for small single-pass welds where the work cannot be tilted.
For practice, tack+weld two pieces of scrap together to
form a tee-jolnt (fig. 10). Use a 5/32-inch rod held at
angles indicated, and direct the arc into the corner ot the
joint. The arc length should be somewhat shorter than for
flat fillet welding. To assure penetration at the root, use the
highest welding current that ca_ be handled (fig. 11).
Good penetration is of prime importance and appearance
will come with experience. If the arc is advanced too fast,
or held too close to the vertical plate, undercutting may
result (fig. 12). Too slow travel will cause overlapping and
an extremely close arc or low current will produce a bead
with a convex surface (fig. 13). To check the penetration and
soundnessof the bead, break some of the welds for inspec-
tion, as shown in figure 4+
When making a lap weld, care should be taken not to mett
too much of the upper corner on the top plate (fig. 14).
Some melting will take place, but proper advance of the
rod will cause the weld metal to build up and blend into the
top surface. On sheet metal, hold the 3/32-inch rod almosl
perpendicular and move the arc rapidly. Welds of this
type should be wider than they are high, somewhat like a
flat beacJ(fig. 15). A sfight discoloration on the underside
of the lower sheet indicates good penetration. On heavy
metal, a 3/8+inch fillet weld can be laid in one pass with a
1/4-inch rod using a 295-ampere machine. However, with
smaller machines, the same weld or larger can be made by
building up with a number of passes (fig. 16). When
welding long narrow pieces, stagger the welds in short
intermittent beads, first on one side then on the other side,
to minimize distortion (fig. 17).
t-)O