
Owner`s manual
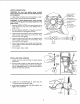

CHUCKKEY... It is a self-ejecting chuck key which
will "pop" out of the chuck when you let go of it. This
action is designed to help prevent throwing of the chuck
key from the chuck when power is turned "ON". Do not
use any other key as a substitute, order a new one if
damaged or lost.
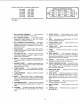
DRiLLiNG SPEED... Can be changed by placing the
belt in any of the STEPS (grooves) in the pulleys. See
Spindle Speed chart on right side of Head.
To determine the approximate drilling speed, refer to
the table on the LEFT side of the drill press head.
BELT TENSION... Refer to section "Assembly - Instal-
ling and Tensioning Belt" (Page 9).
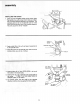
3/16" ROD
CHUCK KEY
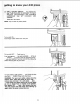
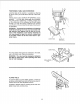
REMOVING THE CHUCK
1. Insert a piece of 1/4" dia. steel rod in one of the
holes in the chuck body.
2. Insert 3/16" alia. rod or drill into one of the holes in
the collar.., turn it in the direction of arrow until
LOOSE. Continue to turn it until the chuck is re-
leased.
J
CHUCK
BODY
LOCKING
COLLAR
1/4" ROD /
OR DRILL \ •
CHUCK
SLEEVE
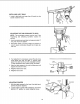
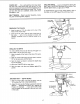
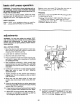
DRILLING TO DEPTH
To drill a BLIND hole (not all the way through) to a
given depth, can be done two ways.
1. Mark the depth of the hole on the side of the work-
piece.
2. With the switch OFF bring the drill down until the
TIP or lips are even with the Mark.
3. Spin the lower nut down to contact the depth stop
lug on the Head.
4. Move the POINTER all the way down.
5. Spin the upper nut down and tighten against the
pointer.
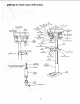
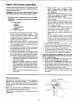
ANOTHER WAY -- DEPTH SCALE
1. With the switch OFF, bring the drill down until the
TIP touches the TOP of the WORKPIECE.
2. Adjust the nuts so the Pointer is set to the desired
DEPTH... TIGHTEN the UPPER NUT against the
Pointer. For example.., if you want to drill a hole
one inch deep, set the pointer at the one inch mark
in the scale.
--J !/_ SCALE
• _ 19 T UPPER
_"[ _____ J STOP NUT
TIP TOUCHES _ _1_ "STOP NUT
WORKPIECE__L_""
17