
Operating instructions

TROUBLE SHOOTING
WARNING_ FOR IYOUR OWN SAFETY, TURN SWITCH "OFF" AND REMOVE PLUG
FROM POWER SOURCE OUTLET BEFORE TROUBLE SHOOTING YOUR SHAPER
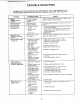
"_-17 : _TROUBLE
:itoo hard.
Cutter comes loose
:: during operation.
Cutter slow down
during operation,
J PROBABLE CAUSE
Set screw engaging slot
in spindle assembly
too tight,
Keyed washer not
properly installed.
I 1. Work being fed too
rapidly.
2. Insufficient belt
tension.
3, Glazed belt
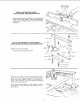
Bottoms of fence faces
striking table.
....Bindi. 0fF "0e...... i
Boards when adjusting
IN or out.
Shaper produces ragged 1, Work piece not being
or riplMe cuts. held firmly against
fence and/or table.
_. 2. Interrupted feed
: past cutter.
3. Dull cutter.
, 4, Belt slipping - causing
, cutter speed to vary.
5, Cutter blades not
concentric. (Blade
segments have uneven
lengths.)
, : F: 6. Work being fed too
7_ Quality of wood not
. : sufficient to produce
: : : ' ::: .... desired results,
smooth cut, but does
., not l'_|d a straight edge,
Shape varies across
.width of board.
REMEDY
Tighten screw then back it off 1/4 turn. Adjust until
action is smooth without end play.
The keyed washer must always be used directly under
the nut.
t. Feed work thro'ugh more slowly to allow cutter to
remove stock smoothly,
2, Loosen motor mount plate bolts and move motor
slightly toward rear of shaper until belt tension is
correct, tighten bolts.
3. Replace belt,
screws
Loosen the two through front of face, raise it
s_ightly and tighten screws,
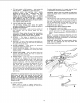
set.
: 2: Spindie Assembly lock
knobnot tight. '
3. WOrkpiece not held
snugly against fence.
4. Work piece not held
snugly against table.
5, Work being fed to
rapidly.
6. Attempting to remove
more material than
required to produce
desired shape.
7. Fence loose on table.
1. Work not held
securely to miter
gauge and/or to
table.
2. End of workpiece
not Paraltel with
miter gauQe slot.
3, End to be shaped I
is wavy (not
straight),
1, Apply sufficient hand pressure in both
directions or revise Auxiliary Fence/Work
Support (pg. 15) accordingly.
2. Maintain continuous feed,
3. Sharpen or replace cutter
4. Adjust [belt for proper tension.
5. Replace or resharpen cutter,
6. Feed work through slow enough to produce
smooth cut,
7. Use a better grade of material.
fence faces.
2. Tighten spindle assembly lock knob.
3, increase hand pressure or revise Auxiliary
Fence/Work Support (10g, 15).
4. Increase hand pressure or revise Auxiliary
Fence/Work Support (pg. t 5),
5. Feed work through more slowly,
6, Joint workpiece to proper width before shaping edge.
7, Tighten fence.
1. Hold work firmly against miter gauge and down
on the table,
2. Adjust miter gauge.
3. Resaw andlor joint as necessary.
2O