
Owner`s manual

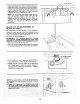

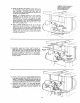

TILT MECHANISM
Lower blade to 2 inches or closer to the table top
before tilting blade. Failure to do this may result in
damage to your saw.
The handwheel should turn freely without binding.
The turning action can be adjusted by tightening or
loosening the screws in the bearing retainer.
NOTE: Tilt Handwheel must be removed to adjust.
When adjusting the screws in the bearing retainer
using a screwdriver, hold the nut inside using a 3/8
in. wrench.
/
TILT HANDWHEEL
ADJUST THESE
TWO SCREWS
i
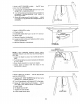
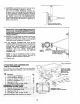
MOUNTING THE MOTOR
NOTE: Motor is included with Model 113.241680.
This motor is non-reversible.
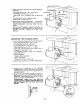
1 CHECK MOTOR ROTATION
A. The motor must rotate COUNTER--
CLOCKWISE when viewed from the shaftend.
B. MAKE SURE "KEY" IS REMOVED FROM
SHAFT.
C. Place the motor on your workbench or on the
floor.
D. Plug the cord into a properly grounded outlet
(See "Motor Specifications and Electrical
Requirements" Section.) Notice the rotation
of the shaft. If it is ROt turning
COUNTERCLOCKWISE, do not continue
assembly. Contact your nearest Sears Store or
Service Center,
E. Remove plug from outlet.
5/8 iNCH __
DIAMETER Si-{AF_
_" KEY
COUNTER-CLOCKWISE
ROTATION
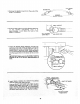
WARNING: TO AVOID INJURY FROM
ACCIDENTAL START, MAKE SURE MOTOR IS
NOT PLUGGED INTO SWITCH OR ANY OTHER
ELECTRICAL OUTLET.
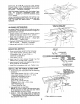
2. From among the loose parts find the following:
1 Motor Mount
2 Carriage Bolts 1/4-20 x 3/4 in. long
2 Hex Nuts 1/4-20 (aprox. dia. of hole 1/4 in,) LOCKWASHER
2 Lockwashers External Type 1/4in. (approx. dia.
of hole 1/4 in.}
3. Insert carriage bolts through square holes in rear
panel of table saw and through square holes in
motor mount. Install Iockwashers and hex nuts. HEXNUT
1/4-20
CARRIAGE BOLT
1/4-20 x 3/4 IN.
MOTOR MOUNT
/
14