
Operating instructions


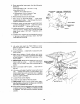


7. Slide SPREADER ROD into BLADE GUARD
SUPPORT until end of ROD is even With edge of
SUPPORT . . . Tighten Hex Head _crew in
support,
8. Attach SPREADER to SPREADER SUPPORT so
that the edge of the spreader is even with the
edge of the spreader support. •, tighten screws.
9. Raise ANTIKICKBACK PAWL (hoSd it in place
with a piece of masking tape)
•.. align spreader SQUARE to table
• . . Tighten both 5/16-18 x ! in. HEX HEAD
SCREWS.
1/4-20 HEX
HD. SCREW
1/d IN. LOCKWASHER
-_/4~20 HEX NUT
sPREADER EDGE
EVEN WiTH SPREADER
SUPPORT EDGE
END OF ROD
EVEN WITH EDGE
OF SUPPORT
F
t
5/16-18 X 1 IN,
HEX HD. SCREWS
10. Raise blade all the way up... make sure it is
square with table.
I1. Raise Blade Guard ... lift up both ANTIKICK-
BACK PAWLS.,. insert one of the SETSCREW
WRENCHES in the notches to hold the pawls out
of the way.
12. Lay blade of square or other straightedge along-
side of blade.
13. Loosen Hex Head Screw in BLADE GUARD
SUPPORT and move spreader so that it touches
blade of square.,, tighten screw•
14. NOTE: The spreader is now square with the table
and approximately in line with the sawb_ade. The
spreader requires further adjustment to align it
PARALLEL to the blade and in the MIDDLE of the
cut (KERF) made by the sawblade.
SCREW
15.IMPORTANT: To work property, the SPREADER
must always be PARALLEL to the sawblade and
adjusted so the cut workpiece will pass on either
side at the spreader without binding or skewing
to the side.
NOTE: The spreader is thinner than the width of
the cut (KERF) made by the 8awblade by approxi-
mately six thicknesses of paper.
KERF WOOD
iw
SPREADER
LOOKING DOWN ON SAW
BLADE
/
/
17