C0) owner’s manual MODEL NO. 113.176120 Serial Number Mabel number is found in the rear on the UL label Serial number will be found on the inside {back side} of the latch.
Warranty CRAFTSMAN ONE YEAR FULL WARRANTY FOR ONE YEAR from the date of purchase, this product is warranted against any defects in material or workmanship. Defective product will be replaced free of charge. For warranty coverage details to obtain free replacement, visit the web site: www.crattsman.com This warranty does not cover filters, hose or attachments, which are expendable parts that can wear out from normal use within the warranty period.
Do not use with a tom filler or without the filter installed except when vacuuming Liquids as described in this manual. Dry debris ingested by the impeller may damage the motor or be exhausted nto the air, Turn off Vac before unplugging. To reduce the risk of injury from accidental starting, unplug power cord before changing or cleaning filter Do not unplug by pulling on cord. To unplug, grasp the plug, not the cord. Do not use with damaged cord, plug or other parts.
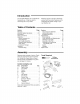
Introduction This Portable Wet/Dry Vac is intended for household use. It may be used for vacuuming wet or dry media. Table of Contents Section Warranty . important Safety Instructions . Introduction LLL Table of Contents Assembly... Carton Contents List Tools Required . Toot Candy Assembly . Wheels/Caster Assembly . Courthouse. Accessory Storage . | Operation.
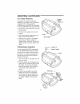
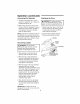
Assembly (continued) Tool Candy Assembly Locate the tool candy and the bag assembly in the carton. The tool candy is designed to fit on the back of the 4-Gallon drum and MUST BE assembled to the Vac BEFORE fastening the wheals. 1. Remove the power head from the drum and set aside. 2. Turn the drum upside down on a flat surface. 3. Turn the tool candy upside down and align to the back of the drum. Tool Candy 4.
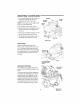
Assembly (continued) 1. Line up front {label and switch side) of the power head with the Vac port located on the front of the drum. NOTE: Power head must be aligned with drum for proper attachment. 2. Place power head on top of drum. 3. Be sure prows head completely covers the top of the drum so leakage does not oeuvre. 4. Push down the flexible latches, and the power head will attach to the drum. 5. To remove the power head, pull up on the latches and remove from drum.
Operation A WARNING: To reduce the risk of fire, explosion, or damage to Vac: Do nat leave Vas running while unattended you may fail to nicety important signs indicating abnormal operation such as jots of suction, debridement exiting exhaust, or abnormal motor noises. Immediately stop using Vac If you notice these signs. Do nat leave Vac plugged-in when not in use. Do not continue running when float has cut off suction, Do not operate Vas in areas with flammable gases, vapors or explosive dust in the ait.
Operation (continued) Vacuuming Dry Materials 1. The filter must always be in correct position to reduce the risk of leaks and possible damage to Vac. 2. When using your Vac to pick up very fine dust, it will be necessary for you to empty the drum and clean the filter at more frequent intervals to maintain peak Vac performance NOTE: A dry fitter is necessary to pick up dry material. If you use your Vac to pick up dust when the filter is wet, the filter will clog quickly and be very difficult to clean.
Maintenance Filter AA WARNING: To reduce the risk of injury from accidental starting, unplug power cord before changing or cleaning filter. NOTE: This filter is made of high quality paper designed to stop very small particles of dust. The filter can be used for wet or dry pick up. Handle the filter carefully when removing to clean or installing it. Creases in the filter pleats may occur from installation but creases will not affect the performance of the fitter.
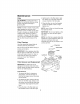
Maintenance (continued) NOTE: If fitter cage needs to be removed, or replaced, use a flat blade screwdriver and insert the bade near one of the tabs between the filter cage and the center ring of the power head. Pry the tab out of the slot. Tilt the cage and lift away from the power head. Replace in the following manner: 1. Place the float over the opening in the center of the power head as shown, laying face down over the hole. 2. Lina up filter cage tabs with slots in the center ring of the power head. 3.
Maintenance (continued) Cleaning and Disinfecting the Wet/Dry Vac To keep your Wet/Dry Vac looking its bast, clean the outside with a cloth dampened with warm water and mild soap. To clean the drum: 1. Dump debris out. 2. Wash drum thoroughly with warm water and mild soap. 3. Wipe out with dry cloth Before prolonged storage or as needed waste water pick up) the drum should be disinfected.
Repair Parts 4 Gallon Portable Wet/Dry Vac Model Number 113.176120 Always order hy Part Number Not by Key Number A WARNING SERVICING OF DOUBLE-INSULATED WET/DRY VAC In a double-insulated Wet/Dry Vac, two systems of insulation are provided instead of grounding. No grounding means is provided on a double-insulated appliance, nor should a means for grounding be added.
C0) manual del usuario NO. DE MODELO 113.176120 Rimero de serie El minero de modelo se encintara en la parte trasera, en la etiqueta de UL. Ef minera de serie se encontrar en el interior {lato trasero} del pestillo. Usted debe anotar los animeros tanto de modelo cama de serie en un lugar seguro para uso futuro.
Ensamblaje (continuación) 1. Nogalina la parte delantera (el lado da la vigueta y el interruptor) del cabezal del motor con el orificio de aspiración ubicada en la parte delantera del yambo. NOTA: £1 cabezal del motor se debe alinear can ef tambor para instalarlo correctamente. Coloque el cabezal del motor sobre 1a parte superior dal yambo, Aseglares de que ef cabeza! del motor cubra completamente la parte superior det tambor, para que no haya fugas.
Mantenimiento Filtro AA ADVERTENCIA: Para aducir el riesgo de {sesiones por causa da un arraigue accidental, desenchufe ef cordón de energía antes dg cambiar o limpiar ef filtro. NOTA: Este filtro estad hecho de papel de alta calidad diseñado para detener partículas de polvo mita pejigueras. El filtro se puede utilizar para recoger material mofado o sec. Maneje f filtro van sudado cuando la quite para templarlo a cuando lo instale.
Mantenimiento (continuación) NOTA: Si es necesario retirar o reemplazar a jauta del filtro, ufos un despitorrado de hoja plana Inserte la hoja cerca de una de las lengüetas entre la jauda dal filtro y ef anillo central del cabezal del motor. Haga planea en la lengüeta hasta sacarla de fa ranura. Incline la jauta y dintela alejandrino del cabezal del motor. Comuníquela de nuevo de fa siguiente manera: 1.
Your Home For troubleshooting, product manuals and expert advice: @® manageability www.managemylife.com For repair — in your home — of all major brand appliances, lawn and garden equipment, or heating and cooling systems, no matter who made it, no matter who sold it! For the replacement parts, accessories and owner's manuals that you need to do-it-yourself, For Sears professional installation of home appliances and items like garage door openers and water heaters. 1-800-4-MY-HOME® Call anytime.