
Manual

i i 1 i
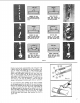
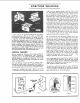
Fi_re .3 Figure 4
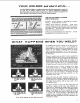
1o lay a weldbeadonlytwo Watchthe wold puddleto
movementsare Used,down- keep the slag fromflowing
wardandin the directionthe in frontof it, causinginciu-
weldis to be laid. sionsandgas pockets,
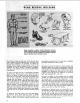
Figure 5
Fill the crater, whenstarting
a new rod, by striking the
arc at A then movingto B
and back to C position.
[[ _1 i
I I
Figure 6
1"owiden the bead, work the
rod from side to side slight-
ly, with a stow, zigzagging
crescent-shaped motion.
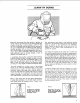
Ifldifficult:y is experienced after repeated.attempts t9
maintain an arc, check ithe work connection for proper
contact with the work; If this does not help, increase the
welding current. Also check the rod size, as larger rods
requi re higher current settings.
Practice Striking and maintaining an arc for a few seconds,
then snap it out by rapidly pulling the rod away from the
Workl Repeat this Operation until the arc can be started
and the gap maintained as uniformly as possible. In a
find the:arc iength can be controlled by
the_::cra(_kiingor.:_:frying :,sound:which may be recognized
by gradua!ly shi_tening the arc until it sputters irregularly
aS though.lt wei:e going to: choke out' and stick-then
slowly lengthening the arc by pulfing the rod away from
the work unt;i it snaps out. Somewhere between these two
extremes the steady crackling sound of a proper arc length
will; be heard.
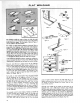
To lay only two movements are used, a
stead}(.downwa_d feeding of the rod to maintain the correct
arc |ength;.and a islowtrave|: in the direction in which the
weld: 3).iWatch the weld puddle and
arc length_andim0_e theil.rod Steadi|y in a straight line as
the back end 0f:ilffieCrate_ fi!ls:up (fig. 4). The Slight angle
of the rod wiii keep the flux or slag {lowing over: th:e
dep0slted weidmetal 'to: farina protective coating, if:the
rod is moved too lsl0wly the stag will flow in front of the
puddle ancl be trapp:ed :i'n the weld,: producihg' ini:lusions
and gas pocketSi : .... " i....
Lay a bead. approximately fou_ incheslong. After allowing
it to cool SligF_tly,remove the: SlagCoating; which Coversthe
top of the weld; by:scraplng along each edge of the weld
with a cotd:.cF_isetf0!owed by wii_ebrushing until:it is bright
and dean_ Inspect the Surface Of the weld carefully before
starting another. The surface of a good weld is rippled
uniformly, which results from a steady rate of travel and
uniform arc length.
If the scrap plate used is small, it will become very hot after
laying a :few beadS. This will alter welding conditions
Which €ou'ld be;very Confusing to a beginner. Have several
scrap pieces handy so each may be allowed to cool before
After laying a number of beads, try "'working" the rod
from side to side slightly (fig. 6). This movement should
be slow and not wider than the diameter of the rod being
used. Experiment with different current settings, rod sizes
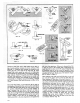
and rates of travel. Compare results with welds shown in
the diagrams (fig. 9).
Too low a current setting tends to deposit the bead on top
of the plate with very little penetration. The arc sound will
be an intermittent crackle with irregular sputtering. Too
high a current setting (for the size of the rod being used)
will provide sufficient penetration but the bead will be thin
and undercut in places. The arc makes a hissingsound and
the rod becomes red hot before it is half used.
if travel istoo slow it" will pile up a wide, heavy bead with
good penetration but witk overlap of the weld metaI on
sides without fusion. A large area surrounding the weld is
heated to o high temperature which produces distortion,
even on a simple weld. If the rod is moved too fast the
small bead will result with little more than melted base
metal An extremel)_ ]0ng arc causes the rod to melt off in
globules, with little Or nopenetration, and a very irregular
weld Surface. The arc produces a hissingsound.
A good weld laid with correct current setting, speed and arc
length?.willproduce a sUrface that is rippled uniformly, with
the same width throughout its length, and wel] formed
crater.. The cross-sectional view showsit to have good pene-
tration and no undercut or overlap.
i
laying a seCOnd:bead.
IlU Jl
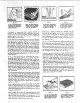
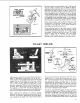
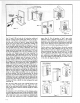
When starting with a new rod, chip slag from the crater Figure7
and strike,the arc at the forward end aS shown ;at "'A" in
figure 5. Then move the rod to "B" and back to "C," at Lay the weld beadsabout
one ineh apart. Removethe
about twice the normal rate of travel to give the rod and slagandexamineeachwed
base metal time to heat up for proper fusion, before starting the nexL
Figure 8
A pad of weld metal is built
up by running a series of
beads in layers at right
angles to each ether.
1.6