
Operating instructions


_, WARNING l
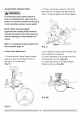
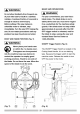
Ensure that the blade collars are clean and
correctly positioned on the arbor.
Lower the blade into the table and check for
any contact with the table or table insert.
If contact occurs see CUTTING HEAD
TRAVEL page 25.
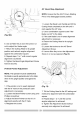
MOUNTING THE MITER SAW
WARNING I
To reduce the risk of injury from unexpected
saw movement, place the saw in the
desired location either on a workbench or
other suitable machine stand. The base of
the saw has four mounting holes through
which suitable bolts can be placed to secure
the miter saw. If the saw is to be used in
one location, permanently fasten it to the
workbench using appropriate fasteners
(not supplied). Use locking washers and nuts
on the underside of the workbench.
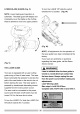
(Fig. H)
1. Tighten the miter and bevel locks.
See OPERATION section.
2. To avoid injury from flying dust, position
the saw so that other people or bystanders
cannot stand too close (or behind) it.
3. Locate the saw on a firm, level surface
where there is plenty of room for handling
and properly supporting the workpiece.
4. Support the saw so the machine table is
level and the saw does not rock.
5. Bolt or clamp the saw securely to its
support stand or workbench.
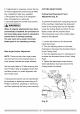
For portable use:
1. Mount the saw on a 3_in. thick piece of
plywood using appropriate fasteners (not
supplied).
2. It may be necessary to countersink the
washers, nuts etc to the underside of the
plywood mounting board to avoid an uneven
work surface.
3. Use 'C' - clamps to attach the mounting
board to the work surface at the work site.
(Fig. J)
(Fig. H)
I I i!ii_
I I
I I
I I
I I
I I
I I
I I
(Fig. J)
21