
Operating instructions


ADJUSTMENT INSTRUCTIONS
WARNING l
To avoid injury from electric shock or
from an accidental start, make sure the
switch is in the OFF position and the plug
is not connected a power source outlet.
NOTE: When checking angular
alignments the Cutting Head should be
lowered and locked in the down position
with the latching pin fully located in its
socket.
Refer to 'Locking the Cutting Head in the
down position' page 18
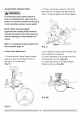
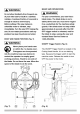
0° Bevel Stop Adjustment
1. Ensure that the Cutting Head is upright
against its stop and the Bevel Pointer is
indicating '0°' on the scale.
(Fig. K)
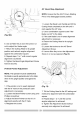
2. Place a combination square on the miter
table with the rule against the table and the
heel of the square against the blade. (Fig. L)
(Fig. L)
3. If the blade is not 900 square with the miter
table, adjustment is required.
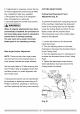
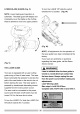
4. Loosen the Bevel Lock Handle and tilt the
Cutting Head to the left. (Fig. M1)
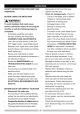
5. Loosen the tocknut on the Bevel Angle
Adjustment Screw. (Fig. M2)
(Fig. M1)
(Fig. K)
22