
Operator`s manual
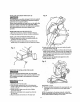
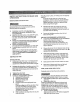
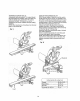

BODY AND HAND POSITION (FIG P)
Proper positioning of your bedy and hands when
operating the miter saw will make cutting easier and
safe_ Never p!ece hands near the cutting area. Position
hands at least 7-1/4" away from the path of the blade.
Hold workpiece firmly against the fence to prevent
movement toward the bfade. Keep hands in position
.untilthe.tr_gg_=rhas been released and the blade has
completely slopp_d Before rnal_ing ,_cut, _vit5 the .....
power switch in the OFF position bring the saw blade
down to the workpiece fo see the cutting path of the
blade.
• Keep children away. Keep all visitors a safe
distance from the miter saw. Make sure
bystanders are clear of the miter saw and
workplace°
e Don't force tool It will do the job better and safer
at its designed rate Feed the saw into the
workplace slowly with a firm downward mot.fen,
o Before freeing jammed material:
e Turn switch OFF.
a Unplug the miter saw,
@ Wait for all moving parts to stop,
@ After finishing a cut, keep holding the upper
blade assembly in the down position,
e Release the switch, and wait for all moving
parts to stop before moving your hands
o 11the bfade doesn't step within 6 seconds, unplug
the saw and folIow the instructions in
TROUBLESHOOTING GUIDE section for
adjusting the blade brake before using the saw
aoain.
Fig. P
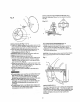
TURNING THE SAW ON (Fig, Q)
To reduce the likelihood of accidenta! starting, a thumb
activated lock-OFF switch is located on top of the
switcll handle, The safety lock-OFF button (1) must be
pushed forward before the trigger switch (2) can be
activated and the miter saw started.
Make the switch child-proof. Insert a padlock through
the hole {3) in the trigger switch and lock _L This will
prevent children and other unauthorized users from
turning the swttch ON,
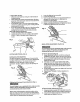
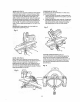
THE LASER -TRAC _
Your tool is equipped with our latest innovation,
the Laser -Tree_, a battery powered device using
Class TI][a laser beams. The laser beams will
enable you to preview the miter blade path on the
workpteea to be cut before you begin your
operation,
Laser is activated when blade is rotating Do not stare
into beam or view directly with optical instruments, Do
not remove the warning label affixed to the blade
guard. Avoid direct eye contact with light source.
NOTE .The red laser line wilt appear as a dotted line
when the motor is activated and the blade assembly is
in the uppermost position. This b?oken line will assist
you in aligning the mark on your workpiece with the
cutting path of the saw blade. As you lower the blade
assembly, the retractable guard will llft and turn the
broken line into a solid red laser line.
Laser Warning label: Max output <5roW DIODE
LASER: 630-670nm, Complies with 2 tCFR 1040.10
and 1040° 11.
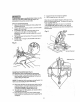
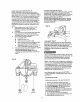
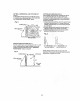
OPERATION OF LASER
With the blade assembly inthe uppermostpositient
t L r
®,
[
1
I
[
I
®
6 lt2 po
1 Position yourwo_kpiece ontothe miter saw,
2. Turn on the m_tersaw to activate the laser beam.
3 Verify the laser beam i_ _ligned withthe mark on
the workplace (WARNING - Do not lower the blade
assembly duringthe alignment process).
4 Ifthe mark on the workplaceis not aligned withthe
dotted laser Dine,turn oft machine, wait for the blade to
stop and repositionworkpiece
5. Turn on the mitersaw and verifyalig nment.
6 Once alignment is achieved, secureworkpiece with
a clampingdevice and perform the cut
]7