
Operator`s manual
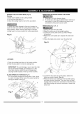
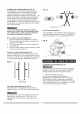
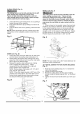

ALIGNING THE LASER GUIDE (Fig. P, Q, R)
This adjustment was made at the factory however
minor adjustment may be required before the tool is
used for the first time. Also, the laser alignment
should be checked periodically to verify accuracy. You
also have the option to change the laser projection to
the left, middle or right side of the blade according to
your preference when using the laser to guide the
cutting operation. When using the laser on an edge of
the workpiece, it may require recalibration to cut at the
left or right of the kerf.
For your own safety, never connect the plug to
power source outlet until all the adjustment steps
are complete and you have read and understood
the safety and operational instructions.
How to Check Laser-beam Alignment
1. Find a 90 ° square scrap workpiece and scribe a
90 ° line as the calibrating pattern and position the
workpiece on the table.
2. Turn on the laser and line up the laser beam with
the scribed line.
3. Lower the cutting head to verify the blade is parallel
to the side of the scribed line.
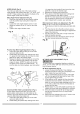
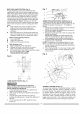
Parallel Laser Beam Adjustment (Fig. P)
Lower the cutting head so the blade is flush with the
side of the scribed line. Turn on the laser beam, loosen
the screw (4 - Fig. R) ¼ turn and adjust the thumbscrew
(2 - Fig. R) accordingly then retighten the screw (4).
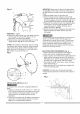
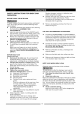
Fig. Q
Laser-beam J
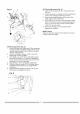
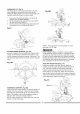
Laser Position Adjustment
If the Laser Beam moves when the upper cutting arm is
raised and lowered, adjust the screw (3) cautiously with
a slotted screwdriver +/- 5 ° or approximately 1/8 turn.
Fig. R
5
Fig. P .
m
n
m
m
m
i
m
m
i
m
w
i
Laser- beam
I
w
m
m
u
m
m
m
m
m
m
u
i
m
m
Laser Beam Angle Adjustment (Fig. Q)
If the laser-beam is not parallel to the scribed line,
adjust the screw (1 - Fig. R) with a Phillips screwdriver.
CHANGING THE BATTERIES (Fig. R)
Unplug your miter saw before making any adjustments.
Failure to unplug your saw could result in accidental
starting causing possible serious personal injury.
1. Lift open the battery cover (5).
2. Remove and replace the two batteries.
Note: Replace the batteries that have a rating of 1.5
volts (Number 4 series and AAA size or equivalent).
When replacing the batteries, the battery cover should
be thoroughly cleaned. Use a soft paintbrush or similar
device, to remove all sawdust and debris.
Be careful not to overturn the adjustment screw. The
maximum turn for the screw (1 - Fig. R) is +/- 5or
approximately 1/8 turn to prevent any possible wire
damage.