
Manual

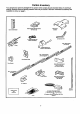
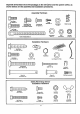

Separate all hardware from the packages in the rail carton and the opener carton, as
shown below, for the assembly and installation procedures.
Assembly Hardware
Hex Screw
1/4".20xS/r (2)
_lll@illIPIlll0
Hex Screw
5/16"-18x7/8" (3)
#8-32x_8" (1)
Lock Washer
Washemd Screw Caffiage Bolt 1/4" (2}
5/16".18xi/2" {4) 1/4".20xi/2" (7)
(2 -mounted in opener}
TrolleyThreadedshaft{1)
©
Lock Washer
5/16" (4)
©
Nut-
5/16"-18(5)
i
Master Link(2)
©
Lock Nut
1/4"-20 (7)
Installation Hardware
5/16"-9Xl -5/8" (4)
Handle
_ll!llllllllllllltll0
Hex Screw
5/16"-18x7/8" (4) Nut 5116"-18 (6)
Carnage Bolt
III[ll!iIIIIIIIIitlltllllillD
5/16"-18X2-I/2" 12)
0
Ring
Fastaner(3)
Rail Grease
©
Lock WaSher 5/16" (6)
_ i tqlllil,_lllilflllIIIl_
Screw
6ABxl-1/2" (2)
Clevis Pin Clevis Pin
5/16"x2-3/4" (1) 5/16"x1" (2)
Insulated
Staples (10)
Dry W_dlAnchors (2)
_llll=llllllltllllllllt_
Lag Screw
114x1-1/2" (4)
Dllll!liilllililililillillliilillli0
Hex screw
114-20xi-1/2" (2)
Safety Reversing Sensor
Installation Hardware
Carriage Boll
1/4"-20xlr2" (4)
Screw
#I0-32x318" (41
©
Lock Nut
1/4"-20 (4)
©
Lock NUt
#I0X32 (4)
Wing Nut (2)
Insulated
Staples (20)