
Manual


Assembly Section: Pages 7- 10
To avoid installation difficulties, do not run the garage door opener until instructed to do so.
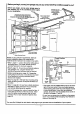
Assembly Step I
Assemble the Rail &
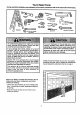
Attach the Chain Pulley Bracket
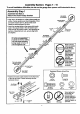
• Align the 4 rail sections on a fiat surface exactly as
shown. Center sections are interchangeable. Front
and back sections are not. Be sure the arrow
labels are pointingtoward the door.
• Insert the carriage bolts so the square bolt necks
seat in the square holes in the rail sections and
pass through the square holes in the opposing rail
sections. Assemble lock nuts, ensure alignment
and tighten.
RAIL BACK
(TO OPENER)
Rail-BackSection
(To Opener)
=,
CarriageBolt
I14"-20x I/2"
(CenterS_-"aon)
If rail is not assembled
exactly as shown, trolley
will not travel smoothly I -_
along length of rail or it
wi I hit against nuts. ] --e-. ,=
_l_ RailA,_
Chain pugey bracket
attachesto FRONT
END of Rail
I
[ToDoor]
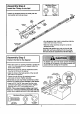
i_ ake sure bolt
necks are seated
in the square
= _= =u holes and rails
are aligned
before you
tighten lock nuts.
Right (See right and
wrong views).
@ Improper
assembly can
cause jerky
trolley operation,
noise and/or
nuisance door
Wrong reversals.
RAIL FRONT
(TO DOOR)
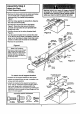
• Position the chain pulley bracket on the front end
of the rail as shown. Fasten securely with the
hardware shown.
5/16*.18x7/8 •
Chain Pulley
Bracket
I
0
Nul - 5/16" _ _ Lock Washer
i_ 5/16"
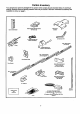
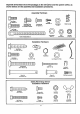
Hardware Shown Actual Size
©
Lock Nut Carriage sclt
1/4"-20x7116" 1/4"-20xi/2"
Hex Screw Nut Lock Washer
5/16"-18xW8 ° 5/16"-18 5/16"
QQ
Right Wrong
When tightening
the screws, be
sure to keep
bracket parallel to
the rail. Otherwise,
the rail may bow
when the opener is
operated.
7