
Manual
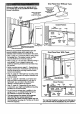

Assembly Step 4
Install the Chain/Cable &
Attach the Sprocket Cover
KeepChain and Cable
TautWhen Dispensing
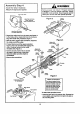
• Detach the cable loop from the carton and fasten it
to the trolley with a master link from the hardware
bag. See master link procedure, Figure 1.
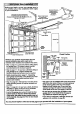
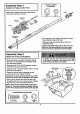
• With the trolley against the screwdriver, dispense
the cable around the pulley.
• Proceed back around the opener sprocket,
Figure 2. Be sure sprocket teeth engage the
chain. Continue forward to the trolley
threaded shaft, Figure 3.
• Use the second master link to connect
the chain to the flat end of the shaft.
Check to make sure the chain Is
not twisted.
• Remove the screwdriver.
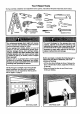
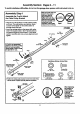
Master Link
C_p-On Spring , ,
Master
Link
u
WARNINQi
i i i i i • i
Serious injury can result if fingers become
entangled in moving opener sprocket. Attach
sprocket cover securely. Never operate opener
while your hand is near the opener sprocket.
Figure 2 c._.,.
Sprockel
Figure 3
Rat End
of Trolley
ThreadedShaft
Chain
T-rail
Install Chain and Cadle
In This Direction
Spmckat
Cov_
Front Tab Slot Mortaring
Plate
Cable
PuJley
Trolley
m
t
_ Master
LinkBat
Figure I
M_ Unk Procedure:
Pushpinsof masterlinkbar
throughcable loopand hole in
frontend oftrolley.Push cap
overpinsandpast notches.
Slidedip-on spdngover cap
and intonotchesunUIboth
pinsare securelyIo_ked.
To attach the sprocket cover:
• Insert the back tab in the opener slot. Squeeze the
cover slightlyand insert the front tab in the slot on
the mounting plate.
lO